RAC Attack - Oracle Cluster Database at Home/Print Book
| This is the print version of RAC Attack - Oracle Cluster Database at Home You won't see this message or any elements not part of the book's content when you print or preview this page. |
Overview
editRAC Attack is a free curriculum and platform for hands-on learning labs related to Oracle RAC (cluster database). We believe that the best way to learn about RAC is with a lot of hands-on experience. This curriculum has been used by individuals at home and by instructors in classes since 2008.
The original contributors were Jeremy Schneider, Dan Norris and Parto Jalili. The handbook was published at http://www.ardentperf.com for several years before its migration to this wikibook. All RAC Attack content was released under the CC-BY-SA license in May 2011 when this project was initiated.
To learn about upcoming RAC Attack events or to organize one yourself, visit the Events page. You can use the shortcut http://racattack.org/events to access this page at any time.
The goal of this workbook is to help students learn about Oracle RAC cluster databases through guided examples. (Specifically, 11gR2 RAC on VMware Server with ASM or Shared Filesystem and Oracle Enterprise Linux 5.) It can be used by organizers of events, by instructors in classes or by individuals at home.
RAC Attack differs in depth from other tutorials currently available.
- Every keystroke and mouse click is carefully documented here.
- The process is covered from the very beginning to the very end - from the very first installation of VMware on your laptop to various experiments on your running cluster database... with everything in between.
- The labs in the main workbook have been tested thoroughly and repeatedly.
Prerequisites
editStudents should be able to navigate in Unix - for example, listing files with "ls".
Hardware Minimum Requirements
editMost modern laptop and desktop computers should be powerful enough to run a two-node virtual RAC cluster. In a nutshell, these are the recommended minimums:
- Dual-core 2GHz 32-bit processor (it's been done with single-core)
- 4GB memory (it's been done with 3GB)
- Two physical hard disks - not partitions (it's been done with one)
- External HD for laptops (it's been done with certain USB flash memory sticks)
- 50 GB + 10.5 GB free space (it's been done with slightly less)
- Windows XP or Vista (Linux & Mac & Windows 7/8 are not directly covered in these instructions, but a supplementary PDF covering VirtualBox can be downloaded)
Making This Lab Successful
edit- Read about: Planning Your Time
- Focus on what you can learn.
- Choose as many specific learning goals as possible and take your time to investigate them.
- Be creative and experiment.
- Take risks and don't be afraid to break things.
- Take advantage of the classroom or event setting, if you're in one
- You can "jumpstart" back to the beginning of a lab with one click.
- Record discoveries and questions to share with others.
- Help each other out. There are more participants than instructors!
- When possible, cut-and-paste steps directly into a PuTTY SSH terminal session.
Lab Tips
edit- All passwords are racattack
- Always choose "I moved this VM" when asked, unless instructions specifically say to choose "copied".
- If using your own laptop, start the VMs one after another. That is, wait until the first VM completes bootup - including clusterware and database - before starting the second.
- Classroom specific tips:
- Common login account for Workstation and VMware console: "admin"
- Common changes from the lab handbook:
- Use 5GB shared disks – not 3.25GB
- Use 900MB memory – not 760MB
- Jumpstarts could take longer than you think... read: Planning Your Time
- "RAC11g" directory is often at C:\RAC11g
- Handout is available with stretch goals for advanced participants
Storage Overview
edit| ASM | Shared FS | |
|---|---|---|
| /dev/sdb | DATA | /u51 (/u61) |
| /dev/sdc | BACKUP | /u52 |
Networking Overview
edit| collabn1 | collabn2 | |
|---|---|---|
| Interconnect | 172.16.100.51 | 172.16.100.52 |
| Administration | 192.168.78.51 | 192.168.78.52 |
| VIP | 192.168.78.61 | 192.168.78.62 |
| SCAN | 192.168.78.250 | |
Planning Your Time
editFor the most benefit, you must plan your time carefully. There will not be enough time to complete all of the labs - so choose the ones which most interest you.
If you are using your own computer at home or at an event, then you always need to complete the first lab (Hardware and Windows Preparation) before you can jumpstart to any following labs. If you are in a class then the instructor has probably completed the first lab for you, and you can begin with a jumpstart. |
Overview
edit
Time
editThese times were gathered with a laptop just meeting the recommended minimum requirements. In addition to the wait times listed below, we suggest that you reserve about 40 minutes of work time to complete any given lab.
Downloads only apply to home users. If you are at an event or a class then the organizers have already downloaded the software for you. |
| Jumpstart | Size | Next Lab | Jumpstart Time | Wait Times in the Lab | Build Time |
|---|---|---|---|---|---|
| Hardware and Windows Preparation | Download: VMware Server (500MB) Download: OEL (3GB) |
||||
| 0 | Create VM | 15 min: Linux Install Download: Oracle Cluster & Database (4.5GB) |
|||
| 1 | 3 GB | Create Cluster | 4 min: jumpstart | 5 min: Copy VM 3 min: startup collabn1 3 min: startup collabn2 |
6 min |
| 2 | 13 GB | Grid Install (ASM or Shared FS) | 11 min: jumpstart 3 min: startup nodes |
25 min: GI Install 10 min: root.sh collabn1 8 min: root.sh collabn2 |
17 min |
| 3 | 20 GB | RAC Install | 18 min: jumpstart 4 min: startup collabn1 4 min: startup collabn2 |
42 min: DB Install | 30 min |
| 4 | 27 GB | Create Database | 25 min: jumpstart 4 min: startup collabn1 4 min: startup collabn2 |
22 min: DB Create | 45 min |
| 5 | 28 GB | Rolling Patches Part II: Exploring RAC (w/o PSU) |
25 min: jumpstart 6 min: startup collabn1 6 min: startup collabn2 |
22 min: GI Patch collabn1 20 min: DB Patch collabn1 22 min: GI Patch collabn2 20 min: DB Patch collabn2 5 min: catbundle |
45 min |
| 6 | 37 GB | Part II: Exploring RAC (w/PSU) | 35 min: jumpstart 6 min: startup collabn1 6 min: startup collabn2 |
60 min |
Hardware and Windows Preparation
editHardware and Windows Minimum Requirements
editThis handbook will walk you through the process of creating a two-node Oracle RAC cluster on your own laptop or desktop computer.
A detailed explanation of virtualization is beyond the scope of this lab but here is a simple overview of what we are building:

Hardware Minimum Requirements
editMost modern laptop and desktop computers should be powerful enough to run a two-node virtual RAC cluster. In a nutshell, these are the recommended minimums:
- Dual-core 2GHz 32-bit processor (it's been done with single-core)
- 4GB memory (it's been done with 3GB)
- Two physical hard disks - not partitions (it's been done with one)
- External HD for laptops (it's been done with certain USB flash memory sticks)
- 50 GB + 10.5 GB free space (it's been done with slightly less)
- Support files larger than 2GB, e.g. NTFS (it's been done without 2GB file support, on FAT32)
- Windows XP or Vista (Linux & Mac & Windows 7/8 are not directly covered in these instructions, but a supplementary PDF covering VirtualBox can be downloaded)
If your laptop or desktop does not meet these minimum requirements then it is not recommended to try completing the RAC Attack labs. Although it is possible to complete these labs with smaller configurations, there are many potential problems.
Although we recommend against trying, RAC Attack has been done with: single-core, 3GB memory, one physical hard drive, certain USB flash memory sticks, and less than 60GB of free space. |
Windows Preparation
edit- Reboot windows. After this clean boot-up, don't start any unneeded programs - for example email or instant messenger.
- If possible, disable virus scanning (so that your antivirus software[1] doesn't try to scan I/O on the virtual machine disks).
- Terminate any memory resident programs which are running, especially programs that help big applications "quick-start" (these often use up a lot of memory).
Hardware Verificaton
editProcessor
edit-
From the Start menu, choose or type RUN. In the dialog box that appears, type msinfo32.

-
Select System Summary in the left pane. Scroll down to Processor in the right pane. Verify that you have at least 2 cores and that the speed is at least 2000 Mhz.


Memory
edit-
Scroll down to Memory in the right pane. Verify that Installed Physical Memory is at least 4GB. Also, verify that Available Memory is at least 1.4GB. You can terminate programs which run in the foreground and background to increase the Available Memory.


Hard Disks
edit-
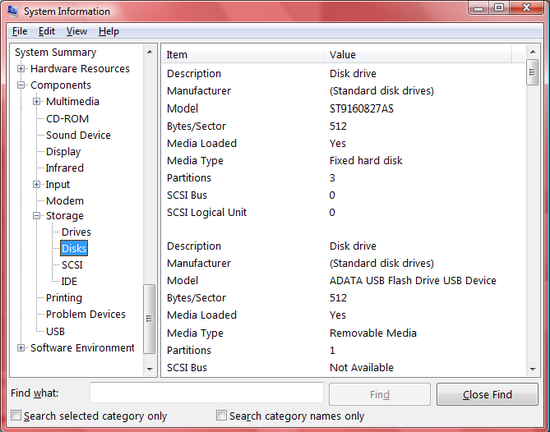
In the left pane, choose Components -> Storage -> Disks. Count the number of Disk Drive entries and verify that there are at least two.

Second Hard Disk
edit| Connection | Storage Type | |
|---|---|---|
Most Preferred  Least Preferred |
|
|
|
| |
|
| |
|
A single hard disk can max out as low as 45 MB/s. (This has been observed during RAC Attack testing.) Typical USB Flash Thumb Drives get very, very poor performance and should not be used. Some USB Flash Thumb Drives are marketed for performance; these typically get a maximum around 30 MB/s. In tests for RAC Attack, USB drives worked well for storing ISO images but somewhat poorly for storing virtual machine files.
For a detailed comparison of different connection types, refer to: http://www.pixelbeat.org/speeds.html |
Free Space Requirements
editRAC Attack is carefully designed to use three directories and spread out I/O for the best possible responsiveness during labs. You can choose how to spread the directories across your hard disks, and the best configuration may vary depending on your connection and storage type.
| Directory Name | Description | Free Space | Suggested Location |
|---|---|---|---|
| RAC11g | Operating System Oracle RAC Software |
50 GB | Second Hard Disk (not flash) |
| RAC11g-shared | Oracle RAC Data | 7.5 GB | Windows Hard Disk* |
| RAC11g-iso | OEL Installation DVD (read-only) | 3 GB | Windows Hard Disk* |
*page file is usually on Windows Hard Disk
Note: do not create the RAC11g directory (with OS and Oracle Software) on a Flash Thumb Drive.
We worked hard to reduce the footprint of RAC Attack, however with 11gR2 it's very difficult to reduce it beyond this. |
Login Accounts
editRAC Attack requires a local windows user account with a password and with administrative privileges. You may login using a network or password-free account only if the login account has admin privileges and you know the password for a local account which also has admin privileges (and not an empty password).
If your account is not local, or if your account does not have local admin privileges then you can create an admin account by following the directions here.
Creating a Local Admin Account
edit-
From the Start menu, choose RUN. In the dialog box that appears, type cmd to launch a command prompt.
On Windows 7 find the "search programs" field at the bottom of the Start menu. Type cmd in but don't run it. Right click on "cmd" then choose to "Run as administrator".
After you have opened the command prompt as an admin user, run the following two commands:
net user admin racattack /add
net localgroup administrators admin /add
Login: admin
Password: racattack
Verifying the Login Account
edit-
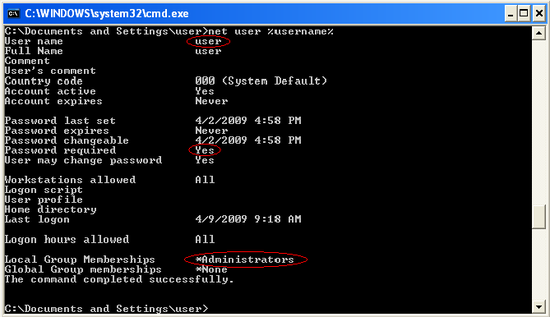
Type net user %username% (if you're using a network or password-free login account then replace %username% with the local password-ed admin account).
VERIFY the username, VERIFY that password required is yes, and VERIFY that local group memberships include Administrators.

Install VMware Server
edit-
These labs have been tested with version 2.0.1 of VMware Server. Go to the VMware Server website at http://www.vmware.com/go/getserver

-
Register for an account if you don't have one already.
- Write down your license number.
- If you are at home, then download VMware Server. If you are at a RAC Attack event then the instructor-provided Jumpstart Drive contains a copy of VMware Server, so that you don't need to download it. (However you still need a license number from the VMware website.)
These labs have been tested with version 2.0.1 of VMware Server.

-
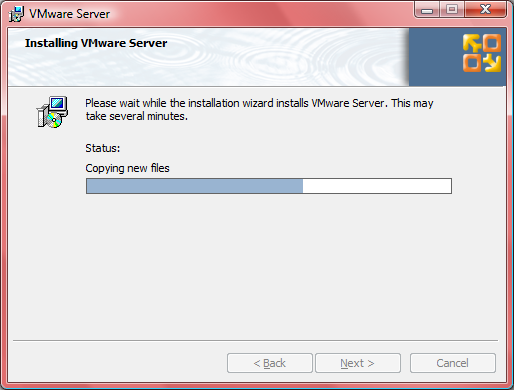
Run the VMware Installer

-
Accept the license agreement and all default options during the installation process.


-
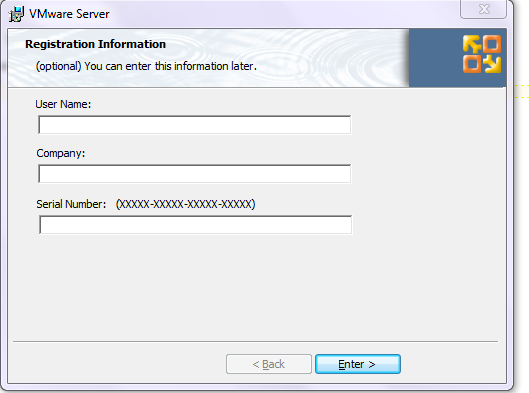
Enter your license information, which is visible at the VMware website on the same page where you downloaded the software.
- Reboot your computer if you are asked by the VMware installer.


Setup Virtual Networks
edit-
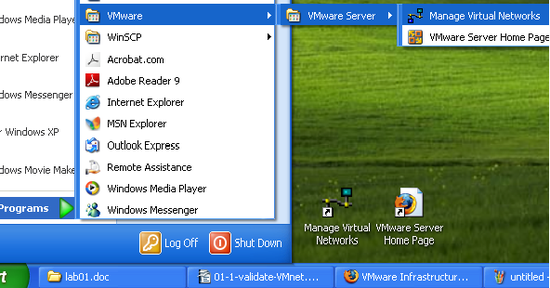
Choose Manage Virtual Networks from the start menu. After the program starts, make sure that you see an "Apply" button at the bottom. If you do not see an "Apply" button then close the program and re-start it by right-clicking and choosing to "run as administrator" (this must be done on Windows 7 normally).
-
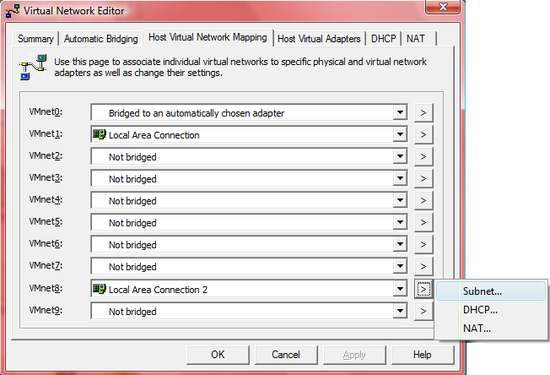
Click the Host Virtual Network Mapping Tab and then click the Right Arrow Button next to VMnet1. Choose Subnet from the submenu.

-
Set the IP address to 172.16.100.0 and click OK.

-
Click the Right Arrow Button next to Vmnet8 and choose Subnet from the submenu.
-
Set the IP address to 192.168.78.0 and click OK.

- Click the APPLY button.
-
Return to the Summary tab and VALIDATE:
VMnet1 has subnet 172.16.100.0
VMnet8 has subnet 192.168.78.0
-
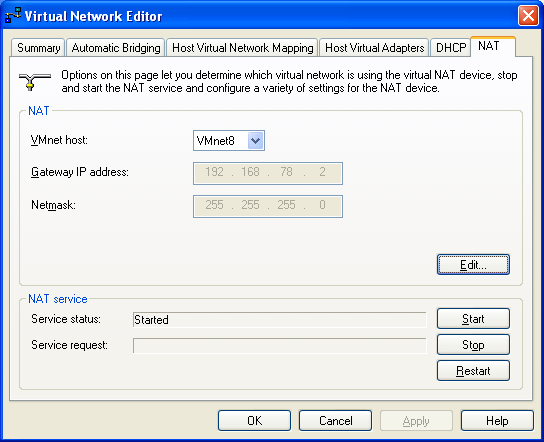
Go to the NAT tab and VALIDATE that the VMnet host is VMnet8 and Gateway IP is 192.168.78.2


Setup Virtual Storage
editIf you are at an event, then the event organizers might provide a special DEMO option - where you can run a pre-configured RAC cluster on your own laptop. In order to use this DEMO option, follow this lab but use the directories on the event-provided external hard drive.
- RAC Attack is carefully designed to use three directories and spread out I/O for the best possible responsiveness during labs. Create these three directories in the destinations that you chose in Hardware and Windows Minimum Requirements, taking the guidelines into consideration. mkdir C:\RAC11g mkdir D:\RAC11g-shared mkdir D:\RAC11g-iso In the RAC11g directory, make sure that collabn1 and collabn2 subdirectories don't exist. rmdir C:\RAC11g\collabn1 rmdir C:\RAC11g\collabn2
-
The VMware Server management interface is web-based, and some new web browsers are not compatible with it. There are two ways to open this management interface:
- Open a non-default web browser and go to the address https://localhost:8333/
- If you are at an event, then the event organizers might have provided Firefox 2.0.0.20 which has been tested with RAC Attack. You can run this browser directly from the Jumpstart Drive without installing it on your PC. This version of firefox can also be downloaded from the internet.
- Launch VMware Server Home Page from the start menu. This will use your default web browser.

- Open a non-default web browser and go to the address https://localhost:8333/
-
Depending on what web browser you use, you might receive security-related warnings. Proceed through all of these warnings and choose to view the web page.

The warning in Mozilla Firefox 
The same alert in Internet Explorer 6 -
Login to the VMware console with the local windows admin account username and password.

-
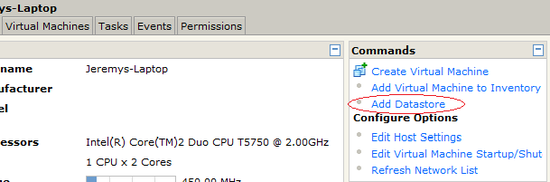
On the main screen (Summary tab), find the Commands box and choose Add Datastore.
-
Repeat this step three times. Set the datastore names to RAC11g, RAC11g-shared and RAC11g-iso. Choose Local Datastore and use the directory path which you previously chose and created.

-
VERIFY that the three new datastores exist in the Summary screen – named RAC11g and RAC11g-iso and RAC11g-shared. Also VERIFY that the two networks vmnet1 and vmnet8 are available as HostOnly and NAT respectively.


Download Oracle Enterprise Linux
editIf you are at an event, then the event organizers have already downloaded the software and copied it to the Jumpstart Drive.
- Skip this lab.
If you are at home, then follow these instructions to download Oracle Enterprise Linux.
- Continue below.
-
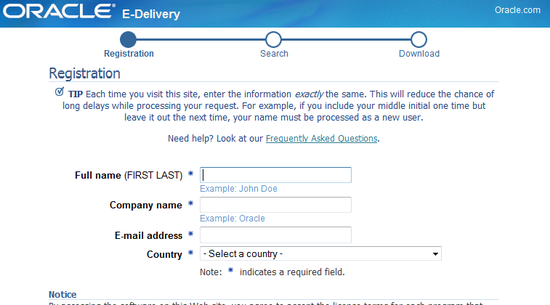
Visit http://edelivery.oracle.com/linux and choose Continue.

-
Enter your Name, Company, Email and Country and review/accept the license and export restrictions before clicking Continue. If you have visited Oracle EDelivery before then make sure to enter your information exactly the same.
If this is the first time you've downloaded software from Oracle, then you might have to wait a few days until you receive an email from Oracle granting you permission to continue.
-
Search for Oracle Linux on the x86-32-bit platform. Choose Oracle Linux Release 5 Update 6.
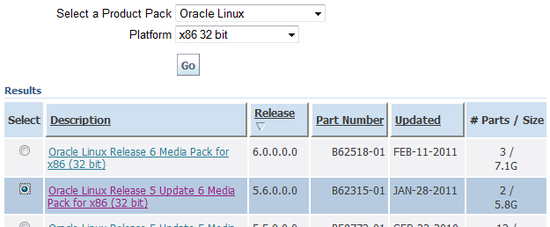
-
Download the file for x86 (32 bit) – not the source.

- This zip file will contain a single file named Enterprise-R5-U6-Server-i386-dvd.iso – extract this file into the RAC11g-iso folder and then delete the original zip file.


Linux Install
editCreate VM
edit-
From the SUMMARY screen, choose Create Virtual Machine. Name the new machine collabn1 and select the RAC11g datastore.

-
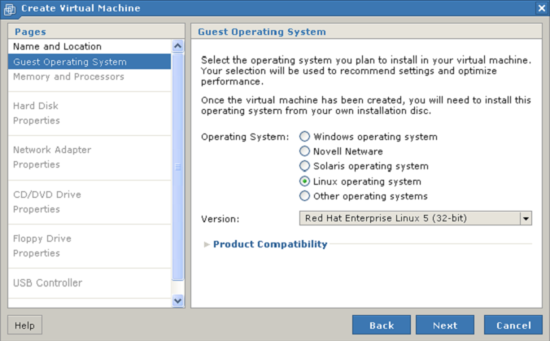
Select Linux Operating System and choose Red Hat Enterprise Linux 5 (32-bit).
-
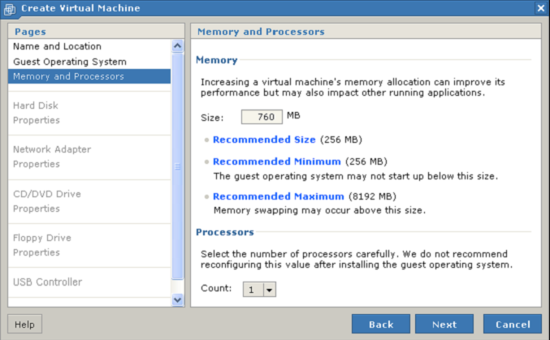
Allocate 760M of memory for the virtual machine and choose 1 processor.
-
Choose to Create a New Virtual Disk.

-
Set the disk size to 30G and name the file [RAC11g] collabn1/system.vmdk – leave all other options at their defaults and click Next.

-
Choose to Add a Network Adapter.

-
Choose to create a NAT network connection.

-
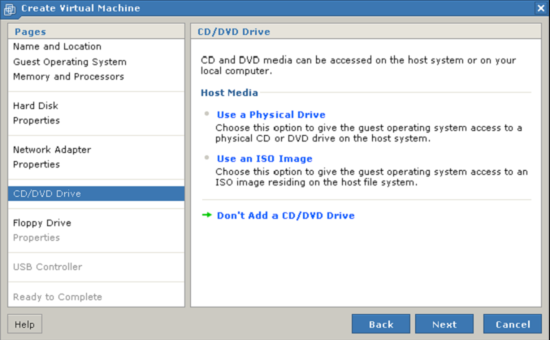
Choose Don't Add a CD/DVD Drive.
-
Choose Don't Add a Floppy Drive.

-
Choose Don't Add a USB Controller.

-
Review the configuration and click Finish. Do not power on the virtual machine yet.


Prep for OS Installation
editVIRTUAL DVD CONFIGURATION:
| Virtual Device Node (Adapter/Device) | Path (Datastore/Directory/Filename) |
|---|---|
| IDE 0:0 | [RAC11g-iso] Enterprise-R5-U6-Server-i386-dvd.iso |
| IDE 0:1*** | [RAC11g-iso] RAC11gR2.iso*** |
***INSTRUCTOR-LED CLASS ONLY
-
In the Inventory tab at the left, select collabn1 (the virtual machine we just created).

-
From the Commands box, click Add Hardware. In the window that appears, click CD/DVD Drive.

-
Choose to Use an ISO Image.

-
Click Browse and locate the file [RAC11g-iso] Enterprise-R5-U6-Server-i386-dvd.iso.
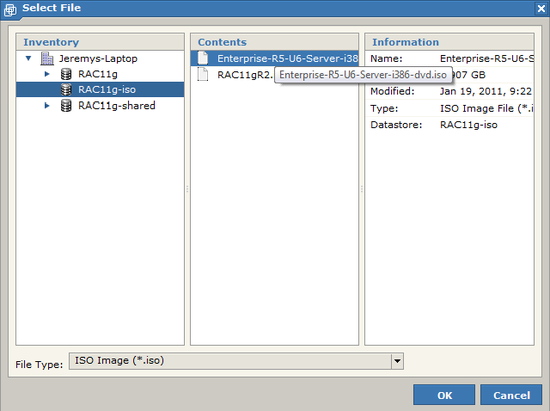
-
Open the section called Virtual Device Node and choose IDE 0:0. Then click Next.
Carefully follow this step because it's easy to miss.

-
Click Finish to add the device. Don't power on the virtual machine yet.

-
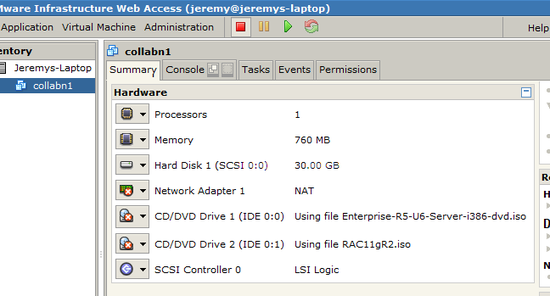
If you are in a class, then the instructor may have provided a second virtual DVD named RAC11gR2.iso to save some class time. It contains all additional software downloads.
- Repeat all previous steps from this lab to add the second DVD using RAC11gR2.iso image and choosing IDE 0:1.
- Continue below.
-
Scroll down to the Hardware box and confirm the Virtual Machine settings. They should match this picture (except that you should only see the second DVD if you are in a class and it was provided by the instructor):


OS Installation
edit-
Click the Console tab. You might see a message saying that the Remote Console Plug-in is not
installed. If you see this message then click Install plug-in and follow the directions before
continuing. (Note: you may be asked to restart your computer during this process.)

-
When the plugin is installed, you should see a large “play” button in the center of the console. Click
on the play button to start the VM.

-
When you see the square boxes, click anywhere to open a console window.

-
A new window will now open - outside of your web browser. If you opened this window soon after starting the Virtual Machine, then you will see the boot screen of the Oracle Enterprise Linux installer.

At first, this new console window will ignore your keyboard and mouse. Click inside the new console window and it will begin accepting your keyboard and mouse.
Anytime your keyboard and mouse are stuck in the VMware Virtual Machine, you can press CTRL and ALT together to move them outside the VM.If you still see the boot screen then you may press enter to continue, or just wait for it to automatically continue.
-
Choose to SKIP the media test.

-
Choose NEXT when the first installer screen comes up.

-
Accept the default English language and choose Next.

-
Choose US English keyboard layout and click Next.

-
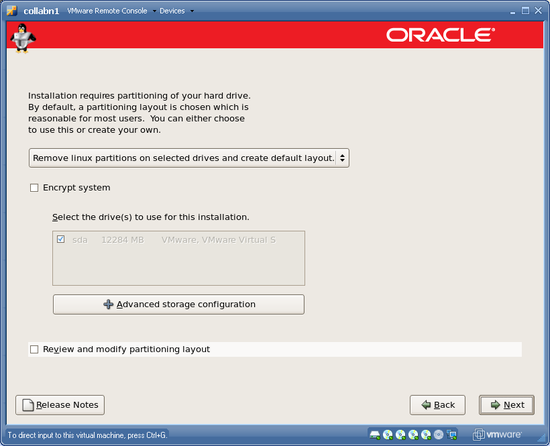
Select YES to initialize the drive.

-
Accept the default layout (with no encryption) and choose NEXT.
-
Choose YES to remove all partitions.

-
Set the hostname to collabn1.vm.ardentperf.com and leave DHCP enabled before choosing NEXT.

-
Choose the timezone where you are located! Let the system clock run on UTC though.

-
Set the root password to racattack

-
Choose Customize Now – but don't choose any "additional tasks". Then click NEXT.

-
Select only these package groups, then click NEXT to continue:
Category Selections Desktop Environments Gnome Desktop Environment Applications Editors
Graphical Internet
Text-based InternetDevelopment Development Libraries
Development ToolsServers Server Configuration Tools Base System Administration Tools
Base
System Tools
X Window SystemDo not choose Cluster Storage or Clustering.

-
Choose NEXT to start the installation.


-
Choose REBOOT when the installation is complete.

-
After the machine reboots – when you wee the Welcome screen – choose FORWARD.

-
ACCEPT the license and choose FORWARD.

-
DISABLE the firewall and choose FORWARD. Confirm by clicking YES.

-
DISABLE SELinux before choosing FORWARD. Confirm with YES.

-
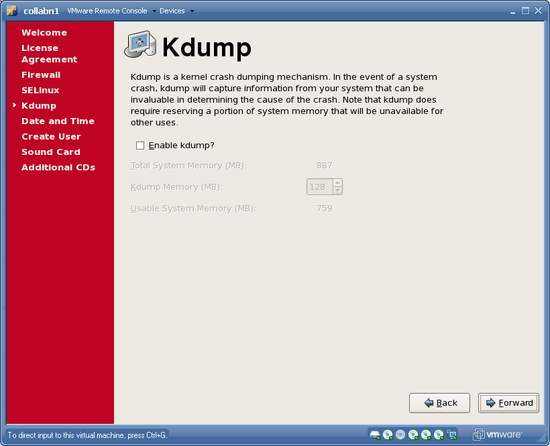
Leave Kdump disabled and choose FORWARD.
-
Leave the clock alone (with the wrong time) and click FORWARD.

-
Don't create a user; click FORWARD. Choose CONTINUE to confirm.

-
Choose FORWARD to skip sound card config.

-
Choose FINISH to close the installer. Click OK to reboot.

-
After reboot you will see a login screen.


Wrap-up OS Installation
editTip: If you are familiar with the unix command-line, then we recommend connecting through SSH in addition to using the VMware console. You can then copy-and-paste many commands from this handbook! Until we configure networking, VMware will assign the address 192.168.78.128.
-
Login as the user root with password racattack.

-
GNOME is the graphical window environment installed by default in OEL. First, disable GNOME CD automount. Go to the menu System >> Preferences >> Removable Drives and Media.

-
Uncheck all of the options under Removable Storage and click Close.

-
Open a terminal window from the menu Applications >> Accessories >> Terminal.

-
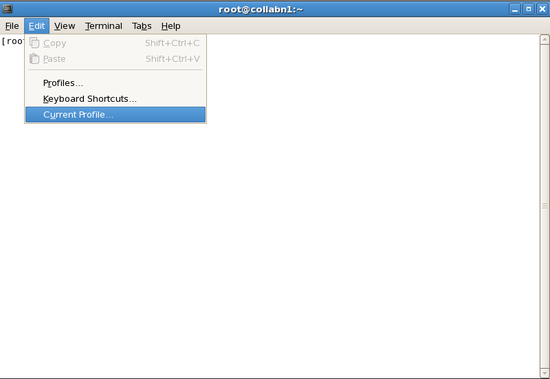
From the menus, open Edit >> Current Profile.
-
In the Title and Command tab, check the box for Run command as a login shell, then close the dialog.

-
The editor "gedit" is a simple graphical editor – similar to notepad – and it can be used to edit files on Linux. If you are going to use gedit, then it is helpful if you open Edit > Preferences to disable text wrapping and enable line numbers.

-
In a terminal window as the root user, shutdown and disable anacron then run it manually with no delay.
[root@collabn1 ~]# service anacron stop
Stopping anacron: [ OK ]
[root@collabn1 ~]# chkconfig anacron off
[root@collabn1 ~]# chkconfig --list anacron
anacron 0:off 1:off 2:off 3:off 4:off 5:off 6:off
[root@collabn1 ~]# anacron -n
It should not cause any problems for you, but be aware that several CPU and I/O intensive jobs will run in the background for about 10 minutes while you continue with this lab (e.g. updatedb and makewhatis). You might notice some slight system performance degradation. You can always use the program top to see what is currently running.
- In a terminal window as the root user, shutdown and disable the automounter. [root@collabn1 ~]# service autofs stop Stopping automount: [ OK ] [root@collabn1 ~]# umount /media/* [root@collabn1 ~]# chkconfig autofs off [root@collabn1 ~]# chkconfig --list autofs autofs 0:off 1:off 2:off 3:off 4:off 5:off 6:off
- In a terminal window as the root user, shutdown and disable the apple zeroconf service (avahi). [root@collabn1 ~]# service avahi-daemon stop Shutting down Avahi daemon: [ OK ] [root@collabn1 ~]# chkconfig avahi-daemon off [root@collabn1 ~]# chkconfig --list avahi-daemon avahi-daemon 0:off 1:off 2:off 3:off 4:off 5:off 6:off
-
If any of the small CD images in the status bar do not have a green dot, then click on the CD image and choose "Connect to [RAC11g] iso/... on Server". If a window opens showing the CD contents then make sure to close the window.

-
Create two CDROM directories named cdrom and cdrom5.
Make sure to use these names because many later steps in this handbook will reference them!
[root@collabn1 ~]# cd /mnt
[root@collabn1 mnt]# mkdir cdrom
[root@collabn1 mnt]# mkdir cdrom5
- Add entries to /etc/fstab for all CD's and then mount them. If you are in a class then you will probably have two CD's. If you are not in a class then you will probably have only one. [root@collabn1 ~]# ls /dev/cdrom-* /dev/cdrom-hda /dev/cdrom-hdb [root@collabn1 ~]# gedit /etc/fstab /dev/cdrom-hda /mnt/cdrom iso9660 defaults 0 0 /dev/cdrom-hdb /mnt/cdrom5 iso9660 defaults 0 0 [root@collabn1 mnt]# mount cdrom [root@collabn1 mnt]# mount cdrom5
- Install the additional required RPM's cd /mnt # From Enterprise Linux 5 CDROM 2 rpm -Uvh */*/compat-libstdc++-33* rpm -Uvh */*/libaio-devel-0.* rpm -Uvh */*/unixODBC-2.* rpm -Uvh */*/unixODBC-devel-2.* # From Enterprise Linux 5 CDROM 3 rpm -Uvh */*/sysstat-7.* # Additional required packages which are already installed: # From Enterprise Linux 5 CDROM 1 rpm -Uvh */*/binutils-2.* rpm -Uvh */*/elfutils-libelf-0.* rpm -Uvh */*/glibc-2.*i686* rpm -Uvh */*/glibc-common-2.* rpm -Uvh */*/libaio-0.* rpm -Uvh */*/libgcc-4.* rpm -Uvh */*/libstdc++-4.* rpm -Uvh */*/make-3.* # From Enterprise Linux 5 CDROM 2 rpm -Uvh */*/elfutils-libelf-devel-* rpm -Uvh */*/glibc-headers* rpm -Uvh */*/glibc-devel-2.* rpm -Uvh */*/libgomp* rpm -Uvh */*/gcc-4.* rpm -Uvh */*/gcc-c++-4.* rpm -Uvh */*/libstdc++-devel-4.*
- Eject the cdrom [root@collabn1 mnt]# eject /mnt/cdrom
-
Return to the Summary tab in the VMware console. From the Status box, choose to Install VMware Tools. Click the Install button to begin.

-
Install VMware client tools and run configuration tool.
You must perform this step in the VMware Console; do not use PuTTY or any other terminal program.
[root@collabn1 mnt]# mount /mnt/cdrom
mount: block device /dev/cdrom-hda is write-protected, mounting read-only

[root@collabn1 mnt]# rpm -ivh /mnt/cdrom/VMwareTools-7.7.5-156745.i386.rpm
Preparing...                ########################################### [100%]
   1:VMwareTools            ########################################### [100%]

The installation of VMware Tools 7.7.5 for Linux completed successfully.
You can decide to remove this software from your system at any time by
invoking the following command: "rpm -e VMwareTools".

Before running VMware Tools for the first time, you need to
configure it for your running kernel by invoking the
following command: "/usr/bin/vmware-config-tools.pl".

Enjoy,

    --the VMware team


[root@collabn1 cdrom]# vmware-config-tools.pl
...
Choose NO to skip the VMware FileSystem Sync Driver (vmsync)
Choose display size [12] – 1024x768
Mounting HGFS shares will probably FAIL, but this is ok.

-
Run the network commands. (You can cut and paste the commands into the terminal.) Next, run vmware-toolbox and enable clock synchronization.

-
Logout from your session.

- Unmount the VMware Tools image: umount /mnt/cdrom Using VMware Infrastructure web interface, mount Oracle Enterprise Linux from [RAC11g-iso] data store. Mount it: mount /mnt/cdrom


Create RAC Attack DVD
editIf you are in a class or at an event, then the instructor may have provided a second virtual DVD named RAC11gR2.iso to save some class time. It contains all additional software downloads.
- Skip this lab and continue to the next one.
If you are at home, then follow these instructions to download all needed software and build the second DVD yourself.
- Continue below.
- While logged in as root, download the latest release of the RAC Attack supporting code (GPL). # cd ~ # curl -kL github.com/ardentperf/racattack/tarball/master | tar xz
- You can view the master list of downloads here: https://github.com/ardentperf/racattack/blob/master/makeDVD/auto.sh If you have already downloaded any of these files, you may optionally copy them to the /tmp directory in your virtual machine. When you create the DVD, any remaining files will be automatically downloaded.
-
Create the DVD by running the automatic build script. You will be prompted for your Oracle SSO login and password.
If your account is not authorized for Oracle Support then patch downloads will fail.
 [root@collabn1 ~]# '''sh ardentperf-racattack-*/makeDVD/auto.sh /mnt/cdrom5'''
 `oracle-profile' -> `/mnt/cdrom5/oracle-profile'
 root/
 root/fix_cssd/
 root/fix_cssd/fix_cssd.sh
 Oracle SSO Username: '''<your-username>'''
 Oracle SSO Password: '''<your-password>'''
 LOGGING IN TO ORACLE SSO
   % Total    % Received % Xferd  Average Speed   Time    Time     Time  Current
                                  Dload  Upload   Total   Spent    Left  Speed
 414   733  414  2977    0     0   1621      0 --:--:--  0:00:01 --:--:-- 22383
 DOWNLOADING: /tmp/oracleasmlib-2.0.4-1.el5.i386.rpm
   % Total    % Received % Xferd  Average Speed   Time    Time     Time  Current
                                  Dload  Upload   Total   Spent    Left  Speed
 100 13929  100 13929    0     0  23118      0 --:--:-- --:--:-- --:--:-- 2720k
 `/tmp/oracleasmlib-2.0.4-1.el5.i386.rpm' -> `./oracleasmlib-2.0.4-1.el5.i386.rpm'
 DOWNLOADING: /tmp/linux_11gR2_database_1of2.zip

 ( ... )

 FINISHED BUILDING RAC ATTACK DVD
Prep for Oracle
edit- Edit /etc/sysctl.conf [root@collabn1 ~]# gedit /etc/sysctl.conf kernel.shmmni = 4096 # semaphores: semmsl, semmns, semopm, semmni kernel.sem = 250 32000 100 128 net.ipv4.ip_local_port_range = 1024 65000 net.core.rmem_default=4194304 net.core.rmem_max=4194304 net.core.wmem_default=262144 net.core.wmem_max=262144 [root@collabn1 ~]# sysctl -p
- Edit /etc/security/limits.conf oracle soft nproc 2047 oracle hard nproc 16384 oracle soft nofile 1024 oracle hard nofile 65536
- Edit /etc/pam.d/login and insert the following lines BEFORE the "selinux open" line. session required /lib/security/pam_limits.so session required pam_limits.so
- Create groups and users. Make the oracle password racattack [root@collabn1 ~]# groupadd oinstall [root@collabn1 ~]# groupadd dba [root@collabn1 ~]# groupadd oper [root@collabn1 ~]# groupadd asmdba [root@collabn1 ~]# groupadd asmoper [root@collabn1 ~]# groupadd asmadmin [root@collabn1 ~]# [root@collabn1 ~]# useradd -u 500 -g oinstall -G dba,oper,asmdba,asmoper,asmadmin oracle [root@collabn1 ~]# passwd oracle Changing password for user oracle. New UNIX password: racattack BAD PASSWORD: it is based on a dictionary word Retype new UNIX password: racattack passwd: all authentication tokens updated successfully.
- Create directories. [root@collabn1 ~]# mkdir -p /u01/grid/oracle/product/11.2.0/grid_1 [root@collabn1 ~]# mkdir -p /u01/app/oracle/product/11.2.0/db_1 [root@collabn1 ~]# chown -R oracle:oinstall /u01
-
Logout of your session and login as the oracle user.

-
Disable GNOME CD automount for the oracle user. Go to the menu System >> Preferences >> Removable Drives and Media.
-
Uncheck all of the options under Removable Storage and click Close.
-
Open a terminal window.
-
From the menus, open Edit >> Current Profile.
-
In the Title and Command tab, check the box for Run command as a login shell, then close the dialog.
-
If you are using gedit, then open Edit > Preferences to disable text wrapping and enable line numbers.
- Setup ssh equivalence for oracle user. [oracle@collabn1 ~]$ ssh localhost The authenticity of host 'localhost (127.0.0.1)' can't be established. RSA key fingerprint is 3f:65:e6:77:af:11:84:56:a4:b9:0f:8b:41:b4:2f:8a. Are you sure you want to continue connecting (yes/no)? yes Warning: Permanently added 'localhost' (RSA) to the list of known hosts. oracle@localhost's password: ^C [oracle@collabn1 ~]$ ssh-keygen -t rsa Generating public/private rsa key pair. Enter file in which to save the key (/home/oracle/.ssh/id_rsa): ^M [default] Enter passphrase (empty for no passphrase): ^M [no password] Enter same passphrase again: ^M [no password] Your identification has been saved in /home/oracle/.ssh/id_rsa. Your public key has been saved in /home/oracle/.ssh/id_rsa.pub. The key fingerprint is: 0a:33:74:d4:7a:c0:c6:d0:56:33:10:4e:71:63:4c:e8 oracle@collabn1.vm.ardentperf.com [oracle@collabn1 ~]$ cat /home/oracle/.ssh/id_rsa.pub >> /home/oracle/.ssh/authorized_keys
-
Setup oracle and root users' profiles.
[oracle@collabn1 ~]$ su - root
[root@collabn1 ~]# gedit /etc/oratab
grid:/u01/grid/oracle/product/11.2.0/grid_1:N
[root@collabn1 ~]# chown oracle:dba /etc/oratab
[root@collabn1 ~]# gedit /root/.bashrc
ORAENV_ASK=NO
ORACLE_SID=grid
. oraenv >/dev/null
unset ORAENV_ASK
[root@collabn1 ~]# su - oracle
[oracle@collabn1 ~]$ cd /mnt
[oracle@collabn1 ~]$ cat */oracle-profile >>/home/oracle/.bash_profile
The source code for this file can be found at https://github.com/ardentperf/racattack/blob/master/makeDVD/oracle-profile
- Close and re-open your terminal sessions so that the new profiles take effect.
-
Install fix_cssd script.
In VMware test environments you usually have a very small amount of memory. Oracle CSS processes can take up a *LOT* of the memory (over 50% in this lab) because it locks several hundred MB in physical memory. In VMware (for both ASM and RAC environments) this may be undesirable. This low-level hack will make the memory swappable at runtime.
NEVER, EVER, EVER EVEN IN YOUR WILDEST DREAMS THINK ABOUT TRYING THIS ON ANYTHING CLOSE TO A PRODUCTION SYSTEM.
The source code for this file can be found at https://github.com/ardentperf/racattack/blob/master/makeDVD/root/fix_cssd/fix_cssd.sh[oracle@collabn1 ~]$ su - root [root@collabn1 ~]# cd / [root@collabn1 ~]# tar xvf mnt/*/fix_cssd.tar root/fix_cssd/fix_cssd.sh [root@collabn1 ~]# chmod 774 /root/fix_cssd/fix_cssd.sh [root@collabn1 ~]# gedit /etc/rc.d/rc.local cd /root/fix_cssd nohup nice -n -20 ./fix_cssd.sh 2>&1 & [root@collabn1 ~]# /etc/rc.d/rc.local nohup: appending output to `nohup.out'

Create Cluster
editCreate Interconnect
edit- If the machine is running then logout and shutdown. The machine needs to be powered off.
-
In the Inventory tab at the left, select collabn1 (the virtual machine we just created).
-
Scroll down to the Hardware box and CONFIRM that there is one Network Adapter of type NAT.
-
From the Commands box, click Add Hardware. In the window that appears, click Network Adapter.
-
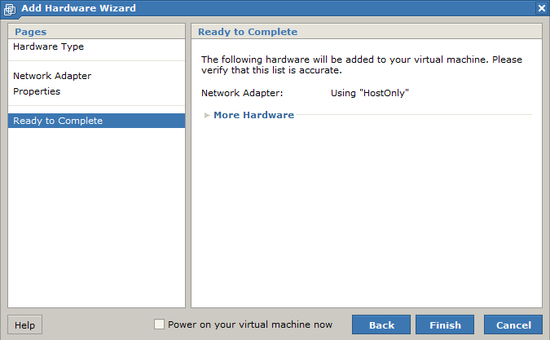
Choose to create a HostOnly network connection. This will be used for the interconnect. Then click Next.

-
Click FINISH to create the network adapter.


Create Shared Disks
editREPEAT STEPS 1-6 FOR BOTH OF THESE DEVICES:
| Virtual Device Node (Adapter/Device) | Size | Path (Datastore/Directory/Filename) |
|---|---|---|
| SCSI 1:0 | 3.25 GB | [RAC11g-shared] data.vmdk |
| SCSI 1:1 | 3.25 GB | [RAC11g-shared] backup.vmdk |
-
In the Inventory tab at the left, select collabn1 (the virtual machine we just created).
-
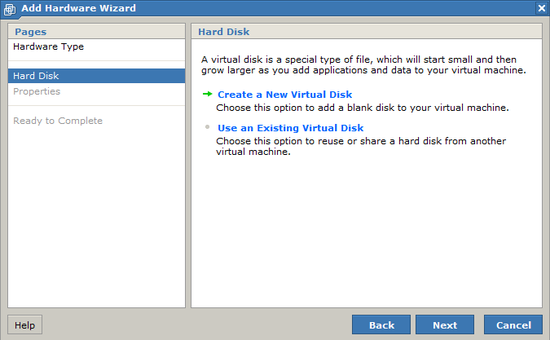
From the Commands box, click Add Hardware. In the window that appears, click Hard Disk.
-
Choose to Create a New Virtual Disk and click Next.
-
Enter a capacity of 3.25 GB and type the name “[RAC11g-shared] data.vmdk”.
- Choose File Options → Allocate all disk space now.
- Choose Disk Mode → Independent and Persistent.
- Choose Virtual Device Node → SCSI 1:0. Click Next to continue.

-
Click Finish to create the disk.

It may take a moment for the disk to appear to the VMware console. Wait until the new disk appears before you continue with the lab. Furthermore, the web browser may display an error which requires you to reload the page and login to VMware again. - Repeat steps 1-5 for the second disk (it is listed at the beginning of this lab).
-
CONFIRM that your list of hard disks and network devices matches this screenshot.

-
From the Commands box, click Configure VM.

-
Click the Advanced tab and scroll down to the Configuration Parameters. Use the Add New Entry button to add the entries listed here. Click OK to save the configuration changes.
Name Value disk.locking false diskLib.dataCacheMaxSize 0 diskLib.maxUnsyncedWrites 0 mainMem.useNamedFile false 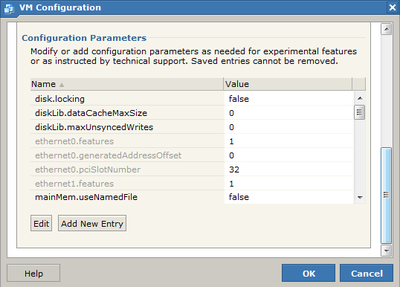
I have found the following three websites among the most useful while creating custom VMware configurations. They show how powerful and versatile VMware is – even the free VMware Server product.http://sanbarrow.com/vmx/vmx-advanced.html
http://vmfaq.com/?View=entry&EntryID=25
http://sanbarrow.com/vmx/vmx-config-ini.html


Copy VM
edit-
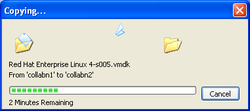
In Windows Explorer, browse to the folder [RAC11g] \collabn1. Copy all of the files to the folder [RAC11g] \collabn2.
- The location of [RAC11g] was determined in the first lab. In a class, the instructor may provide the location.
- If the collabn2 folder does not exist, then create it.

-
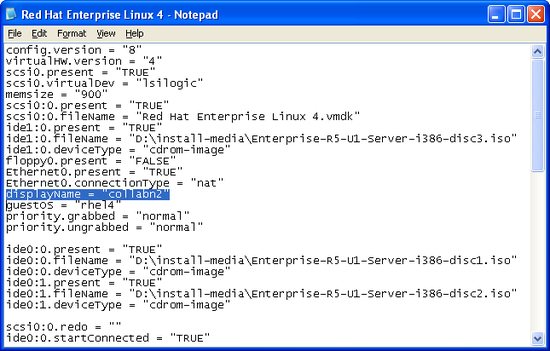
Browse to [RAC11g] \collabn2. Edit the file collabn1.vmx (the VMware Configuration File). You can use notepad or wordpad to edit the file.

-
Find the line displayName and change it to collabn2 (the new node name), then save and close the file.
displayName = "collabn2"


Configure Disks
edit-
In the Inventory tab at the left, select collabn1.
-
Choose the Console tab. Click on the play button to start the VM. When you see the square boxes, click anywhere to open a console window.
-
Login as the oracle user with the password racattack.
-
Open a terminal window.
- Switch to the root user with the "su -" command. (The password is racattack.) CONFIRM that two new disks exist and that they have the appropriate sizes. These two lines should exactly match!! [root@collabn1 ~]# cat /proc/partitions major minor #blocks name ... 8 16 3407872 sdb 8 32 3407872 sdc
-
Create partitions on all of the newly created disks with fdisk.
- run fdisk /dev/sdb You should see the message "Device contains neither a valid DOS partition table, nor Sun, SGI or OSF disklabel"
- type "n" to create a new partition.
- type "p" for a primary partition.
- type partition number 1.
- press enter twice to accept the default first/last cylinders.
- type "t" to set the partition type.
- enter partition type da (Non-FS data).
- type "w" to write the partition table to disk.
- Repeat the previous step for disk /dev/sdc
Configure Node 1
editAfter completing the previous lab, you should already be logged in as the oracle user on collabn1. You should already have a terminal open, where you are currently switched to the root user.
- As the root user, CONFIRM that the IP address if eth0 starts with 192.168.78 and that the IP address of eth1 starts with 172.16.100. [root@collabn1 ~]# ifconfig|grep net eth0 Link encap:Ethernet HWaddr 00:0C:29:07:F5:C0 inet addr:192.168.78.128 Bcast:192.168.78.255 Mask:255.255.255.0 inet6 addr: fe80::20c:29ff:fe07:f5c0/64 Scope:Link eth1 Link encap:Ethernet HWaddr 00:0C:29:07:F5:CA inet addr:172.16.100.128 Bcast:172.16.100.255 Mask:255.255.255.0 inet6 addr: fe80::20c:29ff:fe07:f5ca/64 Scope:Link inet addr:127.0.0.1 Mask:255.0.0.0 inet6 addr: ::1/128 Scope:Host
- Update the IP addresses by directly editing the linux network configuration files. Update the BOOTPROTO line and add the remaining lines. [root@collabn1 ~]# cd /etc/sysconfig/network-scripts [root@collabn1 network-scripts]# gedit ifcfg-eth0 BOOTPROTO=none IPADDR=192.168.78.51 NETMASK=255.255.255.0 GATEWAY=192.168.78.2 [root@collabn1 network-scripts]# gedit ifcfg-eth1 BOOTPROTO=none IPADDR=172.16.100.51 NETMASK=255.255.255.0
- Update the DNS search domain [root@collabn1 network-scripts]# gedit /etc/resolv.conf search vm.ardentperf.com nameserver 192.168.78.2
-
As root, restart the network services by typing service network restart. Then confirm the new ip addresses with ifconfig. Also confirm the search domain by inspecting /etc/resolv.conf – if the file has reverted then edit it again. (When I wrote this lab, the change stuck after the second time I edited the file.)
You must perform this step in VMware; do not use PuTTY.

- Edit /etc/ hosts. EDIT the line with 127.0.0.1 and then ADD all of the other lines below: [root@collabn1 etc]# vi /etc/hosts 192.168.78.51 collabn1 collabn1.vm.ardentperf.com 192.168.78.61 collabn1-vip collabn1-vip.vm.ardentperf.com 172.16.100.51 collabn1-priv collabn1-priv.vm.ardentperf.com 192.168.78.52 collabn2 collabn2.vm.ardentperf.com 192.168.78.62 collabn2-vip collabn2-vip.vm.ardentperf.com 172.16.100.52 collabn2-priv collabn2-priv.vm.ardentperf.com 192.168.78.250 collab-scan collab-scan.vm.ardentperf.com 192.168.78.251 collab-gns collab-gns.vm.ardentperf.com ::1 localhost6.localdomain6 localhost6 127.0.0.1 localhost.localdomain localhost

Configure Node 2
edit-
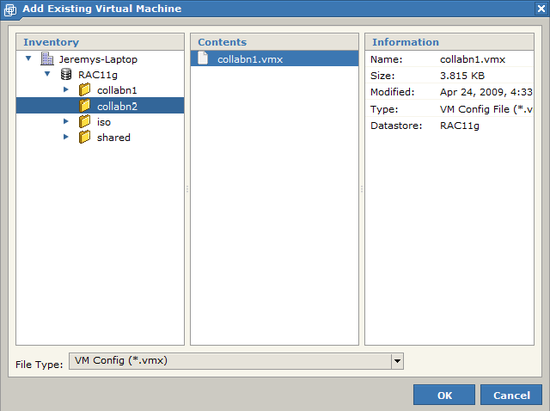
In the VMware console, go to the Virtual Machine menu and choose Add Virtual Machine to Inventory.

-
Browse to RAC11g/collabn2 and open collabn1.vmx. Make sure you browse to the right folder!
-
In the Inventory tab at the left, select the new VM – collabn2. Choose the Console tab and click the play button to start the VM.

-
The VMware console should ask you whether you copied or moved the VM. Answer that you copied the files and click OK.

-
When you see the square boxes, click anywhere to open a console window.
-
Login as the oracle user with the password racattack.
-
Open a terminal ( Applications >> Accessories >> Terminal ) and switch to the root user.
When you first open a console on collabn2, you will notice that the hostname still says collabn1. This is because we copied the machine; we will change the hostname shortly.

- CONFIRM that the IP address of eth1 starts with 172.16.100. [root@collabn1 ~]# ifconfig|grep net eth1 Link encap:Ethernet HWaddr 00:0C:29:C9:3E:C8 inet addr:172.16.100.129 Bcast:172.16.100.255 Mask:255.255.255.0 inet addr:127.0.0.1 Mask:255.0.0.0
- Update the IP addresses by directly editing the linux network configuration files. Update the BOOTPROTO line and add the remaining lines. COMMENT or DELETE the line which begins with HWADDR. [root@collabn1 ~]# cd /etc/sysconfig/network-scripts [root@collabn1 network-scripts]# gedit ifcfg-eth0 BOOTPROTO=none #HWADDR=... IPADDR=192.168.78.52 NETMASK=255.255.255.0 GATEWAY=192.168.78.2 [root@collabn1 network-scripts]# gedit ifcfg-eth1 BOOTPROTO=none #HWADDR=... IPADDR=172.16.100.52 NETMASK=255.255.255.0
- Update the DNS search domain [root@collabn1 network-scripts]# gedit /etc/resolv.conf search vm.ardentperf.com nameserver 192.168.78.2
- Update the HOSTNAME by editing the linux system configuration files. Set it to collabn2.vm.ardentperf.com. Then change the active system hostname with the hostname command. [root@collabn1 network-scripts]# gedit /etc/sysconfig/network HOSTNAME=collabn2.vm.ardentperf.com [root@collabn1 network-scripts]# hostname collabn2.vm.ardentperf.com
-
As root, restart the network services by typing service network restart. Then confirm the new ip addresses with ifconfig. Confirm that search domain by inspecting /etc/resolv.conf – if the file has reverted then edit it again. (The change stuck after the second time I edited the file while walking through this lab.) Also confirm the new hostname with hostname.
You must perform this step in VMware; do not use PuTTY.

- Exit your terminal session and start a new one so that you can see the updated hostname in the prompt.
- Edit /etc/hosts. EDIT the line with 127.0.0.1 and then ADD all of the other lines below: [root@collabn2 etc]# vi /etc/hosts 192.168.78.51 collabn1 collabn1.vm.ardentperf.com 192.168.78.61 collabn1-vip collabn1-vip.vm.ardentperf.com 172.16.100.51 collabn1-priv collabn1-priv.vm.ardentperf.com 192.168.78.52 collabn2 collabn2.vm.ardentperf.com 192.168.78.62 collabn2-vip collabn2-vip.vm.ardentperf.com 172.16.100.52 collabn2-priv collabn2-priv.vm.ardentperf.com 192.168.78.250 collab-scan collab-scan.vm.ardentperf.com 192.168.78.251 collab-gns collab-gns.vm.ardentperf.com 127.0.0.1 localhost.localdomain localhost ::1 localhost6.localdomain6 localhost6


SSH and CVU
edit- Login to node collabn2. As the oracle user, make sure that you can ping both nodes on the interconnect and public network. [oracle@collabn2 ~]$ ping -c 1 collabn1 PING collabn1 (192.168.78.51) 56(84) bytes of data. 64 bytes from collabn1 (192.168.78.51): icmp_seq=1 ttl=64 time=0.793 ms [oracle@collabn2 ~]$ ping -c 1 collabn2 PING collabn2 (192.168.78.52) 56(84) bytes of data. 64 bytes from collabn2 (192.168.78.52): icmp_seq=1 ttl=64 time=0.024 ms [oracle@collabn2 ~]$ ping -c 1 collabn1-priv PING collabn1-priv (172.16.100.51) 56(84) bytes of data. 64 bytes from collabn1-priv (172.16.100.51): icmp_seq=1 ttl=128 time=0.901 ms [oracle@collabn2 ~]$ ping -c 1 collabn2-priv PING collabn2-priv (172.16.100.52) 56(84) bytes of data. 64 bytes from collabn2-priv (172.16.100.52): icmp_seq=1 ttl=64 time=0.058 ms
- Store the public keys for the hosts. You can do this with a tool called ssh-keyscan. [oracle@collabn2 .ssh]$ ssh-keyscan -t rsa collabn1 collabn1-priv collabn2 collabn2-priv >> ~/.ssh/known_hosts # collabn1 SSH-2.0-OpenSSH_4.3 # collabn1-priv SSH-2.0-OpenSSH_4.3 # collabn2 SSH-2.0-OpenSSH_4.3 # collabn2-priv SSH-2.0-OpenSSH_4.3
- Test ssh equivilance. It is important that there is no prompt and you are automatically logged in. [oracle@collabn2 .ssh]$ ssh collabn1 Warning: Permanently added the RSA host key for IP address '192.168.78.51' to the list of known hosts. Last login: Tue Apr 15 16:59:36 2008 from collabn2 [oracle@collabn1 ~]$ exit logout Connection to collabn1 closed.
- Switch to node collabn1. As the oracle user, confirm that you can ping both servers. Then copy the known_hosts file from collabn2. [oracle@collabn1 ~]$ ping -c 1 collabn1 PING collabn1 (192.168.78.51) 56(84) bytes of data. 64 bytes from collabn1 (192.168.78.51): icmp_seq=1 ttl=64 time=0.793 ms [oracle@collabn1 ~]$ ping -c 1 collabn2 PING collabn2 (192.168.78.52) 56(84) bytes of data. 64 bytes from collabn2 (192.168.78.52): icmp_seq=1 ttl=64 time=0.024 ms [oracle@collabn1 ~]$ ping -c 1 collabn1-priv PING collabn1-priv (172.16.100.51) 56(84) bytes of data. 64 bytes from collabn1-priv (172.16.100.51): icmp_seq=1 ttl=128 time=0.901 ms [oracle@collabn1 ~]$ ping -c 1 collabn2-priv PING collabn2-priv (172.16.100.52) 56(84) bytes of data. 64 bytes from collabn2-priv (172.16.100.52): icmp_seq=1 ttl=64 time=0.058 ms [oracle@collabn1 ~]$ scp collabn2:.ssh/known_hosts ~/.ssh/known_hosts The authenticity of host 'collabn2 (192.168.78.52)' can't be established. RSA key fingerprint is 3f:65:e6:77:af:11:84:56:a4:b9:0f:8b:41:b4:2f:8a. Are you sure you want to continue connecting (yes/no)? yes Warning: Permanently added 'collabn2,192.168.78.52' (RSA) to the list of known hosts. known_hosts 100% 3146 3.1KB/s 00:00
- Test ssh equivilance. [oracle@collabn1 ~]$ ssh collabn2 Last login: Tue Apr 15 17:02:29 2008 from collabn2 [oracle@collabn2 ~]$ exit logout Connection to collabn2 closed.
- You need to be able to login to yourself too; test this. [oracle@collabn1 ~]$ ssh collabn1 Last login: Tue Apr 15 17:03:39 2008 from collabn2 [oracle@collabn1 ~]$ exit logout Connection to collabn1 closed.
- Run CLUVFY to validate your hardware and OS installation! The shared disk test will fail; this is OK. Ignore that error. collabn1:/home/oracle[RAC1]$ /mnt/cdrom*/grid/runcluvfy.sh stage -post hwos -n collabn1,collabn2 Performing post-checks for hardware and operating system setup Checking node reachability... Node reachability check passed from node "collabn1" Checking user equivalence... User equivalence check passed for user "oracle" Checking node connectivity... Checking hosts config file... Verification of the hosts config file successful Node connectivity passed for subnet "192.168.78.0" with node(s) collabn2,collabn1 TCP connectivity check passed for subnet "192.168.78.0" Node connectivity passed for subnet "172.16.100.0" with node(s) collabn2,collabn1 TCP connectivity check passed for subnet "172.16.100.0" Interfaces found on subnet "192.168.78.0" that are likely candidates for VIP are: collabn2 eth0:192.168.78.52 collabn1 eth0:192.168.78.51 Interfaces found on subnet "172.16.100.0" that are likely candidates for a private interconnect are: collabn2 eth1:172.16.100.52 collabn1 eth1:172.16.100.51 Node connectivity check passed Check for multiple users with UID value 0 passed Post-check for hardware and operating system setup was successful.
Grid Install (ASM)
editSetup ASMLIB
edit-
Login to collabn1 as oracle and open a teminal. Switch to the root user.

-
Install ASMLib on both nodes and initialize the disks. mount command may fail (mount: /dev/cdrom-hda already mounted or /mnt/cdrom busy) if you already have cdrom mounted from previous steps.
[root@collabn1 ~]# cd /mnt
[root@collabn1 mnt]# mount /mnt/cdrom
mount: block device /dev/cdrom-hda is write-protected, mounting read-only
[root@collabn1 mnt]# mount /mnt/cdrom5
mount: block device /dev/cdrom-hdb is write-protected, mounting read-only
# OracleASM
rpm -Uvh */*/oracleasm-support*
rpm -Uvh */*/oracleasm*el5-2* # (Note - that's lowercase EL5-2.)
# Missing from the install media; copied to RAC Attack DVD.
rpm -Uvh */oracleasmlib*
[root@collabn1 mnt]# /etc/init.d/oracleasm configure
Configuring the Oracle ASM library driver.
This will configure the on-boot properties of the Oracle ASM library
driver. The following questions will determine whether the driver is
loaded on boot and what permissions it will have. The current values
will be shown in brackets ('[]'). Hitting <ENTER> without typing an
answer will keep that current value. Ctrl-C will abort.
Default user to own the driver interface []: oracle
Default group to own the driver interface []: dba
Start Oracle ASM library driver on boot (y/n) [n]: y
Fix permissions of Oracle ASM disks on boot (y/n) [y]: y
Writing Oracle ASM library driver configuration: done
Initializing the Oracle ASMLib driver: [ OK ]
Scanning the system for Oracle ASMLib disks: [ OK ]
The disks are shared so you only need to initialize them once.
[root@collabn1 ~]# /etc/init.d/oracleasm createdisk data /dev/sdb1
Marking disk "data" as an ASM disk:                        [  OK  ]
[root@collabn1 ~]# /etc/init.d/oracleasm createdisk backup /dev/sdc1
Marking disk "backup" as an ASM disk:                      [  OK  ]
[root@collabn1 ~]# /etc/init.d/oracleasm listdisks
BACKUP
DATA
Now repeat some of the steps on the second virtual machine:
[root@collabn1 ~]# ssh collabn2

[root@collabn2 ~]# cd /mnt

# OracleASM
rpm -Uvh */*/oracleasm-support*
rpm -Uvh */*/oracleasm*el5-2*
# Missing from the install media; copied to RAC Attack DVD.
rpm -Uvh */oracleasmlib*

[root@collabn2 ~]# /etc/init.d/oracleasm configure
Configuring the Oracle ASM library driver.

This will configure the on-boot properties of the Oracle ASM library
driver.  The following questions will determine whether the driver is
loaded on boot and what permissions it will have.  The current values
will be shown in brackets ('[]').  Hitting <ENTER> without typing an
answer will keep that current value.  Ctrl-C will abort.

Default user to own the driver interface []: oracle
Default group to own the driver interface []: dba
Start Oracle ASM library driver on boot (y/n) [n]: y
Fix permissions of Oracle ASM disks on boot (y/n) [y]: y
Writing Oracle ASM library driver configuration: done
Initializing the Oracle ASMLib driver:                     [  OK  ]
Scanning the system for Oracle ASMLib disks:               [  OK  ]

[root@collabn2 ~]# /etc/init.d/oracleasm listdisks
BACKUP
DATA

Cluster Verification Utility (ASM)
edit-
Login to collabn1 as the oracle user and open a terminal.

- Run CVU to validate that you're ready to install CRS. Use the new “fixup” feature of 11gR2 CVU to create a script that can fix missing parameters. [oracle@collabn1 ~]$ /mnt/cdrom*/grid/runcluvfy.sh stage -pre crsinst -n collabn1,collabn2 -fixup -r 11gR2 Performing pre-checks for cluster services setup Checking node reachability... Node reachability check passed from node "collabn1" Checking user equivalence... User equivalence check passed for user "oracle" Checking node connectivity... Checking hosts config file... Verification of the hosts config file successful Node connectivity passed for subnet "192.168.78.0" with node(s) collabn2,collabn1 TCP connectivity check passed for subnet "192.168.78.0" Node connectivity passed for subnet "172.16.100.0" with node(s) collabn2,collabn1 TCP connectivity check passed for subnet "172.16.100.0" Interfaces found on subnet "192.168.78.0" that are likely candidates for VIP are: collabn2 eth0:192.168.78.52 collabn1 eth0:192.168.78.51 Interfaces found on subnet "172.16.100.0" that are likely candidates for a private interconnect are: collabn2 eth1:172.16.100.52 collabn1 eth1:172.16.100.51 Node connectivity check passed Total memory check failed Check failed on nodes: collabn2,collabn1 Available memory check passed Swap space check failed Free disk space check passed for "collabn2:/tmp" Free disk space check passed for "collabn1:/tmp" User existence check passed for "oracle" Group existence check passed for "oinstall" Group existence check passed for "dba" Membership check for user "oracle" in group "oinstall" [as Primary] passed Membership check for user "oracle" in group "dba" passed Run level check passed Hard limits check passed for "maximum open file descriptors" Soft limits check passed for "maximum open file descriptors" Hard limits check passed for "maximum user processes" Soft limits check passed for "maximum user processes" System architecture check passed Kernel version check passed Kernel parameter check passed for "semmsl" Kernel parameter check passed for "semmns" Kernel parameter check passed for "semopm" Kernel parameter check passed for "semmni" Kernel parameter check passed for "shmmax" Kernel parameter check passed for "shmmni" Kernel parameter check passed for "shmall" Kernel parameter check failed for "file-max" Check failed on nodes: collabn2,collabn1 Kernel parameter check passed for "ip_local_port_range" Kernel parameter check passed for "rmem_default" Kernel parameter check passed for "rmem_max" Kernel parameter check passed for "wmem_default" Kernel parameter check failed for "wmem_max" Check failed on nodes: collabn2,collabn1 Kernel parameter check failed for "aio-max-nr" Check failed on nodes: collabn2,collabn1 Package existence check passed for "make-3.81" Package existence check passed for "binutils-2.17.50.0.6" Package existence check passed for "gcc-4.1.2" Package existence check passed for "gcc-c++-4.1.2" Package existence check passed for "libgomp-4.1.2" Package existence check passed for "libaio-0.3.106" Package existence check passed for "glibc-2.5-24" Package existence check passed for "compat-libstdc++-33-3.2.3" Package existence check passed for "elfutils-libelf-0.125" Package existence check passed for "elfutils-libelf-devel-0.125" Package existence check passed for "glibc-common-2.5" Package existence check passed for "glibc-devel-2.5" Package existence check passed for "glibc-headers-2.5" Package existence check passed for "libaio-devel-0.3.106" Package existence check passed for "libgcc-4.1.2" Package existence check passed for "libstdc++-4.1.2" Package existence check passed for "libstdc++-devel-4.1.2" Package existence check passed for "sysstat-7.0.2" Package existence check passed for "unixODBC-2.2.11" Package existence check passed for "unixODBC-devel-2.2.11" Package existence check passed for "ksh-20060214" Check for multiple users with UID value 0 passed Current group ID check passed Core file name pattern consistency check passed. User "oracle" is not part of "root" group. Check passed Default user file creation mask check passed Starting Clock synchronization checks using Network Time Protocol(NTP)... NTP Configuration file check started... NTP Configuration file check passed Checking daemon liveness... Liveness check failed for "ntpd" Check failed on nodes: collabn2,collabn1 PRVF-5415 : Check to see if NTP daemon is running failed Clock synchronization check using Network Time Protocol(NTP) failed Fixup information has been generated for following node(s): collabn2,collabn1 Please run the following script on each node as "root" user to execute the fixups: '/tmp/CVU_11.2.0.1.0_oracle/runfixup.sh' Pre-check for cluster services setup was unsuccessful on all the nodes.
- Switch to the root user and run the fixup script on both nodes. collabn1:/home/oracle[RAC1]$ su - Password: -bash: oraenv: No such file or directory [root@collabn1 ~]# /tmp/CVU_11.2.0.1.0_oracle/runfixup.sh Response file being used is :/tmp/CVU_11.2.0.1.0_oracle/fixup.response Enable file being used is :/tmp/CVU_11.2.0.1.0_oracle/fixup.enable Log file location: /tmp/CVU_11.2.0.1.0_oracle/orarun.log Setting Kernel Parameters... fs.file-max = 6815744 net.ipv4.ip_local_port_range = 9000 65500 net.core.wmem_max=262144 net.core.wmem_max = 1048576 fs.aio-max-nr = 1048576 [root@collabn1 ~]# ssh collabn2 /tmp/CVU_11.2.0.1.0_oracle/runfixup.sh root@collabn2's password: /root/.bashrc: line 16: oraenv: No such file or directory Response file being used is :/tmp/CVU_11.2.0.1.0_oracle/fixup.response Enable file being used is :/tmp/CVU_11.2.0.1.0_oracle/fixup.enable Log file location: /tmp/CVU_11.2.0.1.0_oracle/orarun.log Setting Kernel Parameters... fs.file-max = 6815744 net.ipv4.ip_local_port_range = 9000 65500 net.core.wmem_max=262144 net.core.wmem_max = 1048576 fs.aio-max-nr = 1048576
- As the oracle user, run CVU again to make sure the fixit script worked. The NTP, memory and swap checks might fail – but this is acceptable for our VMware test cluster. [root@collabn1 ~]# exit logout collabn1:/home/oracle[RAC1]$ /mnt/cdrom*/grid/runcluvfy.sh stage -pre crsinst -n collabn1,collabn2 -r 11gR2 ... Total memory check failed ... Swap space check failed ... Kernel parameter check passed for "file-max" ... Kernel parameter check passed for "wmem_max" Kernel parameter check passed for "aio-max-nr" ... Liveness check failed for "ntpd" ...

Install Grid Infrastructure (ASM)
edit-
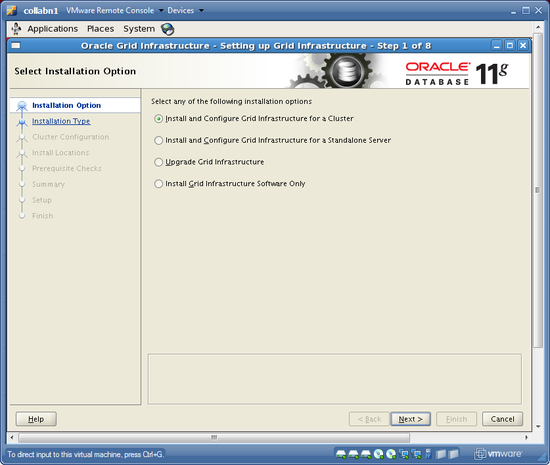
As the oracle user, launch the grid installer. At the first screen, choose Install and Configure Grid Infrastructure for a Cluster and click NEXT.
[oracle@collabn1 ~]$ /mnt/cdrom*/grid/runInstaller

-
Choose Advanced Installation and click NEXT.

-
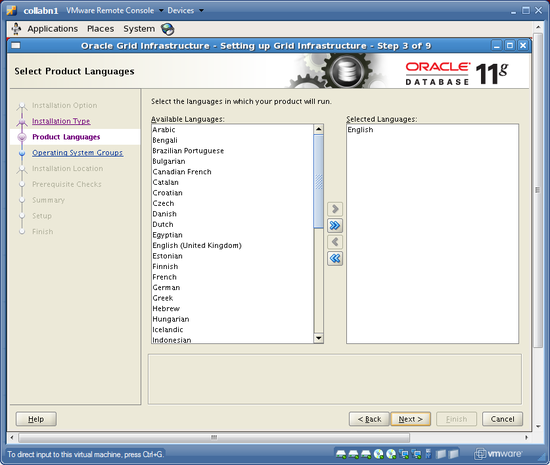
Accept the default language (English) and choose NEXT.
-
Name the cluster collab and make sure that the SCAN name is collab-scan with port 1521, then click NEXT.

-
Add node collabn2 with VIP collabn2-vip and choose NEXT to validate the cluster configuration.

-
Verify that eth0 on subnet 192.168.78.0 is PUBLIC and that eth1 on subnet 172.16.100.0 is PRIVATE, then click NEXT.

-
Choose to store the Clusterware Files in ASM and choose NEXT.

-
Create a diskgroup called DATA with External Redundancy using only the disk ORCL:DATA and click NEXT.

-
Choose to use the same passwords for all accounts and enter the password racattack, then click NEXT. (Ignore the message that Oracle doesn't like this password.)

-
Do not use IPMI. Click NEXT.

-
Set the OSDBA group to asmdba, the OSOPER group to asmoper and the OSASM group to asmadmin. Then click NEXT.

-
Accept the ORACLE_BASE location of /u01/app/oracle and use the ORACLE_HOME location of /u01/grid/oracle/product/11.2.0/grid_1. Then click NEXT.

-
Accept the default inventory location of /u01/app/oraInventory and choose NEXT

-
The prerequisite checks will execute. A warning will be issued saying that three checks failed: physical memory, swap size and network time protocol. Click the CHECK BOX to Ignore All, then click NEXT.

-
SAVE a response file called grid.rsp in the oracle user home directory. Then click FINISH to install grid infrastructure.


-
When prompted, open a terminal as the root user and run the two root.sh scripts. Make sure to run BOTH SCRIPTS on BOTH NODES!
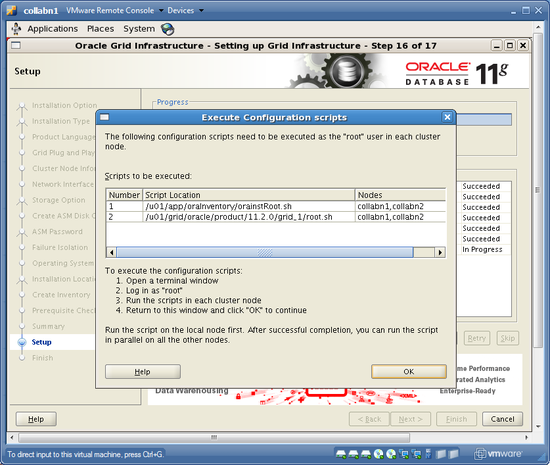
[oracle@collabn1 ~]$ su -
Password: racattack

[root@collabn1 ~]# /u01/app/oraInventory/orainstRoot.sh
Changing permissions of /u01/app/oraInventory.
Adding read, write permissions for group.
Removing read,write,execute permissions for world.

Changing groupname of /u01/app/oraInventory to oinstall.
The execution of the script is complete.

[root@collabn1 ~]# /u01/grid/oracle/product/11.2.0/grid_1/root.sh
Running Oracle 11g root.sh script...

The following environment variables are set as:
    ORACLE_OWNER= oracle
    ORACLE_HOME=  /u01/grid/oracle/product/11.2.0/grid_1

Enter the full pathname of the local bin directory: [/usr/local/bin]: /usr/bin
   Copying dbhome to /usr/bin ...
   Copying oraenv to /usr/bin ...
   Copying coraenv to /usr/bin ...

Entries will be added to the /etc/oratab file as needed by
Database Configuration Assistant when a database is created
Finished running generic part of root.sh script.
Now product-specific root actions will be performed.
2011-03-30 16:49:13: Parsing the host name
2011-03-30 16:49:13: Checking for super user privileges
2011-03-30 16:49:13: User has super user privileges
Using configuration parameter file: /u01/grid/oracle/product/11.2.0/grid_1/crs/install/crsconfig_params
Creating trace directory
LOCAL ADD MODE
Creating OCR keys for user 'root', privgrp 'root'..
Operation successful.
  root wallet
  root wallet cert
  root cert export
  peer wallet
  profile reader wallet
  pa wallet
  peer wallet keys
  pa wallet keys
  peer cert request
  pa cert request
  peer cert
  pa cert
  peer root cert TP
  profile reader root cert TP
  pa root cert TP
  peer pa cert TP
  pa peer cert TP
  profile reader pa cert TP
  profile reader peer cert TP
  peer user cert
  pa user cert
Adding daemon to inittab
CRS-4123: Oracle High Availability Services has been started.
ohasd is starting
CRS-2672: Attempting to start 'ora.gipcd' on 'collabn1'
CRS-2672: Attempting to start 'ora.mdnsd' on 'collabn1'
CRS-2676: Start of 'ora.mdnsd' on 'collabn1' succeeded
CRS-2676: Start of 'ora.gipcd' on 'collabn1' succeeded
CRS-2672: Attempting to start 'ora.gpnpd' on 'collabn1'
CRS-2676: Start of 'ora.gpnpd' on 'collabn1' succeeded
CRS-2672: Attempting to start 'ora.cssdmonitor' on 'collabn1'
CRS-2676: Start of 'ora.cssdmonitor' on 'collabn1' succeeded
CRS-2672: Attempting to start 'ora.cssd' on 'collabn1'
CRS-2672: Attempting to start 'ora.diskmon' on 'collabn1'
CRS-2676: Start of 'ora.diskmon' on 'collabn1' succeeded
CRS-2676: Start of 'ora.cssd' on 'collabn1' succeeded
CRS-2672: Attempting to start 'ora.ctssd' on 'collabn1'
CRS-2676: Start of 'ora.ctssd' on 'collabn1' succeeded

ASM created and started successfully.

DiskGroup DATA created successfully.

clscfg: -install mode specified
Successfully accumulated necessary OCR keys.
Creating OCR keys for user 'root', privgrp 'root'..
Operation successful.
CRS-2672: Attempting to start 'ora.crsd' on 'collabn1'
CRS-2676: Start of 'ora.crsd' on 'collabn1' succeeded
CRS-4256: Updating the profile
Successful addition of voting disk 6b7c5142d3214fe9bf4d4273f0ff11fd.
Successfully replaced voting disk group with +DATA.
CRS-4256: Updating the profile
CRS-4266: Voting file(s) successfully replaced
##  STATE    File Universal Id                File Name Disk group
--  -----    -----------------                --------- ---------
 1. ONLINE   6b7c5142d3214fe9bf4d4273f0ff11fd (ORCL:DATA) [DATA]
Located 1 voting disk(s).
CRS-2673: Attempting to stop 'ora.crsd' on 'collabn1'
CRS-2677: Stop of 'ora.crsd' on 'collabn1' succeeded
CRS-2673: Attempting to stop 'ora.asm' on 'collabn1'
CRS-2677: Stop of 'ora.asm' on 'collabn1' succeeded
CRS-2673: Attempting to stop 'ora.ctssd' on 'collabn1'
CRS-2677: Stop of 'ora.ctssd' on 'collabn1' succeeded
CRS-2673: Attempting to stop 'ora.cssdmonitor' on 'collabn1'
CRS-2677: Stop of 'ora.cssdmonitor' on 'collabn1' succeeded
CRS-2673: Attempting to stop 'ora.cssd' on 'collabn1'
CRS-2677: Stop of 'ora.cssd' on 'collabn1' succeeded
CRS-2673: Attempting to stop 'ora.gpnpd' on 'collabn1'
CRS-2677: Stop of 'ora.gpnpd' on 'collabn1' succeeded
CRS-2673: Attempting to stop 'ora.gipcd' on 'collabn1'
CRS-2677: Stop of 'ora.gipcd' on 'collabn1' succeeded
CRS-2673: Attempting to stop 'ora.mdnsd' on 'collabn1'
CRS-2677: Stop of 'ora.mdnsd' on 'collabn1' succeeded
CRS-2672: Attempting to start 'ora.mdnsd' on 'collabn1'
CRS-2676: Start of 'ora.mdnsd' on 'collabn1' succeeded
CRS-2672: Attempting to start 'ora.gipcd' on 'collabn1'
CRS-2676: Start of 'ora.gipcd' on 'collabn1' succeeded
CRS-2672: Attempting to start 'ora.gpnpd' on 'collabn1'
CRS-2676: Start of 'ora.gpnpd' on 'collabn1' succeeded
CRS-2672: Attempting to start 'ora.cssdmonitor' on 'collabn1'
CRS-2676: Start of 'ora.cssdmonitor' on 'collabn1' succeeded
CRS-2672: Attempting to start 'ora.cssd' on 'collabn1'
CRS-2672: Attempting to start 'ora.diskmon' on 'collabn1'
CRS-2676: Start of 'ora.diskmon' on 'collabn1' succeeded
CRS-2676: Start of 'ora.cssd' on 'collabn1' succeeded
CRS-2672: Attempting to start 'ora.ctssd' on 'collabn1'
CRS-2676: Start of 'ora.ctssd' on 'collabn1' succeeded
CRS-2672: Attempting to start 'ora.asm' on 'collabn1'
CRS-2676: Start of 'ora.asm' on 'collabn1' succeeded
CRS-2672: Attempting to start 'ora.crsd' on 'collabn1'
CRS-2676: Start of 'ora.crsd' on 'collabn1' succeeded
CRS-2672: Attempting to start 'ora.evmd' on 'collabn1'
CRS-2676: Start of 'ora.evmd' on 'collabn1' succeeded
CRS-2672: Attempting to start 'ora.asm' on 'collabn1'
CRS-2676: Start of 'ora.asm' on 'collabn1' succeeded
CRS-2672: Attempting to start 'ora.DATA.dg' on 'collabn1'
CRS-2676: Start of 'ora.DATA.dg' on 'collabn1' succeeded
CRS-2672: Attempting to start 'ora.registry.acfs' on 'collabn1'
CRS-2676: Start of 'ora.registry.acfs' on 'collabn1' succeeded

collabn1     2011/03/30 16:59:35     /u01/grid/oracle/product/11.2.0/grid_1/cdata/collabn1/backup_20110330_165935.olr
Preparing packages for installation...
cvuqdisk-1.0.7-1
Configure Oracle Grid Infrastructure for a Cluster ... succeeded
Updating inventory properties for clusterware
Starting Oracle Universal Installer...

Checking swap space: must be greater than 500 MB.   Actual 968 MB    Passed
The inventory pointer is located at /etc/oraInst.loc
The inventory is located at /u01/app/oraInventory
'UpdateNodeList' was successful.
Before you run any scripts on the second node, check the CPU utilization on the first node - where you just finished running scripts. If %idle is 0 then something is still running in the background and you should wait until %idle increases. You can monitor the CPU with any of these three commands:- top
- vmstat 3
- iostat -x sda sdb sdc 3
-
After running both scripts, return to the installer window and click OK to continue running configuration assistants.

-
The Cluster Verification Utility will fail because NTP is not running. If you want to, check the error message at the very end of the logfile. Then click OK to close the messagebox and click NEXT to continue.

-
You should now see the final screen! Click CLOSE to exit the installer.


[root@collabn1 ~]# vmstat 3 4
procs -----------memory---------- ---swap-- -----io---- --system-- -----cpu------
 r  b   swpd   free   buff  cache   si   so    bi    bo   in   cs us sy id wa st
 0  0 660156  11868   6472 263348   33  229  1505  2740 1194 2407  8 22 44 27  0
 2  0 660156  11884   6472 263364    0    0     1     3  712 3635  2  4 90  4  0
 1  0 660156  11884   6480 263368    0    0     0    34  701 3565  1  3 90  6  0
 4  0 660156  11884   6480 263372    0    0     1     5  721 3642  2  8 88  2  0

[root@collabn1 ~]# ssh collabn2
root@collabn2's password: racattack
-bash: oraenv: No such file or directory
[root@collabn2 ~]# /u01/app/oraInventory/orainstRoot.sh
Changing permissions of /u01/app/oraInventory.
Adding read, write permissions for group.
Removing read,write,execute permissions for world.

Changing groupname of /u01/app/oraInventory to oinstall.
The execution of the script is complete.

[root@collabn2 ~]# /u01/grid/oracle/product/11.2.0/grid_1/root.sh
Running Oracle 11g root.sh script...

The following environment variables are set as:
    ORACLE_OWNER= oracle
    ORACLE_HOME=  /u01/grid/oracle/product/11.2.0/grid_1

Enter the full pathname of the local bin directory: [/usr/local/bin]: /usr/bin
   Copying dbhome to /usr/bin ...
   Copying oraenv to /usr/bin ...
   Copying coraenv to /usr/bin ...

Entries will be added to the /etc/oratab file as needed by
Database Configuration Assistant when a database is created
Finished running generic part of root.sh script.
Now product-specific root actions will be performed.
2011-03-30 17:04:26: Parsing the host name
2011-03-30 17:04:26: Checking for super user privileges
2011-03-30 17:04:26: User has super user privileges
Using configuration parameter file: /u01/grid/oracle/product/11.2.0/grid_1/crs/install/crsconfig_params
Creating trace directory
LOCAL ADD MODE
Creating OCR keys for user 'root', privgrp 'root'..
Operation successful.
Adding daemon to inittab
CRS-4123: Oracle High Availability Services has been started.
ohasd is starting
CRS-4402: The CSS daemon was started in exclusive mode but found an active CSS daemon on node collabn1, number 1, and is terminating
An active cluster was found during exclusive startup, restarting to join the cluster
CRS-2672: Attempting to start 'ora.mdnsd' on 'collabn2'
CRS-2676: Start of 'ora.mdnsd' on 'collabn2' succeeded
CRS-2672: Attempting to start 'ora.gipcd' on 'collabn2'
CRS-2676: Start of 'ora.gipcd' on 'collabn2' succeeded
CRS-2672: Attempting to start 'ora.gpnpd' on 'collabn2'
CRS-2676: Start of 'ora.gpnpd' on 'collabn2' succeeded
CRS-2672: Attempting to start 'ora.cssdmonitor' on 'collabn2'
CRS-2676: Start of 'ora.cssdmonitor' on 'collabn2' succeeded
CRS-2672: Attempting to start 'ora.cssd' on 'collabn2'
CRS-2672: Attempting to start 'ora.diskmon' on 'collabn2'
CRS-2676: Start of 'ora.diskmon' on 'collabn2' succeeded
CRS-2676: Start of 'ora.cssd' on 'collabn2' succeeded
CRS-2672: Attempting to start 'ora.ctssd' on 'collabn2'
CRS-2676: Start of 'ora.ctssd' on 'collabn2' succeeded
CRS-2672: Attempting to start 'ora.drivers.acfs' on 'collabn2'
CRS-2676: Start of 'ora.drivers.acfs' on 'collabn2' succeeded
CRS-2672: Attempting to start 'ora.asm' on 'collabn2'
CRS-2676: Start of 'ora.asm' on 'collabn2' succeeded
CRS-2672: Attempting to start 'ora.crsd' on 'collabn2'
CRS-2676: Start of 'ora.crsd' on 'collabn2' succeeded
CRS-2672: Attempting to start 'ora.evmd' on 'collabn2'
CRS-2676: Start of 'ora.evmd' on 'collabn2' succeeded

collabn2     2011/03/30 17:12:32     /u01/grid/oracle/product/11.2.0/grid_1/cdata/collabn2/backup_20110330_171232.olr
Preparing packages for installation...
cvuqdisk-1.0.7-1
Configure Oracle Grid Infrastructure for a Cluster ... succeeded
Updating inventory properties for clusterware
Starting Oracle Universal Installer...

Checking swap space: must be greater than 500 MB.   Actual 1205 MB    Passed
The inventory pointer is located at /etc/oraInst.loc
The inventory is located at /u01/app/oraInventory
'UpdateNodeList' was successful.


Increase CRS Fencing Timeout (ASM)
editThese steps are not necessary for a test or production environment. However they might make your VMware test cluster just a little more stable and they will provide a good learning opportunity about Grid Infrastructure.
- Grid Infrastructure must be running on only one node to change these settings. Shutdown the clusterware on collabn2 as user root. [oracle@collabn1 ~]$ ssh collabn2 Last login: Wed Mar 30 14:50:49 2011 Set environment by typing 'oenv' - default is instance RAC1. collabn2:/home/oracle[RAC1]$ su - Password: racattack [root@collabn2 bin]# crsctl stop crs CRS-2791: Starting shutdown of Oracle High Availability Services-managed resources on 'collabn2' CRS-2673: Attempting to stop 'ora.crsd' on 'collabn2' CRS-2790: Starting shutdown of Cluster Ready Services-managed resources on 'collabn2' ... ... ... CRS-2793: Shutdown of Oracle High Availability Services-managed resources on 'collabn2' has completed CRS-4133: Oracle High Availability Services has been stopped.
- Return to node collabn1. As the root user, increase the misscount so that CRS waits 1.5 minutes before it reboots. (VMware can drag a little on some laptops!) [root@collabn1 ~]# crsctl get css misscount 30 [root@collabn1 ~]# crsctl set css misscount 90 Configuration parameter misscount is now set to 90.
- Increase the disktimeout so that CRS waits 10 minutes for I/O to complete before rebooting. [root@collabn1 ~]# crsctl get css disktimeout 200 [root@collabn1 ~]# crsctl set css disktimeout 600 Configuration parameter disktimeout is now set to 600.
- Restart CRS on the other node. [root@collabn1 bin]# ssh collabn2 [root@collabn2 bin]# crsctl start crs
Setup ASM
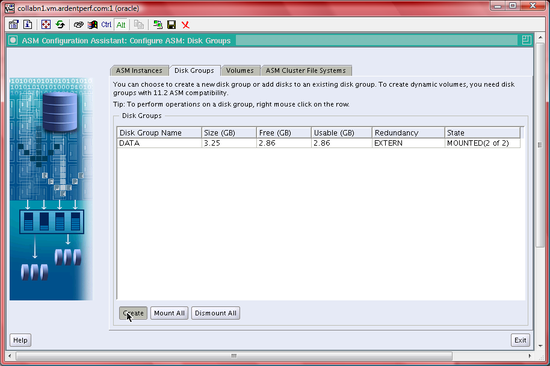
edit- As the oracle user, use the oenv macro (from Ardent Performance Computing) to set your environment for the SID +ASM1. Then, type asmca to launch ASMCA. collabn1:/home/oracle[RAC1]$ oenv SIDs here are: grid +ASM1 ORACLE_SID = [RAC1] ? +ASM1 The Oracle base for ORACLE_HOME=/u01/grid/oracle/product/11.2.0/grid_1 is /u01/app/oracle collabn1:/home/oracle[+ASM1]$ asmca
-
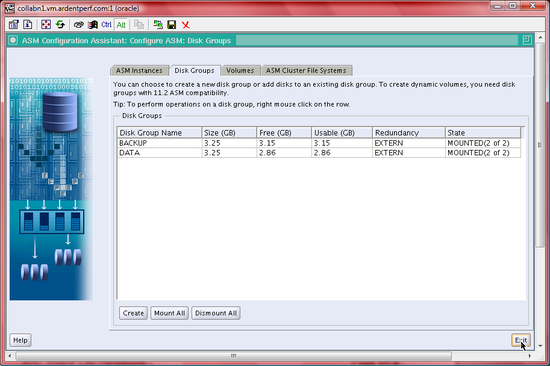
Make sure you're on the Disk Groups tab and then right-click on the DATA diskgroup and choose Edit Attributes.

-
Set the Database Compatibility and the ADVM Compatibility both to 11.2.0.0.0 then click OK. Choose YES when prompted about advancing database compatibility.

-
Click the Create button to add a new diskgroup.
-
Name the new diskgroup BACKUP. Choose External redundancy and select the disk ORCL:BACKUP. Then, click the Show Advanced Options button.

-
Leave the Allocation Unit at 1MB and set all compatibility parameters to 11.2.0.0.0, then click OK.


-
Click EXIT to close the ASM Configuration Assistant.


Grid Install (Shared Filesystem)
editSetup OCFS2
edit-
Open a terminal as the root user on collabn1.
- Create mountpoints on both nodes for two OCFS volumes: /u51 and /u52. [root@collabn1 ~]# mkdir /u51 [root@collabn1 ~]# mkdir /u52 [root@collabn1 ~]# ssh collabn2 root@collabn2's password: racattack [root@collabn2 ~]# mkdir /u51 [root@collabn2 ~]# mkdir /u52
- Install and load the OCFS2 packages from the OEL (Oracle Enterprise Linux) installation media and then load the module. Install and load OCFS2 on collabn2 as well. [root@collabn1 ~]# cd /mnt # From Enterprise Linux 5 Disk 3 rpm -Uvh */*/ocfs2-tools-1.* rpm -Uvh */*/ocfs2-*el5-* rpm -Uvh */*/ocfs2console-* [root@collabn1 mnt]# /etc/init.d/o2cb load Loading module "configfs": OK Mounting configfs filesystem at /sys/kernel/config: OK Loading module "ocfs2_nodemanager": OK Loading module "ocfs2_dlm": OK Loading module "ocfs2_dlmfs": OK Creating directory '/dlm': OK Mounting ocfs2_dlmfs filesystem at /dlm: OK [root@collabn1 ~]# ssh collabn2 root@collabn2's password: racattack [root@collabn2 ~]# cd /mnt # From Enterprise Linux 5 Disk 3 rpm -Uvh */*/ocfs2-tools-1.* rpm -Uvh */*/ocfs2-*el5-* rpm -Uvh */*/ocfs2console-* [root@collabn2 mnt]# /etc/init.d/o2cb load Loading module "configfs": OK Mounting configfs filesystem at /sys/kernel/config: OK Loading module "ocfs2_nodemanager": OK Loading module "ocfs2_dlm": OK Loading module "ocfs2_dlmfs": OK Creating directory '/dlm': OK Mounting ocfs2_dlmfs filesystem at /dlm: OK
-
From the terminal window, as root, launch ocfs2console

-
Choose CONFIGURE NODES… from the CLUSTER menu. If you see a notification that the cluster has been started, then acknowledge it by clicking the Close button.


-
Click ADD and enter the collabn1 and the private IP 172.16.100.51. Accept the default port. Click OK to save.

-
Click ADD a second time and enter collabn2 and 172.16.100.52. Then choose to APPLY then click CLOSE to close the window.

-
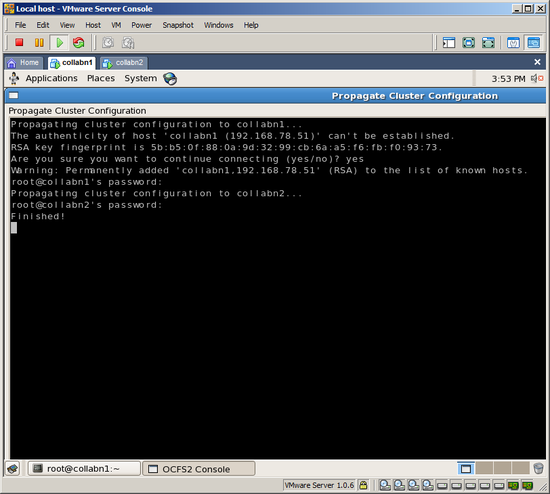
Choose PROPAGATE CONFIGURATION… from the CLUSTER menu. If you are prompted to accept host keys then type YES. Type the root password racattack at the both prompts. When you see the message “Finished!” then press <ALT-C> to close the window.
-
From the TASKS menu, choose FORMAT to create the OCFS filesystem. Select /dev/sdb1 and type the volume label u51-data. Leave the rest of the options at their defaults and click OK to format the volume. Confirm by clicking YES.


-
Repeat the previous step for volume /dev/sdc1 and name it u52-backup.

-
Exit the OCFS2 console by selecting QUIT from the FILE menu.
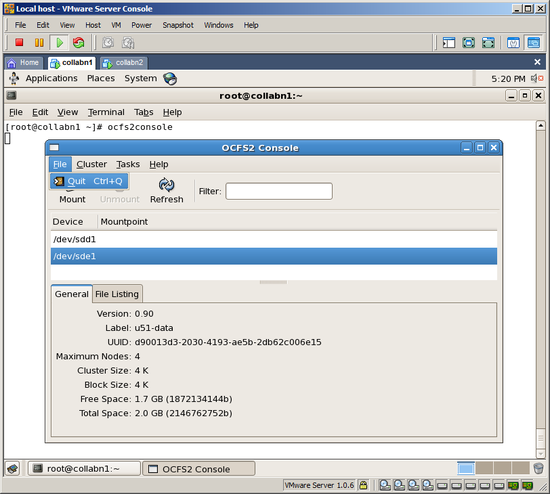
- Configure OCFS2 on both nodes. We will use a conservative disk heartbeat timeout (300 seconds) because VMware is slow on some laptops. [root@collabn1 mnt]# /etc/init.d/o2cb configure Configuring the O2CB driver. This will configure the on-boot properties of the O2CB driver. The following questions will determine whether the driver is loaded on boot. The current values will be shown in brackets ('[]'). Hitting <ENTER> without typing an answer will keep that current value. Ctrl-C will abort. Load O2CB driver on boot (y/n) [n]: y Cluster stack backing O2CB [o2cb]: Cluster to start on boot (Enter "none" to clear) [ocfs2]: Specify heartbeat dead threshold (>=7) [31]: 300 Specify network idle timeout in ms (>=5000) [30000]: Specify network keepalive delay in ms (>=1000) [2000]: Specify network reconnect delay in ms (>=2000) [2000]: Writing O2CB configuration: OK Cluster ocfs2 already online [root@collabn1 ~]# ssh collabn2 root@collabn2's password: racattack [root@collabn2 mnt]# /etc/init.d/o2cb configure figuring the O2CB driver. This will configure the on-boot properties of the O2CB driver. The following questions will determine whether the driver is loaded on boot. The current values will be shown in brackets ('[]'). Hitting <ENTER> without typing an answer will keep that current value. Ctrl-C will abort. Load O2CB driver on boot (y/n) [n]: y Cluster stack backing O2CB [o2cb]: Cluster to start on boot (Enter "none" to clear) [ocfs2]: Specify heartbeat dead threshold (>=7) [31]: 300 Specify network idle timeout in ms (>=5000) [30000]: Specify network keepalive delay in ms (>=1000) [2000]: Specify network reconnect delay in ms (>=2000) [2000]: Writing O2CB configuration: OK Starting O2CB cluster ocfs2: OK
- Reload the O2CB driver on the node where you ran ocfs2console. [root@collabn2 mnt]# exit logout Connection to collabn2 closed. [root@collabn1 mnt]# /etc/init.d/o2cb force-reload Stopping O2CB cluster ocfs2: OK Unmounting ocfs2_dlmfs filesystem: OK Unloading module "ocfs2_dlmfs": OK Unmounting configfs filesystem: OK Unloading module "configfs": OK Loading filesystem "configfs": OK Mounting configfs filesystem at /sys/kernel/config: OK Loading filesystem "ocfs2_dlmfs": OK Mounting ocfs2_dlmfs filesystem at /dlm: OK Starting O2CB cluster ocfs2: OK
- Edit /etc/fstab to add entries for the new file systems. [root@collabn1 ~]# vi /etc/fstab LABEL=u51-data /u51 ocfs2 _netdev,datavolume,nointr 0 0 LABEL=u52-backup /u52 ocfs2 _netdev,datavolume,nointr 0 0
- Mount the volumes and create directories for the oracle database files. [root@collabn1 ~]# mount /u51 [root@collabn1 ~]# mount /u52 [root@collabn1 ~]# mkdir /u51/oradata [root@collabn1 ~]# mkdir /u52/oradata [root@collabn1 ~]# mkdir /u51/cluster [root@collabn1 ~]# chown oracle:dba /u51/oradata /u52/oradata /u51/cluster [root@collabn1 ~]# df -h Filesystem Size Used Avail Use% Mounted on /dev/sdb1 3.3G 279M 3.0G 9% /u51 /dev/sdc1 3.3G 279M 3.0G 9% /u52
- Login to the second node collabn2 as root and repeat these steps there. [root@collabn1 ~]# ssh collabn2 root@collabn2's password: racattack [root@collabn2 ~]# vi /etc/fstab LABEL=u51-data /u51 ocfs2 _netdev,datavolume,nointr 0 0 LABEL=u52-backup /u52 ocfs2 _netdev,datavolume,nointr 0 0 [root@collabn2 ~]# mount /u51 [root@collabn2 ~]# mount /u52 [root@collabn2 ~]# df -h Filesystem Size Used Avail Use% Mounted on /dev/sdb1 3.3G 279M 3.0G 9% /u51 /dev/sdc1 3.3G 279M 3.0G 9% /u52 [root@collabn2 ~]# ls -l /u5* /u51: total 0 drwxr-xr-x 2 oracle dba 3896 Sep 26 15:30 cluster drwxr-xr-x 2 root root 3896 Sep 26 15:26 lost+found drwxr-xr-x 2 oracle dba 3896 Sep 26 15:29 oradata /u52: total 0 drwxr-xr-x 2 root root 3896 Sep 26 15:26 lost+found drwxr-xr-x 2 oracle dba 3896 Sep 26 15:30 oradata
- Optionally, examine /var/log/messages and dmesg output for status messages related to OCFS2.


Cluster Verification Utility (Shared Filesystem)
edit-
Login to collabn1 as the oracle user and open a terminal.
- Run CVU to validate that you're ready to install CRS. Use the new “fixup” feature of 11gR2 CVU to create a script that can fix missing parameters. [oracle@collabn1 ~]$ /mnt/cdrom*/grid/runcluvfy.sh stage -pre crsinst -n collabn1,collabn2 -fixup -r 11gR2 Performing pre-checks for cluster services setup Checking node reachability... Node reachability check passed from node "collabn1" Checking user equivalence... User equivalence check passed for user "oracle" Checking node connectivity... Checking hosts config file... Verification of the hosts config file successful Node connectivity passed for subnet "192.168.78.0" with node(s) collabn2,collabn1 TCP connectivity check passed for subnet "192.168.78.0" Node connectivity passed for subnet "172.16.100.0" with node(s) collabn2,collabn1 TCP connectivity check passed for subnet "172.16.100.0" Interfaces found on subnet "192.168.78.0" that are likely candidates for VIP are: collabn2 eth0:192.168.78.52 collabn1 eth0:192.168.78.51 Interfaces found on subnet "172.16.100.0" that are likely candidates for a private interconnect are: collabn2 eth1:172.16.100.52 collabn1 eth1:172.16.100.51 Node connectivity check passed Total memory check failed Check failed on nodes: collabn2,collabn1 Available memory check passed Swap space check failed Free disk space check passed for "collabn2:/tmp" Free disk space check passed for "collabn1:/tmp" User existence check passed for "oracle" Group existence check passed for "oinstall" Group existence check passed for "dba" Membership check for user "oracle" in group "oinstall" [as Primary] passed Membership check for user "oracle" in group "dba" passed Run level check passed Hard limits check passed for "maximum open file descriptors" Soft limits check passed for "maximum open file descriptors" Hard limits check passed for "maximum user processes" Soft limits check passed for "maximum user processes" System architecture check passed Kernel version check passed Kernel parameter check passed for "semmsl" Kernel parameter check passed for "semmns" Kernel parameter check passed for "semopm" Kernel parameter check passed for "semmni" Kernel parameter check passed for "shmmax" Kernel parameter check passed for "shmmni" Kernel parameter check passed for "shmall" Kernel parameter check failed for "file-max" Check failed on nodes: collabn2,collabn1 Kernel parameter check passed for "ip_local_port_range" Kernel parameter check passed for "rmem_default" Kernel parameter check passed for "rmem_max" Kernel parameter check passed for "wmem_default" Kernel parameter check failed for "wmem_max" Check failed on nodes: collabn2,collabn1 Kernel parameter check failed for "aio-max-nr" Check failed on nodes: collabn2,collabn1 Package existence check passed for "make-3.81" Package existence check passed for "binutils-2.17.50.0.6" Package existence check passed for "gcc-4.1.2" Package existence check passed for "gcc-c++-4.1.2" Package existence check passed for "libgomp-4.1.2" Package existence check passed for "libaio-0.3.106" Package existence check passed for "glibc-2.5-24" Package existence check passed for "compat-libstdc++-33-3.2.3" Package existence check passed for "elfutils-libelf-0.125" Package existence check passed for "elfutils-libelf-devel-0.125" Package existence check passed for "glibc-common-2.5" Package existence check passed for "glibc-devel-2.5" Package existence check passed for "glibc-headers-2.5" Package existence check passed for "libaio-devel-0.3.106" Package existence check passed for "libgcc-4.1.2" Package existence check passed for "libstdc++-4.1.2" Package existence check passed for "libstdc++-devel-4.1.2" Package existence check passed for "sysstat-7.0.2" Package existence check passed for "unixODBC-2.2.11" Package existence check passed for "unixODBC-devel-2.2.11" Package existence check passed for "ksh-20060214" Check for multiple users with UID value 0 passed Current group ID check passed Core file name pattern consistency check passed. User "oracle" is not part of "root" group. Check passed Default user file creation mask check passed Starting Clock synchronization checks using Network Time Protocol(NTP)... NTP Configuration file check started... NTP Configuration file check passed Checking daemon liveness... Liveness check failed for "ntpd" Check failed on nodes: collabn2,collabn1 PRVF-5415 : Check to see if NTP daemon is running failed Clock synchronization check using Network Time Protocol(NTP) failed Fixup information has been generated for following node(s): collabn2,collabn1 Please run the following script on each node as "root" user to execute the fixups: '/tmp/CVU_11.2.0.1.0_oracle/runfixup.sh' Pre-check for cluster services setup was unsuccessful on all the nodes.
- Switch to the root user and run the fixup script on both nodes. collabn1:/home/oracle[RAC1]$ su - Password: -bash: oraenv: No such file or directory [root@collabn1 ~]# /tmp/CVU_11.2.0.1.0_oracle/runfixup.sh Response file being used is :/tmp/CVU_11.2.0.1.0_oracle/fixup.response Enable file being used is :/tmp/CVU_11.2.0.1.0_oracle/fixup.enable Log file location: /tmp/CVU_11.2.0.1.0_oracle/orarun.log Setting Kernel Parameters... fs.file-max = 6815744 net.ipv4.ip_local_port_range = 9000 65500 net.core.wmem_max=262144 net.core.wmem_max = 1048576 fs.aio-max-nr = 1048576 [root@collabn1 ~]# ssh collabn2 /tmp/CVU_11.2.0.1.0_oracle/runfixup.sh root@collabn2's password: /root/.bashrc: line 16: oraenv: No such file or directory Response file being used is :/tmp/CVU_11.2.0.1.0_oracle/fixup.response Enable file being used is :/tmp/CVU_11.2.0.1.0_oracle/fixup.enable Log file location: /tmp/CVU_11.2.0.1.0_oracle/orarun.log Setting Kernel Parameters... fs.file-max = 6815744 net.ipv4.ip_local_port_range = 9000 65500 net.core.wmem_max=262144 net.core.wmem_max = 1048576 fs.aio-max-nr = 1048576
- As the oracle user, run CVU again to make sure the fixit script worked. The NTP, memory and swap checks might fail – but this is acceptable for our VMware test cluster. [root@collabn1 ~]# exit logout collabn1:/home/oracle[RAC1]$ /mnt/cdrom*/grid/runcluvfy.sh stage -pre crsinst -n collabn1,collabn2 -r 11gR2 ... Total memory check failed ... Swap space check failed ... Kernel parameter check passed for "file-max" ... Kernel parameter check passed for "wmem_max" Kernel parameter check passed for "aio-max-nr" ... Liveness check failed for "ntpd" ...
11gR2 Bug Workaround
editSeveral NFS appliances and big-iron cluster filesystems are very common in large cluster database deployments. We will use OCFS2 here to practice 11gR2 RAC with a filesystem.
Note: 11gR2 clusterware has a bug – it does allow cluster files on OCFS2 (even though this is a supported configuration). To work around this bug, we will present the OCFS2 directory to clusterware with a local "loopback" NFS mount.
- As the root user, Follow the steps below to setup the local NFS mount on node collabn1. [root@collabn1 ~]# mkdir /u61 [root@collabn1 ~]# vi /etc/fstab # create an NFS mount on u61 which points back to u51 localhost:/u51 /u61 nfs \ rw,bg,hard,nointr,rsize=32768,wsize=32768,tcp,vers=3,timeo=600,noac [root@collabn1 ~]# vi /etc/exports /u51 *(rw,no_root_squash,sync) [root@collabn1 ~]# chkconfig nfs on [root@collabn1 ~]# service nfs start [root@collabn1 ~]# mount /u61
- Repeat all of these steps on node collabn2. [root@collabn1 ~]# ssh collabn2 [root@collabn2 ~]# mkdir /u61 [root@collabn2 ~]# vi /etc/fstab # create an NFS mount on u61 which points back to u51 localhost:/u51 /u61 nfs \ rw,bg,hard,nointr,rsize=32768,wsize=32768,tcp,vers=3,timeo=600,noac [root@collabn2 ~]# vi /etc/exports /u51 *(rw,no_root_squash,sync) [root@collabn2 ~]# chkconfig nfs on [root@collabn2 ~]# service nfs start [root@collabn2 ~]# mount /u61
Install Grid Infrastructure (Shared Filesystem)
editSeveral NFS appliances and big-iron cluster filesystems are very common in large cluster database deployments. We will use OCFS2 here to practice 11gR2 RAC with a filesystem.
-
As the oracle user, launch the grid installer. At the first screen, choose Install and Configure Grid Infrastructure for a Cluster and click NEXT.
[oracle@collabn1 ~]$ /mnt/cdrom*/grid/runInstaller
-
Choose Advanced Installation and click NEXT.
-
Accept the default language (English) and choose NEXT.
-
Name the cluster collab and make sure that the SCAN name is collab-scan with port 1521, then click NEXT.
-
Add node collabn2 with VIP collabn2-vip and choose NEXT to validate the cluster configuration.
-
Verify that eth0 on subnet 192.168.78.0 is PUBLIC and that eth1 on subnet 172.16.100.0 is PRIVATE, then click NEXT.
-
Choose to store the Clusterware Files in Shared File System and choose NEXT.

-
For the OCR, choose External Redundancy and type the path /u61/cluster/ocr. (This is the NFS location from the BUG WORKAROUND.) Click NEXT to continue.

-
For the Voting Disk, do the same – choose External Redundancy and type the path /u61/cluster/vdsk. (Again, this is the NFS location from the BUG WORKAROUND.) Click NEXT to continue.

-
Do not use IPMI. Click NEXT.
-
Set the OSDBA group to asmdba, the OSOPER group to asmoper and the OSASM group to asmadmin. Then click NEXT.
-
Accept the ORACLE_BASE location of /u01/app/oracle and use the ORACLE_HOME location of /u01/grid/oracle/product/11.2.0/grid_1. Then click NEXT.
-
Accept the default inventory location and choose NEXT
-
The prerequisite checks will execute. A warning will be issued saying that three checks failed: physical memory, swap size and network time protocol. Click the CHECK BOX to Ignore All, then click NEXT.
-
SAVE a response file called grid.rsp in the oracle user home directory. Then click FINISH to install grid infrastructure.
-
When prompted, open a terminal as the root user and run the two root.sh scripts. Make sure to run BOTH SCRIPTS on BOTH NODES!
[oracle@collabn1 ~]$ su -
Password: racattack

[root@collabn1 ~]# /u01/app/oraInventory/orainstRoot.sh
Changing permissions of /u01/app/oraInventory.
Adding read, write permissions for group.
Removing read,write,execute permissions for world.

Changing groupname of /u01/app/oraInventory to oinstall.
The execution of the script is complete.

[root@collabn1 ~]# /u01/grid/oracle/product/11.2.0/grid_1/root.sh
Running Oracle 11g root.sh script...

The following environment variables are set as:
    ORACLE_OWNER= oracle
    ORACLE_HOME=  /u01/grid/oracle/product/11.2.0/grid_1

Enter the full pathname of the local bin directory: [/usr/local/bin]: /usr/bin
   Copying dbhome to /usr/bin ...
   Copying oraenv to /usr/bin ...
   Copying coraenv to /usr/bin ...

Entries will be added to the /etc/oratab file as needed by
Database Configuration Assistant when a database is created
Finished running generic part of root.sh script.
Now product-specific root actions will be performed.
2011-03-30 16:49:13: Parsing the host name
2011-03-30 16:49:13: Checking for super user privileges
2011-03-30 16:49:13: User has super user privileges
Using configuration parameter file: /u01/grid/oracle/product/11.2.0/grid_1/crs/install/crsconfig_params
Creating trace directory
LOCAL ADD MODE
Creating OCR keys for user 'root', privgrp 'root'..
Operation successful.
  root wallet
  root wallet cert
  root cert export
  peer wallet
  profile reader wallet
  pa wallet
  peer wallet keys
  pa wallet keys
  peer cert request
  pa cert request
  peer cert
  pa cert
  peer root cert TP
  profile reader root cert TP
  pa root cert TP
  peer pa cert TP
  pa peer cert TP
  profile reader pa cert TP
  profile reader peer cert TP
  peer user cert
  pa user cert
Adding daemon to inittab
CRS-4123: Oracle High Availability Services has been started.
ohasd is starting
CRS-2672: Attempting to start 'ora.gipcd' on 'collabn1'
CRS-2672: Attempting to start 'ora.mdnsd' on 'collabn1'
CRS-2676: Start of 'ora.mdnsd' on 'collabn1' succeeded
CRS-2676: Start of 'ora.gipcd' on 'collabn1' succeeded
CRS-2672: Attempting to start 'ora.gpnpd' on 'collabn1'
CRS-2676: Start of 'ora.gpnpd' on 'collabn1' succeeded
CRS-2672: Attempting to start 'ora.cssdmonitor' on 'collabn1'
CRS-2676: Start of 'ora.cssdmonitor' on 'collabn1' succeeded
CRS-2672: Attempting to start 'ora.cssd' on 'collabn1'
CRS-2672: Attempting to start 'ora.diskmon' on 'collabn1'
CRS-2676: Start of 'ora.diskmon' on 'collabn1' succeeded
CRS-2676: Start of 'ora.cssd' on 'collabn1' succeeded
CRS-2672: Attempting to start 'ora.ctssd' on 'collabn1'
CRS-2676: Start of 'ora.ctssd' on 'collabn1' succeeded
clscfg: -install mode specified
Successfully accumulated necessary OCR keys.
Creating OCR keys for user 'root', privgrp 'root'..
Operation successful.
CRS-2672: Attempting to start 'ora.crsd' on 'collabn1'
CRS-2676: Start of 'ora.crsd' on 'collabn1' succeeded
Now formatting voting disk: /u61/cluster/vdsk.
CRS-4603: Successful addition of voting disk /u61/cluster/vdsk.
##  STATE    File Universal Id                File Name Disk group
--  -----    -----------------                --------- ---------
 1. ONLINE   59f9f62cc0f44f35bff552ced06e35ee (/u61/cluster/vdsk) []
Located 1 voting disk(s).
CRS-2673: Attempting to stop 'ora.crsd' on 'collabn1'
CRS-2677: Stop of 'ora.crsd' on 'collabn1' succeeded
CRS-2673: Attempting to stop 'ora.asm' on 'collabn1'
CRS-2677: Stop of 'ora.asm' on 'collabn1' succeeded
CRS-2673: Attempting to stop 'ora.ctssd' on 'collabn1'
CRS-2677: Stop of 'ora.ctssd' on 'collabn1' succeeded
CRS-2673: Attempting to stop 'ora.cssdmonitor' on 'collabn1'
CRS-2677: Stop of 'ora.cssdmonitor' on 'collabn1' succeeded
CRS-2673: Attempting to stop 'ora.cssd' on 'collabn1'
CRS-2677: Stop of 'ora.cssd' on 'collabn1' succeeded
CRS-2673: Attempting to stop 'ora.gpnpd' on 'collabn1'
CRS-2677: Stop of 'ora.gpnpd' on 'collabn1' succeeded
CRS-2673: Attempting to stop 'ora.gipcd' on 'collabn1'
CRS-2677: Stop of 'ora.gipcd' on 'collabn1' succeeded
CRS-2673: Attempting to stop 'ora.mdnsd' on 'collabn1'
CRS-2677: Stop of 'ora.mdnsd' on 'collabn1' succeeded
CRS-2672: Attempting to start 'ora.mdnsd' on 'collabn1'
CRS-2676: Start of 'ora.mdnsd' on 'collabn1' succeeded
CRS-2672: Attempting to start 'ora.gipcd' on 'collabn1'
CRS-2676: Start of 'ora.gipcd' on 'collabn1' succeeded
CRS-2672: Attempting to start 'ora.gpnpd' on 'collabn1'
CRS-2676: Start of 'ora.gpnpd' on 'collabn1' succeeded
CRS-2672: Attempting to start 'ora.cssdmonitor' on 'collabn1'
CRS-2676: Start of 'ora.cssdmonitor' on 'collabn1' succeeded
CRS-2672: Attempting to start 'ora.cssd' on 'collabn1'
CRS-2672: Attempting to start 'ora.diskmon' on 'collabn1'
CRS-2676: Start of 'ora.diskmon' on 'collabn1' succeeded
CRS-2676: Start of 'ora.cssd' on 'collabn1' succeeded
CRS-2672: Attempting to start 'ora.ctssd' on 'collabn1'
CRS-2676: Start of 'ora.ctssd' on 'collabn1' succeeded
CRS-2672: Attempting to start 'ora.asm' on 'collabn1'
CRS-2676: Start of 'ora.asm' on 'collabn1' succeeded
CRS-2672: Attempting to start 'ora.crsd' on 'collabn1'
CRS-2676: Start of 'ora.crsd' on 'collabn1' succeeded
CRS-2672: Attempting to start 'ora.evmd' on 'collabn1'
CRS-2676: Start of 'ora.evmd' on 'collabn1' succeeded
CRS-2672: Attempting to start 'ora.asm' on 'collabn1'
CRS-2676: Start of 'ora.asm' on 'collabn1' succeeded
CRS-2672: Attempting to start 'ora.DATA.dg' on 'collabn1'
CRS-2676: Start of 'ora.DATA.dg' on 'collabn1' succeeded
CRS-2672: Attempting to start 'ora.registry.acfs' on 'collabn1'
CRS-2676: Start of 'ora.registry.acfs' on 'collabn1' succeeded

collabn1     2011/03/30 16:59:35     /u01/grid/oracle/product/11.2.0/grid_1/cdata/collabn1/backup_20110330_165935.olr
Preparing packages for installation...
cvuqdisk-1.0.7-1
Configure Oracle Grid Infrastructure for a Cluster ... succeeded
Updating inventory properties for clusterware
Starting Oracle Universal Installer...

Checking swap space: must be greater than 500 MB.   Actual 968 MB    Passed
The inventory pointer is located at /etc/oraInst.loc
The inventory is located at /u01/app/oraInventory
'UpdateNodeList' was successful.
[root@collabn1 ~]# ssh collabn2
root@collabn2's password: racattack
-bash: oraenv: No such file or directory
[root@collabn2 ~]# /u01/app/oraInventory/orainstRoot.sh
Changing permissions of /u01/app/oraInventory.
Adding read, write permissions for group.
Removing read,write,execute permissions for world.

Changing groupname of /u01/app/oraInventory to oinstall.
The execution of the script is complete.

[root@collabn2 ~]# /u01/grid/oracle/product/11.2.0/grid_1/root.sh
Running Oracle 11g root.sh script...

The following environment variables are set as:
    ORACLE_OWNER= oracle
    ORACLE_HOME=  /u01/grid/oracle/product/11.2.0/grid_1

Enter the full pathname of the local bin directory: [/usr/local/bin]: /usr/bin
   Copying dbhome to /usr/bin ...
   Copying oraenv to /usr/bin ...
   Copying coraenv to /usr/bin ...

Entries will be added to the /etc/oratab file as needed by
Database Configuration Assistant when a database is created
Finished running generic part of root.sh script.
Now product-specific root actions will be performed.
2011-03-30 17:04:26: Parsing the host name
2011-03-30 17:04:26: Checking for super user privileges
2011-03-30 17:04:26: User has super user privileges
Using configuration parameter file: /u01/grid/oracle/product/11.2.0/grid_1/crs/install/crsconfig_params
Creating trace directory
LOCAL ADD MODE
Creating OCR keys for user 'root', privgrp 'root'..
Operation successful.
Adding daemon to inittab
CRS-4123: Oracle High Availability Services has been started.
ohasd is starting
CRS-4402: The CSS daemon was started in exclusive mode but found an active CSS daemon on node collabn1, number 1, and is terminating
An active cluster was found during exclusive startup, restarting to join the cluster
CRS-2672: Attempting to start 'ora.mdnsd' on 'collabn2'
CRS-2676: Start of 'ora.mdnsd' on 'collabn2' succeeded
CRS-2672: Attempting to start 'ora.gipcd' on 'collabn2'
CRS-2676: Start of 'ora.gipcd' on 'collabn2' succeeded
CRS-2672: Attempting to start 'ora.gpnpd' on 'collabn2'
CRS-2676: Start of 'ora.gpnpd' on 'collabn2' succeeded
CRS-2672: Attempting to start 'ora.cssdmonitor' on 'collabn2'
CRS-2676: Start of 'ora.cssdmonitor' on 'collabn2' succeeded
CRS-2672: Attempting to start 'ora.cssd' on 'collabn2'
CRS-2672: Attempting to start 'ora.diskmon' on 'collabn2'
CRS-2676: Start of 'ora.diskmon' on 'collabn2' succeeded
CRS-2676: Start of 'ora.cssd' on 'collabn2' succeeded
CRS-2672: Attempting to start 'ora.ctssd' on 'collabn2'
CRS-2676: Start of 'ora.ctssd' on 'collabn2' succeeded
CRS-2672: Attempting to start 'ora.drivers.acfs' on 'collabn2'
CRS-2676: Start of 'ora.drivers.acfs' on 'collabn2' succeeded
CRS-2672: Attempting to start 'ora.asm' on 'collabn2'
CRS-2676: Start of 'ora.asm' on 'collabn2' succeeded
CRS-2672: Attempting to start 'ora.crsd' on 'collabn2'
CRS-2676: Start of 'ora.crsd' on 'collabn2' succeeded
CRS-2672: Attempting to start 'ora.evmd' on 'collabn2'
CRS-2676: Start of 'ora.evmd' on 'collabn2' succeeded

collabn2     2011/03/30 17:12:32     /u01/grid/oracle/product/11.2.0/grid_1/cdata/collabn2/backup_20110330_171232.olr
Preparing packages for installation...
cvuqdisk-1.0.7-1
Configure Oracle Grid Infrastructure for a Cluster ... succeeded
Updating inventory properties for clusterware
Starting Oracle Universal Installer...

Checking swap space: must be greater than 500 MB.   Actual 1205 MB    Passed
The inventory pointer is located at /etc/oraInst.loc
The inventory is located at /u01/app/oraInventory
'UpdateNodeList' was successful.
-
After running both scripts, return to the installer window and click OK to continue running configuration assistants.
-
The Cluster Verification Utility will fail because NTP is not running. If you want to, check the error message at the very end of the logfile. Then click OK to close the messagebox and click NEXT to continue.
-
You should now see the final screen! Click CLOSE to exit the installer.


Increase CRS Fencing Timeout (Shared Filesystem)
editThese steps are not necessary for a test or production environment. However they might make your VMware test cluster just a little more stable and they will provide a good learning opportunity about Grid Infrastructure.
- Grid Infrastructure must be running on only one node to change these settings. Shutdown the clusterware on collabn2 as user root. [oracle@collabn1 ~]$ ssh collabn2 Last login: Wed Mar 30 14:50:49 2011 Set environment by typing 'oenv' - default is instance RAC1. collabn2:/home/oracle[RAC1]$ su - Password: racattack [root@collabn2 bin]# crsctl stop crs CRS-2791: Starting shutdown of Oracle High Availability Services-managed resources on 'collabn2' CRS-2673: Attempting to stop 'ora.crsd' on 'collabn2' CRS-2790: Starting shutdown of Cluster Ready Services-managed resources on 'collabn2' ... ... ... CRS-2793: Shutdown of Oracle High Availability Services-managed resources on 'collabn2' has completed CRS-4133: Oracle High Availability Services has been stopped.
- Return to node collabn1. As the root user, increase the misscount so that CRS waits 1.5 minutes before it reboots. (VMware can drag a little on some laptops!) [root@collabn1 ~]# crsctl get css misscount 30 [root@collabn1 ~]# crsctl set css misscount 90 Configuration parameter misscount is now set to 90.
- Increase the disktimeout so that CRS waits 10 minutes for I/O to complete before rebooting. [root@collabn1 ~]# crsctl get css disktimeout 200 [root@collabn1 ~]# crsctl set css disktimeout 600 Configuration parameter disktimeout is now set to 600.
- Restart CRS on the other node. [root@collabn1 bin]# ssh collabn2 [root@collabn2 bin]# crsctl start crs
RAC Install
editInstall Database Software
edit- Login to collabn1 as the oracle user and open a terminal. Run CLUVFY to check that you're ready to start the DB install. The memory, swap and NTP/time checks may fail but everything else should succeed. [oracle@collabn1 ~]$ /mnt/cdrom*/grid/runcluvfy.sh stage -pre dbinst -n collabn1,collabn2 -r 11gR2 Performing pre-checks for database installation Checking node reachability... Node reachability check passed from node "collabn1" Checking user equivalence... User equivalence check passed for user "oracle" Checking node connectivity... Checking hosts config file... Verification of the hosts config file successful Node connectivity passed for subnet "192.168.78.0" with node(s) collabn2,collabn1 TCP connectivity check passed for subnet "192.168.78.0" Node connectivity passed for subnet "172.16.100.0" with node(s) collabn2,collabn1 TCP connectivity check passed for subnet "172.16.100.0" Interfaces found on subnet "192.168.78.0" that are likely candidates for VIP are: collabn2 eth0:192.168.78.52 eth0:192.168.78.250 eth0:192.168.78.62 collabn1 eth0:192.168.78.51 eth0:192.168.78.61 Interfaces found on subnet "172.16.100.0" that are likely candidates for a private interconnect are: collabn2 eth1:172.16.100.52 collabn1 eth1:172.16.100.51 Node connectivity check passed Total memory check failed Check failed on nodes: collabn2,collabn1 Available memory check passed Swap space check failed Free disk space check passed for "collabn2:/u01/grid/oracle/product/11.2.0/grid_1,collabn2:/tmp" Free disk space check passed for "collabn1:/u01/grid/oracle/product/11.2.0/grid_1,collabn1:/tmp" User existence check passed for "oracle" Group existence check passed for "oinstall" Group existence check passed for "dba" Membership check for user "oracle" in group "oinstall" [as Primary] passed Membership check for user "oracle" in group "dba" passed Run level check passed Hard limits check passed for "maximum open file descriptors" Soft limits check passed for "maximum open file descriptors" Hard limits check passed for "maximum user processes" Soft limits check passed for "maximum user processes" System architecture check passed Kernel version check passed Kernel parameter check passed for "semmsl" Kernel parameter check passed for "semmns" Kernel parameter check passed for "semopm" Kernel parameter check passed for "semmni" Kernel parameter check passed for "shmmax" Kernel parameter check passed for "shmmni" Kernel parameter check passed for "shmall" Kernel parameter check passed for "file-max" Kernel parameter check passed for "ip_local_port_range" Kernel parameter check passed for "rmem_default" Kernel parameter check passed for "rmem_max" Kernel parameter check passed for "wmem_default" Kernel parameter check passed for "wmem_max" Kernel parameter check passed for "aio-max-nr" Package existence check passed for "make-3.81" Package existence check passed for "binutils-2.17.50.0.6" Package existence check passed for "gcc-4.1.2" Package existence check passed for "libgomp-4.1.2" Package existence check passed for "libaio-0.3.106" Package existence check passed for "glibc-2.5-24" Package existence check passed for "compat-libstdc++-33-3.2.3" Package existence check passed for "elfutils-libelf-0.125" Package existence check passed for "elfutils-libelf-devel-0.125" Package existence check passed for "elfutils-libelf-devel-static-0.125" Package existence check passed for "glibc-common-2.5" Package existence check passed for "glibc-devel-2.5" Package existence check passed for "glibc-headers-2.5" Package existence check passed for "kernel-headers-2.6.18" Package existence check passed for "gcc-c++-4.1.2" Package existence check passed for "libaio-devel-0.3.106" Package existence check passed for "libgcc-4.1.2" Package existence check passed for "libstdc++-4.1.2" Package existence check passed for "libstdc++-devel-4.1.2" Package existence check passed for "sysstat-7.0.2" Package existence check passed for "unixODBC-2.2.11" Package existence check passed for "unixODBC-devel-2.2.11" Package existence check passed for "ksh-20060214" Check for multiple users with UID value 0 passed Current group ID check passed Default user file creation mask check passed Checking CRS integrity... CRS integrity check passed Checking Cluster manager integrity... Checking CSS daemon... Oracle Cluster Synchronization Services appear to be online. Cluster manager integrity check passed Checking if Clusterware is installed on all nodes... Check of Clusterware install passed Checking if CTSS Resource is running on all nodes... CTSS resource check passed Querying CTSS for time offset on all nodes... Query of CTSS for time offset passed Check CTSS state started... CTSS is in Observer state. Switching over to clock synchronization checks using NTP Starting Clock synchronization checks using Network Time Protocol(NTP)... NTP Configuration file check started... NTP Configuration file check passed Checking daemon liveness... Liveness check failed for "ntpd" Check failed on nodes: collabn2,collabn1 PRVF-5415 : Check to see if NTP daemon is running failed Clock synchronization check using Network Time Protocol(NTP) failed PRVF-9652 : Cluster Time Synchronization Services check failed Checking time zone consistency... Time zone consistency check passed. Pre-check for database installation was unsuccessful on all the nodes.
-
Launch the database installer with /mnt/cdrom*/database/runInstaller.

-
On the first screen, leave the email blank and uncheck the "security update" option. Click NEXT to continue. Choose YES to verify that you don't want to enter an email address.

-
Choose to Install Database Software Only and click NEXT.

-
Choose Real Application Clusters database installation and select all nodes. Click NEXT to continue.

-
Select the English language and click NEXT.

-
Choose Enterprise Edition install and click NEXT.
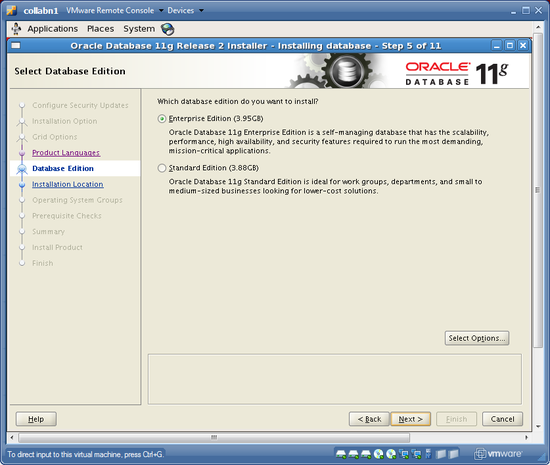
-
Confirm that the ORACLE_BASE is /u01/app/oracle and change the ORACLE_HOME to /u01/app/oracle/product/11.2.0/db_1. Click NEXT to continue.

-
Verify that the OSDBA group is dba and the OSOPER group is oper. Click NEXT to continue.

-
The prerequisite checks will execute. A warning will be issued saying that three checks failed: physical memory, swap size and network time protocol. Click the CHECK BOX to Ignore All, then click NEXT.

-
SAVE a response file called db.rsp in the oracle user home directory. Then click FINISH to install the oracle database software.


-
When prompted, open a terminal as the root user and run the root.sh script. Enter /usr/bin as the local bin directory and overwrite the files which were previously installed by grid infrastructure. Make sure to run it on BOTH NODES!
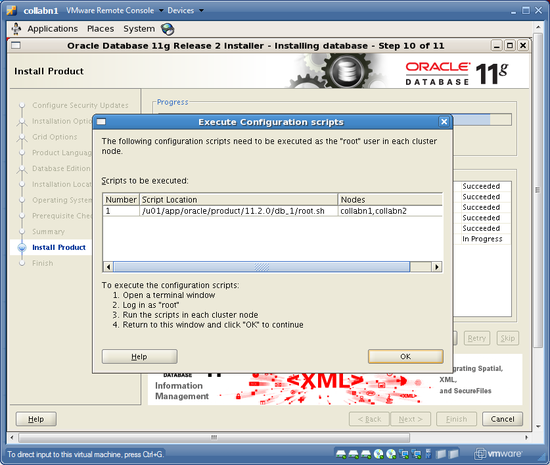
[oracle@collabn1 ~]$ su -
Password: racattack

[root@collabn1 ~]# /u01/app/oracle/product/11.2.0/db_1/root.sh
Running Oracle 11g root.sh script...

The following environment variables are set as:
    ORACLE_OWNER= oracle
    ORACLE_HOME=  /u01/app/oracle/product/11.2.0/db_1

Enter the full pathname of the local bin directory: [/usr/local/bin]: /usr/bin
The file "dbhome" already exists in /usr/bin.  Overwrite it? (y/n)
[n]: y
   Copying dbhome to /usr/bin ...
The file "oraenv" already exists in /usr/bin.  Overwrite it? (y/n)
[n]: y
   Copying oraenv to /usr/bin ...
The file "coraenv" already exists in /usr/bin.  Overwrite it? (y/n)
[n]: y
   Copying coraenv to /usr/bin ...

Entries will be added to the /etc/oratab file as needed by
Database Configuration Assistant when a database is created
Finished running generic part of root.sh script.
Now product-specific root actions will be performed.
Finished product-specific root actions.
[root@collabn1 ~]# ssh collabn2
root@collabn2's password: racattack
Last login: Tue Apr 15 19:34:33 2008 from 192.168.78.1

[root@collabn2 ~]# /u01/app/oracle/product/11.2.0/db_1/root.sh
Running Oracle 11g root.sh script...

The following environment variables are set as:
    ORACLE_OWNER= oracle
    ORACLE_HOME=  /u01/app/oracle/product/11.2.0/db_1

Enter the full pathname of the local bin directory: [/usr/local/bin]: /usr/bin
The file "dbhome" already exists in /usr/bin.  Overwrite it? (y/n)
[n]: y
   Copying dbhome to /usr/bin ...
The file "oraenv" already exists in /usr/bin.  Overwrite it? (y/n)
[n]: y
   Copying oraenv to /usr/bin ...
The file "coraenv" already exists in /usr/bin.  Overwrite it? (y/n)
[n]: y
   Copying coraenv to /usr/bin ...

Entries will be added to the /etc/oratab file as needed by
Database Configuration Assistant when a database is created
Finished running generic part of root.sh script.
Now product-specific root actions will be performed.
Finished product-specific root actions.
-
After running both scripts, return to the installer window and click OK to finish the installation. You should now see the final screen! Click CLOSE to exit the installer.


Create Database
editCreate DB
edit- ASM Databases Only: Login to a terminal as the oracle user. Use the oenv macro to set your environment for the SID +ASM1. Then, type asmca to launch ASMCA. collabn1:/home/oracle[RAC1]$ oenv SIDs here are: grid +ASM1 ORACLE_SID = [RAC1] ? +ASM1 The Oracle base for ORACLE_HOME=/u01/grid/oracle/product/11.2.0/grid_1 is /u01/app/oracle collabn1:/home/oracle[+ASM1]$ asmca
-
ASM Databases Only: Verify that both diskgroups are mounted. If you have jumpstarted or rebooted, then the BACKUP diskgroup may be dismounted. To mount it, right click then choose Mount on All Nodes. Click EXIT to close the ASM Configuration Assistant.

-
Type ". oraenv" to set up the environment. Leave the default SID and enter /u01/app/oracle/product/11.2.0/db_1 for the ORACLE_HOME. Then type dbca to launch the Database Configuration Assistant.

-
At the first prompt, choose Real Application Clusters Database and click NEXT.

-
Choose to CREATE A DATABASE then click NEXT to continue.

-
Select GENERAL PURPOSE OR TRANSACTION PROCESSING then click NEXT to continue.

-
Choose Admin-Managed Database, Set the global database name to RAC.vm.ardentperf.com and select all cluster nodes. Then click NEXT to continue.

-
Do not configure Enterprise Manager (there's probably not enough memory here). Uncheck it and click the Automatic Maintenance Tasks tab.

-
Disable the automatic maintenance tasks (they can really tax the CPU on your laptop...) After unchecking the box, click NEXT to continue.

-
Set all passwords to racattack and click NEXT to continue. Choose YES to continue even though Oracle doesn't like the password.

-
Choose a Storage Type depending on which track of the RAC Attack lab you're doing.
Oracle ASM Shared Filesystem Choose a Storage Type of Automatic Storage Management (ASM).

Choose a Storage Type of Cluster File System.
-
Configure Oracle Managed Files.
Oracle ASM Shared Filesystem Choose ORACLE MANAGED FILES and type +DATA for the database area. Then click NEXT to continue.

Choose ORACLE MANAGED FILES and type /u51/oradata for the database area. Then click NEXT to continue.

-
Configure a Flash Recovery Area.
Oracle ASM Shared Filesystem Choose to SPECIFY FLASH RECOVERY AREA and type +BACKUP as the destination. Increase the size to 3000 MBytes. Do not enable archiving and choose NEXT to continue.

Choose to SPECIFY FLASH RECOVERY AREA and type /u52/oradata as the destination. Increase the size to 3000 MBytes. Do not enable archiving and choose NEXT to continue.
 Oracle will automatically create a directory tree in the specified location and it will separate files by type and by database.
 -
Choose to install the sample schemas. After checking the box, click NEXT to continue.

-
Bump the memory target up to 400MB and do not check Automatic Memory Management. Skip the other tabs and click NEXT to continue.
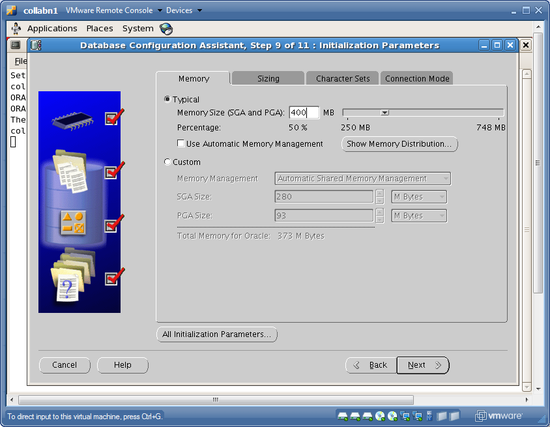
-
Accept the default storage settings and click NEXT to continue.

-
Go ahead and generate scripts (in the default location), but leave Create Database option checked. the Click FINISH to begin database creation.

-
Review the summary, then click OK to continue.
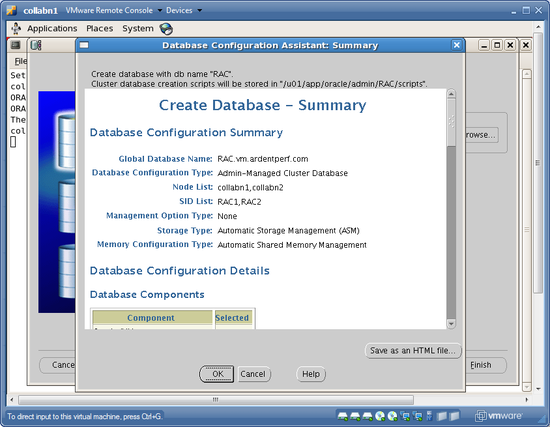
-
DBCA will inform you after it generates the scripts. Click OK to continue with database creation.
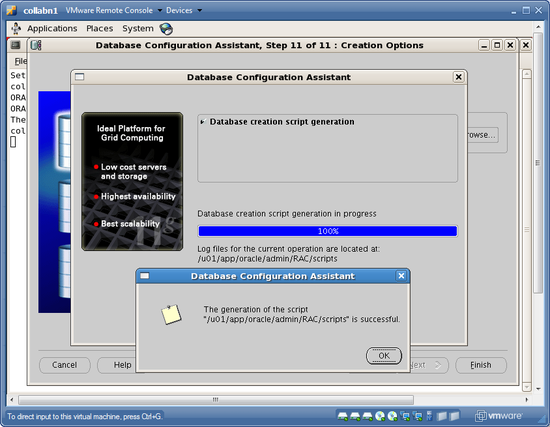

-
When database creation is complete a summary window will appear. Click EXIT to close the installer.


- One last thing: edit /etc/oratab on both nodes and replace the DB name with the Instance name. Also edit the bash_profile on node 2 and set the instance name to RAC2. [oracle@collabn1 ~]$ vi /etc/oratab RAC1:/u01/app/oracle/product/11.1.0/db_1:N [oracle@collabn1 ~]$ ssh collabn2 [oracle@collabn2 ~]$ vi /etc/oratab RAC2:/u01/app/oracle/product/11.1.0/db_1:N [oracle@collabn2 ~]$ vi /home/oracle/.bash_profile export ORACLE_SID=RAC2


Rolling Patches
editPatching Grid and Database Software
editPatching Overview
edit
- Upgrades to the "base version" are very complicated and always use the full Oracle installer (runInstaller). Major new features are only introduced in new base versions.
- Patch Sets are also installed with the full Oracle installer. Historically, each patchset was installed on top of the base version (top row in the illustration) by using runInstaller. However, starting with 11.2.0.2 the patch sets can be installed as a new installation without the base version. It is now recommended to perform Patch Set upgrades "out-of-place" in this manner. Sometimes new features are also included with Patch Sets (for example RAT data collection).
- PSUs are installed with opatch. They include security updates and important bug fixes. They are released quarterly and always include the latest CPU.
- CPUs are installed with opatch. CPUs include only security updates, and are also released quarterly. They cannot be applied after you have applied any PSU. (Until you upgrade to a new patch set or base version.)
Support Status and Known Issues
editBefore performing any installation or upgrade of Oracle, you should always check the Support Status and Known Issues for the release. Metalink note 161818.1 is always the starting point – open this note and review it. Next, follow the link for 11.2.0.X to metalink note 880782.1 and review that note. Finally, follow the link to note 880707.1 and review the known issues with Oracle 11.2.0.1 which is the version we will be using for this lab.
These notes have been saved as HTML files on the virtual DVD provided by the instructor. It is available in your Virtual RAC Nodes at /mnt/cdrom5. |
Practice Rolling Application
editFor this lab, the instructor has provided recent PSUs. PSUs and CPUs are collections of one-off patches. One-off patches can only be applied to an Oracle database in a rolling manner if they have been certified for rolling upgrades.
-
Review the installation instructions. We're going to install three patches and you can find the README files at these locations:
- /mnt/cdrom5/patch/psu6-db-12419378/12419378/README.html
- /mnt/cdrom5/patch/psu2-gi-9655006/README.html
- /mnt/cdrom5/patch/opatch-6880880/README.txt
- First we need to update the OPatch utility. Find patch 6880880 on the instructor-provided CDROM and unzip it directly into both the grid home and the database home. Before unzipping the file, backup the existing OPatch programs. $ oenv SIDs here are: grid +ASM1 RAC1 ORACLE_SID = [RAC1] ? grid $ cd $ORACLE_HOME $ tar czvf ~/gi-opatch-backup_$(date +%Y-%m-%d).tgz OPatch/ ... $ unzip -o /mnt/cdrom*/patch/opatch-6880880/p6880880_112000_LINUX.zip ... $ OPatch/opatch version Invoking OPatch 11.2.0.1.5 OPatch Version: 11.2.0.1.5 OPatch succeeded. $ oenv SIDs here are: grid +ASM1 RAC1 ORACLE_SID = [grid] ? RAC1 $ cd $ORACLE_HOME $ mv OPatch OPatch.backup $ unzip /mnt/cdrom*/patch/opatch-6880880/p6880880_112000_LINUX.zip ... $ OPatch/opatch version Invoking OPatch 11.2.0.1.5 OPatch Version: 11.2.0.1.5 OPatch succeeded.
- Repeat the previous step on node collabn2. $ ssh collabn2 ... repeat previous step ... $ exit
- This new version of OPatch requires an "OCM response file" for certain operations. Use the OCM utility to generate this file. We don't want to configure OCM; leave your username blank and confirm that "YES" you don't want to enter any account information. $ $ORACLE_HOME/OPatch/ocm/bin/emocmrsp -output /home/oracle/ocm.rsp OCM Installation Response Generator 10.3.4.0.0 - Production Copyright (c) 2005, 2010, Oracle and/or its affiliates. All rights reserved. Provide your email address to be informed of security issues, install and initiate Oracle Configuration Manager. Easier for you if you use your My Oracle Support Email address/User Name. Visit http://www.oracle.com/support/policies.html for details. Email address/User Name: <enter> You have not provided an email address for notification of security issues. Do you wish to remain uninformed of security issues ([Y]es, [N]o) [N]: Y The OCM configuration response file (/home/oracle/ocm.rsp) was successfully created.
- Find the Grid Infrastructure and Database PSUs on the instructor-provided DVD. $ cd /mnt/cdrom5/patch $ ls opatch-6880880 psu2-gi-9655006 psu6-db-12419378
- We know that these PSUs can be applied in a rolling manner, but verify this. $ for D in psu*/[0-9]*; do echo -n $D: cd $D $ORACLE_HOME/OPatch/opatch query -is_rolling_patch | grep rolling cd ../.. done psu2-gi-9655006/9654983: Patch is a rolling patch: true psu2-gi-9655006/9655006: Patch is a rolling patch: true psu6-db-12419378/12419378: Patch is a rolling patch: true
- We also know that there won't be any patch conflicts (since these are the first patches we're installing) – but verify this too. $ oenv ORACLE_SID = [RAC1] ? grid [grid]$ cd psu2-gi-9655006 psu2-gi-9655006[grid]$ $ORACLE_HOME/OPatch/opatch prereq CheckConflictAgainstOHWithDetail -phBaseDir ./9655006 ... Invoking prereq "checkconflictagainstohwithdetail" Prereq "checkConflictAgainstOHWithDetail" passed. [grid]$ oenv ORACLE_SID = [RAC1] ? RAC1 [RAC1]$ cd ../psu6-db-12419378/ psu6-db-12419378[RAC1]$ $ORACLE_HOME/OPatch/opatch prereq CheckConflictAgainstOHWithDetail -phBaseDir ./12419378 ... Invoking prereq "checkconflictagainstohwithdetail" Prereq "checkConflictAgainstOHWithDetail" passed.
-
The automated patch application process will automatically shutdown and restart all database processes on the node. However, we don't want the automatic restart – because we are applying two PSUs (one for grid and one for database). Disable the instance auto-start for node collabn1 and manually shutdown the instance for patch application.
On a production system, all active connections would need to be migrated to the other instance before doing this (for example, with services).
collabn1$ srvctl disable instance -d rac -i RAC1
collabn1$ srvctl stop instance -d rac -i RAC1
-
We will use automated patch application to apply the grid infrastructure PSU. First use oenv to enter the grid environment, then switch to the root user and run opatch auto.
- Note: any database processes on this node will be automatically shutdown during patching.
- When prompted for the OCM response file path, enter /home/oracle/ocm.rsp and press enter.
- When prompted about the grid home being shared, type yes to continue.
Make sure to specify the grid home on the command line so that the patch doesn't find the database home and apply itself there in addition.$ oenv SIDs here are: grid +ASM1 RAC1 ORACLE_SID = [RAC1] ? grid The Oracle base for ORACLE_HOME=/u01/grid/oracle/product/11.2.0/grid_1 is /u01/app/oracle [grid]$ cd /mnt/cdrom5/patch/psu2-gi-9655006 psu2-gi-9655006[grid]$ su Password: racattack psu2-gi-9655006# $ORACLE_HOME/OPatch/opatch auto . -oh $ORACLE_HOME Executing /usr/bin/perl /u01/grid/oracle/product/11.2.0/grid_1/OPatch/crs/patch112.pl -patchdir . -patchn . -oh /u01/grid/oracle/product/11.2.0/grid_1 -paramfile /u01/grid/oracle/product/11.2.0/grid_1/crs/install/crsconfig_params opatch auto log file location is /u01/grid/oracle/product/11.2.0/grid_1/OPatch/crs/../../cfgtoollogs/opatchauto2011-04-01_22-44-08.log Detected Oracle Clusterware install Using configuration parameter file: /u01/grid/oracle/product/11.2.0/grid_1/crs/install/crsconfig_params OPatch is bundled with OCM, Enter the absolute OCM response file path: /home/oracle/ocm.rsp Can't change permissions of ./.: Read-only file system Unable to determine if /u01/grid/oracle/product/11.2.0/grid_1 is shared oracle home Enter 'yes' if this is not a shared home or if the prerequiste actions are performed to patch this shared home (yes/no): yes Successfully unlock /u01/grid/oracle/product/11.2.0/grid_1 patch ././9655006 apply successful for home /u01/grid/oracle/product/11.2.0/grid_1 patch ././9654983 apply successful for home /u01/grid/oracle/product/11.2.0/grid_1 ACFS-9300: ADVM/ACFS distribution files found. ACFS-9312: Existing ADVM/ACFS installation detected. ACFS-9314: Removing previous ADVM/ACFS installation. ACFS-9315: Previous ADVM/ACFS components successfully removed. ACFS-9307: Installing requested ADVM/ACFS software. ACFS-9308: Loading installed ADVM/ACFS drivers. ACFS-9321: Creating udev for ADVM/ACFS. ACFS-9323: Creating module dependencies - this may take some time. ACFS-9327: Verifying ADVM/ACFS devices. ACFS-9309: ADVM/ACFS installation correctness verified. CRS-4123: Oracle High Availability Services has been started.
-
Return to the oracle user and find the Database PSU on the instructor-provided DVD. Use oenv to enter the database environment, then run opatch apply.
- Run OPatch in local mode so that it does not attempt an automatic rolling install across the entire cluster.
- When prompted about OCM, leave your username blank and confirm with "y" that you don't want to enter any account information.
- When prompted whether the local home is ready for patching, type "y" to continue.
-
Enable and start the Oracle database instance on node collabn1. After the instance is running, stop and disable the instance on node collabn2. There should be no point at which the database is not running.
$ srvctl enable instance -d rac -i RAC1
$ srvctl start instance -d rac -i RAC1
On a production system, all active connections would need to be migrated to the other instance at this point (for example, with services).
$ srvctl disable instance -d rac -i RAC2
$ srvctl stop instance -d rac -i RAC2
-
Use automated patch application to apply the grid infrastructure PSU to collabn2.
- Note: any database processes on this node will be automatically shutdown during patching.
- Copy the OCM response file (/home/oracle/ocm.rsp) to collabn2.
- When prompted about the grid home being shared, type yes to continue.
Make sure to specify the grid home on the command line so that the patch doesn't find the database home and apply itself there in addition.$ scp /home/oracle/ocm.rsp collabn2:/home/oracle/ $ ssh collabn2 $ oenv SIDs here are: grid +ASM2 RAC2 ORACLE_SID = [RAC2] ? grid The Oracle base for ORACLE_HOME=/u01/grid/oracle/product/11.2.0/grid_1 is /u01/app/oracle [grid]$ cd /mnt/cdrom5/patch/psu2-gi-9655006 psu2-gi-9655006[grid]$ su Password: racattack psu2-gi-9655006# $ORACLE_HOME/OPatch/opatch auto . -oh $ORACLE_HOME Executing /usr/bin/perl /u01/grid/oracle/product/11.2.0/grid_1/OPatch/crs/patch112.pl -patchdir . -patchn . -oh /u01/grid/oracle/product/11.2.0/grid_1 -paramfile /u01/grid/oracle/product/11.2.0/grid_1/crs/install/crsconfig_params opatch auto log file location is /u01/grid/oracle/product/11.2.0/grid_1/OPatch/crs/../../cfgtoollogs/opatchauto2011-04-02_16-42-52.log Detected Oracle Clusterware install Using configuration parameter file: /u01/grid/oracle/product/11.2.0/grid_1/crs/install/crsconfig_params OPatch is bundled with OCM, Enter the absolute OCM response file path: /home/oracle/ocm.rsp Can't change permissions of ./.: Read-only file system Unable to determine if /u01/grid/oracle/product/11.2.0/grid_1 is shared oracle home Enter 'yes' if this is not a shared home or if the prerequiste actions are performed to patch this shared home (yes/no): yes Successfully unlock /u01/grid/oracle/product/11.2.0/grid_1 patch ././9655006 apply successful for home /u01/grid/oracle/product/11.2.0/grid_1 patch ././9654983 apply successful for home /u01/grid/oracle/product/11.2.0/grid_1 ACFS-9300: ADVM/ACFS distribution files found. ACFS-9312: Existing ADVM/ACFS installation detected. ACFS-9314: Removing previous ADVM/ACFS installation. ACFS-9315: Previous ADVM/ACFS components successfully removed. ACFS-9307: Installing requested ADVM/ACFS software. ACFS-9308: Loading installed ADVM/ACFS drivers. ACFS-9321: Creating udev for ADVM/ACFS. ACFS-9323: Creating module dependencies - this may take some time. ACFS-9327: Verifying ADVM/ACFS devices. ACFS-9309: ADVM/ACFS installation correctness verified. CRS-4123: Oracle High Availability Services has been started.
-
Return to the oracle user and find the Database PSU on the instructor-provided DVD. Use oenv to enter the database environment, then run opatch apply.
- Run OPatch in local mode so that it does not attempt an automatic rolling install across the entire cluster.
- When prompted about OCM, leave your username blank and confirm with "y" that you don't want to enter any account information.
- When prompted whether the local home is ready for patching, type "y" to continue.
- Enable and restart the Oracle database instance on node collabn2. $ srvctl enable instance -d rac -i RAC2 $ srvctl start instance -d rac -i RAC2 $ srvctl status database -d rac Instance RAC1 is running on node collabn1 Instance RAC2 is running on node collabn2
- Run the catbundle.sql script. $ ss SQL> @?/rdbms/admin/catbundle.sql psu apply $ less /u01/app/oracle/product/11.2.0/db_1/cfgtoollogs/catbundle/ catbundle_PSU_RAC_APPLY_2011Apr02_17_28_19.log
- Optional: if you want more practice working with patches, then try rolling back the database PSU and then try applying it in automated rolling mode (without local flag) or in the “minimum downtime” mode.
Clusterware Testing
editClusterware and Fencing
editThe goal of this lab is to demonstrate Oracle Clusterware’s fencing ability by forcing a configuration that will trigger Oracle Clusterware’s built-in fencing features. With Oracle Clusterware, fencing is handled at the node level by rebooting the non-responsive or failed node. This is similar to the as Shoot The Other Machine In The Head (STOMITH) algorithm, but it’s really a suicide instead of affecting the other machine. There are many good sources for more information online.
- Start with a normal, running cluster with the database instances up and running.
- Monitor the logfiles for clusterware on each node. On each node, start a new window and run the following command: [oracle@<node_name> ~]$ tail –f \ > /u01/grid/oracle/product/11.2.0/grid_1/log/`hostname -s`/crsd/crsd.log [oracle@<node_name> ~]$ tail –f \ > /u01/grid/oracle/product/11.2.0/grid_1/log/`hostname -s`/cssd/ocssd.log
-
We will simulate “unplugging” the network interface by taking one of the private network interfaces down. On the collabn2 node, take the private network interface down by running the following command (as the root user):
[root@collabn2 ~]# ifconfig eth1 down
Alternatively, you can also simulate this by physically taking the HostOnly network adapter offline in VMware.


-
Following this command, watch the logfiles you began monitoring in step 2 above. You should see errors in those logfiles and eventually (could take a minute or two, literally) you will observe one node reboot itself.
If you used ifconfig to trigger a failure, then the node will rejoin the cluster and the instance should start automatically.
If you used VMware to trigger a failure then the node will not rejoin the cluster.
- Which file has the error messages that indicate why the node is not rejoining the cluster?
- Is the node that reboots always the same as the node with the failure? Why or why not?


Clusterware Callouts
editThe goal of this lab is to demonstrate Oracle Fast Application Notification (FAN) Callouts. In versions prior to 11g, these were also known as Oracle Clusterware Callouts.
This feature is a relatively little-known capability for Oracle Clusterware to fire a script (or a whole directory full of them) to perform whatever tasks you may want performed when a cluster-wide event happens.
For more information, consult the documentation here: http://download.oracle.com/docs/cd/B28359_01/rac.111/b28254/hafeats.htm#BABGCEBF
For this exercise, we’ll configure some FAN callout scripts on each node and then trigger various cluster events to see how each one triggers the callout script.
- Start with a normal, running cluster with both nodes up and running.
-
From a shell prompt (logged in as oracle) on each server, navigate to /u01/grid/oracle/product/11.2.0/grid_1/racg/usrco. Create file there called callout1.sh using vi (or your favorite editor). The contents of the file should be this:
#!/bin/ksh
umask 022
FAN_LOGFILE=/tmp/`hostname`_uptime.log
echo $* "reported="`date` >> $FAN_LOGFILE &
Note the use of backticks around the hostname and date commands.
- Make sure that the permissions on the file are set to 755 using the following command: [oracle@<node_name> ~]$ chmod 755 \ > /u01/grid/oracle/product/11.2.0/grid_1/racg/usrcocallout1.sh
- Monitor the logfiles for clusterware on each node. On each node, start a new window and run the following command: [oracle@<node_name> ~]$ tail –f \ /u01/grid/oracle/product/11.2.0/grid_1/log/`hostname -s`/crsd/crsd.log
- Next, we need to trigger an event that will cause the callout to fire. One such event is node shutdown. Shutdown the clusterware on node collabn2. [root@collabn2 ~]# crsctl stop crs Stopping resources. This could take several minutes. Successfully stopped Oracle Clusterware resources Stopping Cluster Synchronization Services. Shutting down the Cluster Synchronization Services daemon. Shutdown request successfully issued.
-
Following this command, watch the logfiles you began monitoring in step 2 above. Because we set long timeouts on our test cluster, you might have to wait for a few minutes before you see anything.
- You should eventually observe entries noting that the node has failed and shortly following that, you should observe an entry placed in the /tmp/<hostname>_uptime.log file indicating that the node is down.
- Note which members run the clusterware callout script. (A surviving member could run commands to notify clients and/or application servers that one of the cluster nodes has died.)
- Restart the clusterware. Is there a node up event? [root@collabn2 bin]# crsctl start crs
- Try powering off one of the virtual machines – is there an difference from the previous test? What if you disable a linux network interface or VMware network card?
- You may conduct more testing, if you wish. Another interesting event is a database instance going down unexpectedly. Come back to this lab after installing a database to test that situation. [oracle@collabn2 ~]$ sqlplus "/ as sysdba" SQL*Plus: Release 11.1.0.6.0 - Production on Fri Aug 1 14:49:29 2008 Copyright (c) 1982, 2007, Oracle. All rights reserved. Connected to: Oracle Database 11g Enterprise Edition Release 11.1.0.6.0 - Production With the Partitioning, Real Application Clusters, OLAP, Data Mining and Real Application Testing options SQL> shutdown abort; ORACLE instance shut down. SQL> INSTANCE VERSION=1.0 service=RAC.vm.ardentperf.com database=RAC instance=RAC2 host=collabn2 status=down reason=user timestamp=01-Aug-2008 12:34:02 reported=Fri Aug 1 12:34:03 CDT 2008
One popular use for clusterware callouts is to notify administrators (possibly via email) that a cluster event has occurred. You may use the arguments to the script (you’ll see the arguments in the logfile we’ve created) to conditionally perform notification as well. For example, you may not want to notify anyone unless a node crashes unexpectedly. By testing some of these arguments, you may be able to send notifications only when desired. |
Services, Failover and Load Balancing
editInstall Instant Client
editIn order to test failover it would be best to connect from a client outside the cluster, so we'll start by downloading and installing Oracle's Basic Instant Client (English-only) and the Instant Client SQLPlus package.
- Login to the node collabn1 as user oracle and open a connection to the database as SYSDBA and unlock the SH user account. Also grant DBA access. SQL> alter user sh identified by sh account unlock; User altered. SQL> grant dba to sh; Grant succeeded.
-
Download Oracle's Basic (English-only) Instant Client and Oracle's Instant Client SQLPlus package. The lab instructor may have made them available, or they can also be downloaded from Oracle's website here:
http://www.oracle.com/technetwork/topics/winsoft-085727.html
The two files you need are:
- instantclient-basiclite-*.zip
- instantclient-sqlplus-*.zip
-
Each archive contains a folder named "instantclient_11_2". Extract this folder (from both archives) into C:\. (In Explorer you can drag-and-drop or you can choose "Extract All" from the File menu.)

-
Edit c:\windows\system32\drivers\etc\hosts and add IP addresses for the RAC nodes.
Your database connections won't work without this - you can't just create a tnsnames that uses IP addresses. Try it out by doing step 4 a few times in a row before this step. Does step 4 sometimes just hang? Do you know why? We'll explore it more later...
192.168.78.250	collab-scan.vm.ardentperf.com collab-scan
192.168.78.61	collabn1-vip.vm.ardentperf.com collabn1-vip
192.168.78.62	collabn2-vip.vm.ardentperf.com collabn2-vip
192.168.78.51	collabn1.vm.ardentperf.com collabn1
192.168.78.52	collabn2.vm.ardentperf.com collabn2

-
Test your Instant Client installation by connecting to the database.
C:\instantclient_11_2> sqlplus sh/sh@//collab-scan/RAC.vm.ardentperf.com
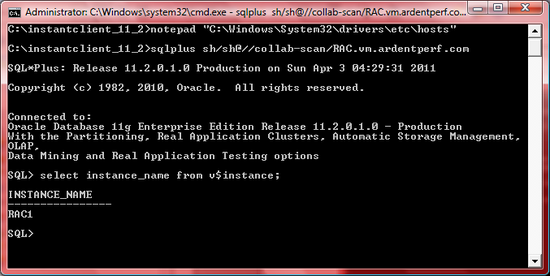
- Create a TNSNAMES files and copy the RAC, RAC1 and RAC2 entries from either cluster database node. C:\instantclient_11_2> notepad C:\instantclient_11_2\tnsnames.ora RAC = (DESCRIPTION = (ADDRESS = (PROTOCOL = TCP)(HOST = collab-scan)(PORT = 1521)) (CONNECT_DATA = (SERVER = DEDICATED) (SERVICE_NAME = RAC.vm.ardentperf.com) ) ) RAC2 = (DESCRIPTION = (ADDRESS = (PROTOCOL = TCP)(HOST = collabn-scan)(PORT = 1521)) (CONNECT_DATA = (SERVER = DEDICATED) (SERVICE_NAME = RAC.vm.ardentperf.com) (INSTANCE_NAME = RAC2) ) ) RAC1 = (DESCRIPTION = (ADDRESS = (PROTOCOL = TCP)(HOST = collabn-scan)(PORT = 1521)) (CONNECT_DATA = (SERVER = DEDICATED) (SERVICE_NAME = RAC.vm.ardentperf.com) (INSTANCE_NAME = RAC1) ) )
-
Test your TNSNAMES by setting the TNS_ADMIN environment variable and running SQLPLUS.
C:\instantclient_11_2>set TNS_ADMIN=c:\instantclient_11_2
C:\instantclient_11_2>sqlplus sh/sh@RAC


Service Failover
edit- Login to collabn1 as the oracle user. Create a new service svctest with RAC1 as a preferred instance and RAC2 as an available instance. This means that it will normally run on the RAC1 instance but will failover to the RAC2 instance if RAC1 becomes unavailable. collabn1:/home/oracle[RAC1]$ srvctl add service -d RAC -s svctest -r RAC1 -a RAC2 -P BASIC collabn1:/home/oracle[RAC1]$ srvctl start service -d RAC -s svctest
-
Examine where the service is running by checking lsnrctl on both nodes and looking at the SERVICE_NAMES init parameter on both nodes.
You should never directly change the SERVICE_NAMES init parameter on a RAC database!! This parameter is maintained automatically by the clusterware.
collabn1:/home/oracle[RAC1]$ srvctl status service -d RAC -s svctest
Service svctest is running on instance(s) RAC1

collabn1:/home/oracle[RAC1]$ lsnrctl services
Service "svctest.vm.ardentperf.com" has 1 instance(s).
  Instance "RAC1", status READY, has 2 handler(s) for this service...
    Handler(s):
      "DEDICATED" established:0 refused:0 state:ready
         REMOTE SERVER
         (ADDRESS=(PROTOCOL=TCP)(HOST=collabn1.vm.ardentperf.com)(PORT=1521))
      "DEDICATED" established:0 refused:0 state:ready
         LOCAL SERVER

collabn1:/home/oracle[RAC1]$ ssh collabn2
Last login: Sun Aug  3 13:13:16 2008 from collabn1
The Oracle base for ORACLE_HOME=/u01/app/oracle/product/11.2.0/db_1 is /u01/app/oracle
Set environment by typing 'oenv' - default is instance RAC1.
collabn2:/home/oracle[RAC2]$ lsnrctl services

collabn2:/home/oracle[RAC2]$ lsnrctl services
Service "svctest.vm.ardentperf.com" has 1 instance(s).
  Instance "RAC1", status READY, has 1 handler(s) for this service...
    Handler(s):
      "DEDICATED" established:0 refused:0 state:ready
         REMOTE SERVER
         (ADDRESS=(PROTOCOL=TCP)(HOST=collabn1.vm.ardentperf.com)(PORT=1521))

SQL> col value format a60
SQL> select inst_id, value from gv$parameter where NAME='service_names';

   INST_ID VALUE
---------- ------------------------------------------------------------
         1 svctest, RAC.vm.ardentperf.com
         2 RAC.vm.ardentperf.com
- Use SHUTDOWN ABORT to kill the instance where service svctest is running. SQL> show user USER is "SYS" SQL> select instance_name from v$instance; INSTANCE_NAME ---------------- RAC1 SQL> shutdown abort; ORACLE instance shut down. SQL>
- Wait a few moments and then repeat step 2. What has happened? collabn1:/home/oracle[RAC1]$ srvctl status service -d RAC -s svctest
-
Restart the instance that you killed.
This does not initiate any instance recovery at all. Do you know why?
collabn1:/home/oracle[RAC1]$ srvctl status database -d RAC
Instance RAC1 is not running on node collabn1
Instance RAC2 is running on node collabn2
collabn1:/home/oracle[RAC1]$ srvctl start instance -d RAC -i RAC1
collabn1:/home/oracle[RAC1]$ srvctl status database -d RAC
Instance RAC1 is running on node collabn1
Instance RAC2 is running on node collabn2
collabn1:/home/oracle[RAC1]$
- Repeat step 2. Where is the service running now? collabn1:/home/oracle[RAC1]$ srvctl status service -d RAC -s svctest
- Manually failover the service. Confirm where it is now running. Note that this does not disconnect any current sessions collabn1:/home/oracle[RAC1]$ srvctl relocate service -d RAC -s svctest -i RAC2 -t RAC1 collabn1:/home/oracle[RAC1]$ srvctl status service -d RAC -s svctest
Connection Failover
editIMPORTANT NOTE: This lab was written for Oracle 11gR1 and the information here is crucial when working with this and older versions. It will demonstrate how failover works and the importance of using proper addresses in TNSNAMES. However, starting with 11gR2 the node VIPs should not be used to connect to the database – the SCAN VIP should always be used instead. The 11gR2 client has this same failover functionality built-in for multiple SCAN VIPs returned on a single DNS entry.
- On your local computer edit the TNSNAMES.ORA file used by the Instance Client. Add two entries called CFTEST and CFTEST-NOVIP which connect to the RAC service with no load balancing. Explicitly enable connection failover even though it is already enabled by default anyway. Don't use the VIP's for the second entry (this is wrong but we'll test it to see what happens). C:\instantclient_11_2> notepad c:\instantclient_11_2\tnsnames.ora CFTEST = (DESCRIPTION = (ADDRESS = (PROTOCOL = TCP)(HOST = collabn1-vip)(PORT = 1521)) (ADDRESS = (PROTOCOL = TCP)(HOST = collabn2-vip)(PORT = 1521)) (LOAD_BALANCE = no) (FAILOVER = yes) (CONNECT_DATA = (SERVER = DEDICATED) (SERVICE_NAME = RAC.vm.ardentperf.com) ) ) CFTEST-NOVIP = (DESCRIPTION = (ADDRESS = (PROTOCOL = TCP)(HOST = collabn1)(PORT = 1521)) (ADDRESS = (PROTOCOL = TCP)(HOST = collabn2)(PORT = 1521)) (LOAD_BALANCE = no) (FAILOVER = yes) (CONNECT_DATA = (SERVER = DEDICATED) (SERVICE_NAME = RAC.vm.ardentperf.com) ) )
- On collabn1 check the number of established connections from the listener to the RAC service. Connect from Windows to CFTEST and CFTEST-NOVIP several times and then check the lsnrctl statistics again. All connections from the Windows machine are attaching to listener on collabn1 but this listener is spreading the connections between both instances. First look at the number of established connections on node 1. It's ok if they're not all zero. collabn1:/home/oracle[RAC1]$ lsnrctl services Service "RAC.vm.ardentperf.com" has 2 instance(s). Instance "RAC1", status READY, has 2 handler(s) for this service... Handler(s): "DEDICATED" 'established:0' refused:0 state:ready LOCAL SERVER "DEDICATED" 'established:0' refused:0 state:ready REMOTE SERVER (ADDRESS=(PROTOCOL=TCP)(HOST=collabn1.vm.ardentperf.com)(PORT=1521)) Instance "RAC2", status READY, has 1 handler(s) for this service... Handler(s): "DEDICATED" established:0 refused:0 state:ready REMOTE SERVER (ADDRESS=(PROTOCOL=TCP)(HOST=collabn2.vm.ardentperf.com)(PORT=1521)) Second, connect to the database several times in a row and use both service names. You can exit each session after you check how long it takes to connect. All of the sessions should connect quickly. Count the number of times you connect. C:\instantclient_11_2> sqlplus sh/sh@CFTEST C:\instantclient_11_2> sqlplus sh/sh@CFTEST C:\instantclient_11_2> sqlplus sh/sh@CFTEST-NOVIP C:\instantclient_11_2> sqlplus sh/sh@CFTEST-NOVIP C:\instantclient_11_2> sqlplus sh/sh@CFTEST C:\instantclient_11_2> sqlplus sh/sh@CFTEST-NOVIP Third, check the listener connections on node 1 again. Make sure that the total number of established connections shows an increase by at least the same number of sessions that you connected. (That is, confirm that all of your sessions connected to this node.) There might be more connections; that's ok. Also, notice how the listener is distributing connections to both instances - even though our client is only connecting to the listener on one node. It doesn't matter how many connections go to each instance; it's ok of you don't see 3 and 3. collabn1:/home/oracle[RAC1]$ lsnrctl services Service "RAC.vm.ardentperf.com" has 2 instance(s). Instance "RAC1", status READY, has 2 handler(s) for this service... Handler(s): "DEDICATED" 'established:3' refused:0 state:ready LOCAL SERVER "DEDICATED" 'established:0' refused:0 state:ready REMOTE SERVER (ADDRESS=(PROTOCOL=TCP)(HOST=collabn1.vm.ardentperf.com)(PORT=1521)) Instance "RAC2", status READY, has 1 handler(s) for this service... Handler(s): "DEDICATED" established:3 refused:0 state:ready REMOTE SERVER (ADDRESS=(PROTOCOL=TCP)(HOST=collabn2.vm.ardentperf.com)(PORT=1521))
-
In the VMware Console, make sure that you have opened the node collabn1 which you are connecting to from Windows. Simulate a complete node failure by choosing Power Off from the Virtual Machine menu.

-
Wait about a minute (so that the cluster can detect the failed node). Then, from Windows, connect to the CFTEST and CFTEST-VIP services again. What happens when you use the NOVIP connection?
C:\instantclient_11_2> sqlplus sh/sh@CFTEST
C:\instantclient_11_2> sqlplus sh/sh@CFTEST
C:\instantclient_11_2> sqlplus sh/sh@CFTEST-NOVIP
C:\instantclient_11_2> sqlplus sh/sh@CFTEST-NOVIP
C:\instantclient_11_2> sqlplus sh/sh@CFTEST
C:\instantclient_11_2> sqlplus sh/sh@CFTEST-NOVIP
The purpose of this lab is to demonstrate why you should always use VIP connections!

Runtime Failover
edit-
Power on collabn1 from the VMware Console. After it has started, login as the oracle user and failback the svctest service which we created earlier in this lab.

[root@collabn1 ~]# srvctl status database -d RAC
Instance RAC1 is running on node collabn1
Instance RAC2 is running on node collabn2

collabn1:/home/oracle[RAC1]$ srvctl status service -d RAC -s svctest
Service svctest is running on instance(s) RAC2

collabn1:/home/oracle[RAC1]$ srvctl relocate service -d RAC -s svctest -i RAC2 -t RAC1

collabn1:/home/oracle[RAC1]$ srvctl status service -d RAC -s svctest
Service svctest is running on instance(s) RAC1
- On your local computer edit the TNSNAMES.ORA file used by the Instance Client. Add a new entry called SVCTEST which connects to the svctest service and make sure that the connection works. Also check your TAF settings after connecting. (Side note: we did not configure this service with a domain name, but you can't connect to it unless you specify one in the TNSNAMES entry. Try it. Where did this domain name come from?) C:\instantclient_11_2> notepad c:\instantclient_11_2\tnsnames.ora SVCTEST = (DESCRIPTION = (ADDRESS = (PROTOCOL = TCP)(HOST = collab-scan)(PORT = 1521)) (LOAD_BALANCE = yes) (CONNECT_DATA = (SERVER = DEDICATED) (SERVICE_NAME = svctest.vm.ardentperf.com) ) ) SVCTEST-NOVIP = (DESCRIPTION = (ADDRESS = (PROTOCOL = TCP)(HOST = collabn1)(PORT = 1521)) (ADDRESS = (PROTOCOL = TCP)(HOST = collabn2)(PORT = 1521)) (LOAD_BALANCE = yes) (CONNECT_DATA = (SERVER = DEDICATED) (SERVICE_NAME = svctest.vm.ardentperf.com) ) ) C:\instantclient_11_2> sqlplus sh/sh@svctest SQL> select instance_name from v$instance; INSTANCE_NAME ---------------- RAC1 SQL> col service_name format a20 SQL> col username format a10 SQL> select username, service_name, failover_method, failover_type 2 from v$session where sid=(select max(sid) from v$mystat); USERNAME SERVICE_NAME FAILOVER_M FAILOVER_TYPE ---------- -------------------- ---------- ------------- SH svctest NONE NONE
- From your Windows SQLPlus session, update the server-side TAF (Transparent Application Failover) settings for the svctest service. begin dbms_service.modify_service( service_name=>'svctest', failover_type=>dbms_service.failover_type_select, failover_method=>dbms_service.failover_method_basic, failover_delay=>5, failover_retries=>60 ); end; / PL/SQL procedure successfully completed.
- Reconnect and check your session's TAF settings again. SQL> exit Disconnected from Oracle Database 11g Enterprise Edition Release 11.1.0.6.0 - Production With the Partitioning, Real Application Clusters, OLAP, Data Mining and Real Application Testing options C:\instantclient_11_2> sqlplus sh/sh@svctest SQL> select instance_name from v$instance; INSTANCE_NAME ---------------- RAC1 SQL> col service_name format a20 SQL> col username format a10 SQL> select username, service_name, failover_method, failover_type 2 from v$session where sid=(select max(sid) from v$mystat); USERNAME SERVICE_NAME FAILOVER_M FAILOVER_TYPE ---------- -------------------- ---------- ------------- SH svctest BASIC SELECT
- Simultaneously open a second sqlplus session connected to the NOVIP service. C:\> cd \instantclient_11_2 C:\instantclient_11_2> set TNS_ADMIN=c:\instantclient_11_2 C:\instantclient_11_2> sqlplus sh/sh@svctest-novip SQL> select instance_name from v$instance; INSTANCE_NAME ---------------- RAC1 SQL> col service_name format a20 SQL> col username format a10 SQL> select username, service_name, failover_method, failover_type 2 from v$session where sid=(select max(sid) from v$mystat); USERNAME SERVICE_NAME FAILOVER_M FAILOVER_TYPE ---------- -------------------- ---------- ------------- SH svctest BASIC SELECT
- Start a long-running query in both queries. While the query is running, Power Down the node that they are connected to. What happens to each session? select c.cust_last_name, p.prod_name, s.quantity_sold from products p, sales s, customers c where p.prod_id = s.prod_id and c.cust_id = s.cust_id;

Client Load Balancing
editNote: This lab was written for 11.1 and does not show the same behavior in 11.2 - it needs to be updated!
--
-
Power on both nodes from the VMware Console.
[root@collabn1 ~]# srvctl status database -d RAC
Instance RAC1 is running on node collabn1
Instance RAC2 is running on node collabn2
- Open a SQLPlus session on the database and confirm that there are no sessions for the SH user. SQL> select inst_id, count(*) from gv$session where username='SH' group by inst_id; no rows selected
- Disable server-side load balancing on both instances by clearing the REMOTE_LISTENER init param and re-registering. Before registering with the listeners, restart them to reset the connection statistics. SQL> alter system set remote_listener=''; System altered. collabn1:/home/oracle[RAC1]$ lsnrctl stop collabn1:/home/oracle[RAC1]$ lsnrctl start SQL> -- instance RAC1 SQL> alter system register; System altered. collabn1:/home/oracle[RAC1]$ lsnrctl services Service "RAC.vm.ardentperf.com" has 1 instance(s). Instance "RAC1", status READY, has 1 handler(s) for this service... Handler(s): "DEDICATED" established:0 refused:0 state:ready LOCAL SERVER collabn2:/home/oracle[RAC2]$ lsnrctl stop collabn2:/home/oracle[RAC2]$ lsnrctl start SQL> -- instance RAC2 SQL> alter system register; System altered. collabn2:/home/oracle[RAC2]$ lsnrctl services Service "RAC.vm.ardentperf.com" has 1 instance(s). Instance "RAC2", status READY, has 1 handler(s) for this service... Handler(s): "DEDICATED" established:0 refused:0 state:ready LOCAL SERVER
-
In your other connected SQLPlus session, keep an eye on the balance of connections. At the same time, open a new shell session and run this script which will open 160 connections to the database.
a=160; while [ $a -gt 0 ]; do
sqlplus sh/sh@RAC &
a=$((a-1))
done
How were the connections distributed between the database instances during client-side load balancing?
Note: In 11.2 these connections are load balanced across the SCAN listeners instead of the RAC nodes.
- Terminate all of the sqlplus sessions by running these two commands. After you run the second command, press <Ctrl-C> after you start seeing the message "no more job". killall sqlplus while true; do fg; done <Ctrl-C>
Server Load Balancing
edit- Open a SQLPlus session on the database and confirm that there are no sessions for the SH user. SQL> select inst_id, count(*) from gv$session where username='SH' group by inst_id; no rows selected If there are any sessions, you can kill them with the output of this SQL: select 'alter system disconnect session '''|| sid||','||serial#||''' immediate;' from v$session where username='SH';
- Re-enable server-side load balancing on both instances by setting the REMOTE_LISTENER init parameter back to its default (collab-scan:1521) and re-registering. Before registering with the listeners, restart them to reset the connection statistics. SQL> alter system set remote_listener='collab-scan:1521'; System altered. collabn1:/home/oracle[RAC1]$ lsnrctl stop collabn1:/home/oracle[RAC1]$ lsnrctl start collabn2:/home/oracle[RAC2]$ lsnrctl stop collabn2:/home/oracle[RAC2]$ lsnrctl start Why is it true that you only need to run the "alter system" command once, but you need to run the lsnrctl command on both nodes? SQL> -- instance RAC1 SQL> alter system register; System altered. collabn1:/home/oracle[RAC1]$ lsnrctl services Service "RAC.vm.ardentperf.com" has 1 instance(s). Instance "RAC1", status READY, has 2 handler(s) for this service... Handler(s): "DEDICATED" established:0 refused:0 state:ready REMOTE SERVER (ADDRESS=(PROTOCOL=TCP)(HOST=collabn1.vm.ardentperf.com)(PORT=1521)) "DEDICATED" established:0 refused:0 state:ready LOCAL SERVER Instance "RAC2", status READY, has 1 handler(s) for this service... Handler(s): "DEDICATED" established:0 refused:0 state:ready REMOTE SERVER (ADDRESS=(PROTOCOL=TCP)(HOST=collabn2.vm.ardentperf.com)(PORT=1521))
- Edit the TNSNAMES.ORA file on the server you're connected to. Add an entry called LBTEST that connects to the RAC service - but only uses one listener. [root@collabn1 ~]# vi $ORACLE_HOME/network/admin/tnsnames.ora LBTEST = (DESCRIPTION = (ADDRESS = (PROTOCOL = TCP)(HOST = collab-scan)(PORT = 1521)) (LOAD_BALANCE = no) (CONNECT_DATA = (SERVER = DEDICATED) (SERVICE_NAME = RAC.vm.ardentperf.com) ) )
- In your other connected SQLPlus session, keep an eye on the balance of connections. At the same time, open a new shell session and run this script which will open 160 connections to the database - but this time it will use the LBTEST connection. a=160; while [ $a -gt 0 ]; do sqlplus sh/sh@LBTEST & a=$((a-1)) done How were the connections distributed between the database instances during server-side load balancing?
- Terminate all of the sqlplus sessions by running these two commands. After you run the second command, press <Ctrl-C> after you start seeing the message "no more job". killall sqlplus while true; do fg; done <Ctrl-C>
RAC SQL and PLSQL
editInstall Runstats
edit- Connect to the database as SYSDBA.
- First, install the DBMS_LOCK package by running ?/rdbms/admin/dbmslock.sql SQL> @?/rdbms/admin/dbmslock.sql Package created. Synonym created. Grant succeeded.
- Tom Kyte’s runstats package is available from http://asktom.oracle.com/pls/apex/ASKTOM.download_file?p_file=6551378329289980701. First, create the run_stats global temporary table: create global temporary table run_stats ( runid varchar2(15), name varchar2(80), value int ) on commit preserve rows;
- Next, create the stats view. create or replace view stats as select 'STAT...' || a.name name, b.value from v$statname a, v$mystat b where a.statistic# = b.statistic# union all select 'LATCH.' || name, gets from v$latch union all select 'STAT...Elapsed Time', hsecs from v$timer;
- Finally, create the runstats package itself: create or replace package runstats_pkg as procedure rs_start; procedure rs_middle; procedure rs_stop( p_difference_threshold in number default 0 ); end; / create or replace package body runstats_pkg as g_start number; g_run1 number; g_run2 number; procedure rs_start is begin delete from run_stats; insert into run_stats select 'before', stats.* from stats; g_start := dbms_utility.get_time; end; procedure rs_middle is begin g_run1 := (dbms_utility.get_time-g_start); insert into run_stats select 'after 1', stats.* from stats; g_start := dbms_utility.get_time; end; procedure rs_stop(p_difference_threshold in number default 0) is begin g_run2 := (dbms_utility.get_time-g_start); dbms_output.put_line ( 'Run1 ran in ' || g_run1 || ' hsecs' ); dbms_output.put_line ( 'Run2 ran in ' || g_run2 || ' hsecs' ); dbms_output.put_line ( 'run 1 ran in ' || round(g_run1/g_run2*100,2) || '% of the time' ); dbms_output.put_line( chr(9) ); insert into run_stats select 'after 2', stats.* from stats; dbms_output.put_line ( rpad( 'Name', 30 ) || lpad( 'Run1', 12 ) || lpad( 'Run2', 12 ) || lpad( 'Diff', 12 ) ); for x in ( select rpad( a.name, 30 ) || to_char( b.value-a.value, '999,999,999' ) || to_char( c.value-b.value, '999,999,999' ) || to_char( ( (c.value-b.value)-(b.value-a.value)), '999,999,999' ) data from run_stats a, run_stats b, run_stats c where a.name = b.name and b.name = c.name and a.runid = 'before' and b.runid = 'after 1' and c.runid = 'after 2' -- and (c.value-a.value) > 0 and abs( (c.value-b.value) - (b.value-a.value) ) > p_difference_threshold order by abs( (c.value-b.value)-(b.value-a.value)) ) loop dbms_output.put_line( x.data ); end loop; dbms_output.put_line( chr(9) ); dbms_output.put_line ( 'Run1 latches total versus runs -- difference and pct' ); dbms_output.put_line ( lpad( 'Run1', 12 ) || lpad( 'Run2', 12 ) || lpad( 'Diff', 12 ) || lpad( 'Pct', 10 ) ); for x in ( select to_char( run1, '999,999,999' ) || to_char( run2, '999,999,999' ) || to_char( diff, '999,999,999' ) || to_char( round( run1/run2*100,2 ), '99,999.99' ) || '%' data from ( select sum(b.value-a.value) run1, sum(c.value-b.value) run2, sum( (c.value-b.value)-(b.value-a.value)) diff from run_stats a, run_stats b, run_stats c where a.name = b.name and b.name = c.name and a.runid = 'before' and b.runid = 'after 1' and c.runid = 'after 2' and a.name like 'LATCH%' ) ) loop dbms_output.put_line( x.data ); end loop; end; end; /
Sequence Test
editThe first test we will perform is a sequence test. Sequential fields often become points of contention in cluster database systems.
- First, open a connection to the database as SYSDBA on both nodes.
- Setup a table and several sequence types for comparison. Also enable serveroutput. create table SEQTEST (seqid varchar2(30), highval number); insert into SEQTEST values ('MYTABLE', 1); commit; create sequence SEQTEST_O_NC ORDER NOCACHE; create sequence SEQTEST_O_C ORDER CACHE 100; create sequence SEQTEST_NO_NC NOORDER NOCACHE; create sequence SEQTEST_NO_C NOORDER CACHE 100; set serveroutput on;
- On node collabn1 measure the differences between various methods. Run this two or three times to warm up the machines. (Note: subtract 500 from the runtimes reported (in hsecs) to account for time in DBMS_LOCK.SLEEP.) exec runstats_pkg.rs_start; DECLARE myval number; BEGIN FOR counter IN 1..10 LOOP select highval into myval from SEQTEST where seqid='MYTABLE' for update; update SEQTEST set highval=highval+1 where seqid='MYTABLE'; dbms_lock.sleep(0.5); commit; END LOOP; END; / exec runstats_pkg.rs_middle; DECLARE myval number; BEGIN FOR counter IN 1..10 LOOP myval := SEQTEST_O_C.NEXTVAL; dbms_lock.sleep(0.5); commit; END LOOP; END; / exec runstats_pkg.rs_stop;
- On the other node - collabn2 - start an anonymous PL/SQL block that retrieves a value every half second. DECLARE myval number; BEGIN LOOP select highval into myval from SEQTEST where seqid='MYTABLE' for update; update SEQTEST set highval=highval+1 where seqid='MYTABLE'; select SEQTEST_O_NC.NEXTVAL into myval from dual; select SEQTEST_O_C.NEXTVAL into myval from dual; select SEQTEST_NO_NC.NEXTVAL into myval from dual; select SEQTEST_NO_C.NEXTVAL into myval from dual; dbms_lock.sleep(0.5); commit; END LOOP; END; /
- Repeat step 3 on node collabn1. See how the results are different as soon as cluster contention is introduced.
- Perform more tests, comparing different types of sequences. What conclusions can you draw about sequences? Does caching matter for ORDER sequences? exec runstats_pkg.rs_start; DECLARE myval number; BEGIN FOR counter IN 1..10 LOOP myval := SEQTEST_O_NC.NEXTVAL; dbms_lock.sleep(0.5); commit; END LOOP; END; / exec runstats_pkg.rs_middle; DECLARE myval number; BEGIN FOR counter IN 1..10 LOOP myval := SEQTEST_O_C.NEXTVAL; dbms_lock.sleep(0.5); commit; END LOOP; END; / exec runstats_pkg.rs_stop;
Parallel Query Test
edit- Login to the node collabn1 and open a connection to the database as SYSDBA and unlock the SH user account. Also grant it DBA access. SQL> alter user sh identified by sh account unlock; User altered. SQL> grant dba to sh; Grant succeeded.
- Reconnect to the database as the sh user with the RAC1 service name. Check your SID and the service you're connected to. SQL> connect sh/sh@RAC1 Connected. SQL> select sid from v$mystat where rownum=1; SID ---------- 145 SQL> col sid format 9999 SQL> col username format a10 SQL> col program format a40 SQL> col service_name format a20 SQL> set linesize 100 SQL> select sid, username, program, service_name from v$session where username='SH'; SID USERNAME PROGRAM SERVICE_NAME ----- ---------- ---------------------------------------- -------------- 145 SH sqlplus@collabn1.vm.ardentperf.com (TNS RAC.vm.ardent
- Enable tracing and run a parallel query on the SH schema. Look for the trace files to determine where the slaves ran. Which nodes to the slaves run on? exec dbms_session.set_identifier('racpx01'); alter session set tracefile_identifier = 'racpx01'; exec dbms_monitor.client_id_trace_enable(client_id=>'racpx01'); select /*+parallel*/ p.prod_name, sum(s.amount_sold) from products p, sales s where p.prod_id = s.prod_id group by p.prod_name; exec dbms_monitor.client_id_trace_disable(client_id=>'racpx01'); SQL> col value format a60 SQL> select inst_id, value from gv$parameter where name='user_dump_dest'; INST_ID VALUE ---------- ------------------------------------------------------------ 1 /u01/app/oracle/diag/rdbms/rac/RAC1/trace 2 /u01/app/oracle/diag/rdbms/rac/RAC2/trace SQL> host ssh collabn1 ls -sh /u01/app/oracle/diag/rdbms/rac/RAC1/trace/*racpx01.trc SQL> host ssh collabn2 ls -sh /u01/app/oracle/diag/rdbms/rac/RAC2/trace/*racpx01.trc
- Create a new service which only runs on node 2 and repeat the test (from collabn1). Which nodes to the slaves run on now? How is this different from Oracle 10g? collabn1:/home/oracle[RAC1]$ srvctl add service -d RAC -s pxtest -r RAC2 -a RAC1 collabn1:/home/oracle[RAC1]$ srvctl start service -d RAC -s pxtest collabn1:/home/oracle[RAC1]$ lsnrctl services Services Summary... Service "pxtest.vm.ardentperf.com" has 1 instance(s). Instance "RAC2", status READY, has 1 handler(s) for this service... Handler(s): "DEDICATED" established:0 refused:0 state:ready REMOTE SERVER (ADDRESS=(PROTOCOL=TCP)(HOST=collabn2.vm.ardentperf.com)(PORT=1521)) collabn1:/home/oracle[RAC1]$ vi $ORACLE_HOME/network/admin/tnsnames.ora PXTEST = (DESCRIPTION = (ADDRESS = (PROTOCOL = TCP)(HOST = collabn1-vip)(PORT = 1521)) (ADDRESS = (PROTOCOL = TCP)(HOST = collabn2-vip)(PORT = 1521)) (LOAD_BALANCE = yes) (CONNECT_DATA = (SERVER = DEDICATED) (SERVICE_NAME = PXTEST.vm.ardentperf.com) ) ) collabn1:/home/oracle[RAC1]$ sqlplus sh/sh@pxtest SQL> col sid format 9999 SQL> col username format a10 SQL> col program format a40 SQL> col service_name format a20 SQL> select sid, username, program, service_name from v$session where username='SH'; SID USERNAME PROGRAM SERVICE_NAME ----- ---------- ---------------------------------------- -------------- 124 SH sqlplus@collabn1.vm.ardentperf.com (TNS V1-V3) pxtest exec dbms_session.set_identifier('racpx05'); alter session set tracefile_identifier = 'racpx05'; exec dbms_monitor.client_id_trace_enable(client_id=>'racpx05'); select /*+parallel*/ p.prod_name, sum(s.amount_sold) from products p, sales s where p.prod_id = s.prod_id group by p.prod_name; exec dbms_monitor.client_id_trace_disable(client_id=>'racpx05'); host ssh collabn1 ls -sh /u01/app/oracle/diag/rdbms/rac/RAC1/trace/*racpx05.trc host ssh collabn2 ls -sh /u01/app/oracle/diag/rdbms/rac/RAC2/trace/*racpx05.trc
Scheduler Test
editIn RAC, PL/SQL can execute on either node - and this must be taken into account when processes are architected. We will take a brief look at this property through two simple tests.
First we'll have a look at the scheduler. Note that this lab relies on the PXTEST service created in the Parallel Query Test.
- Login to the node collabn1 as oracle and confirm that the pxtest service is running on instance RAC2. collabn1:/home/oracle[RAC1]$ srvctl status service -d RAC -s pxtest Service pxtest is running on instance(s) RAC2 collabn1:/home/oracle[RAC1]$
- Shutdown the service. collabn1:/home/oracle[RAC1]$ srvctl stop service -d RAC -s pxtest collabn1:/home/oracle[RAC1]$
- Login to the RAC1 service as sh and create a job class and a PL/SQL procedure that we can execute from the job. Note that the service name is case sensitive! collabn1:/home/oracle[RAC1]$ sqlplus sh/sh@RAC1 exec dbms_scheduler.create_job_class('TESTOFF1',service=>'pxtest'); create or replace procedure traceme(id varchar2) as x number; begin execute immediate 'alter session set tracefile_identifier=||id||'; dbms_session.session_trace_enable(true,true); select count(*) into x from sh.customers; dbms_session.session_trace_disable(); end; /
- Schedule the job to run immediately with the job class that's tied to the PXTEST service. Check to see if it ran. Query the user_schedule_jobs table a few times in a row. Did anything happen? select job_name, schedule_type, job_class, enabled, auto_drop, state from user_scheduler_jobs; begin dbms_scheduler.create_job('TESTJOB1','PLSQL_BLOCK', job_action=>'traceme(scheduler01);', job_class=>'TESTOFF1',enabled=>true); end; / select job_name, schedule_type, job_class, enabled, auto_drop, state from user_scheduler_jobs;
- Startup the PXTEST service and check the status of the job again. Make sure to query the user_schedule_jobs table a few times in a row. (Be patient for at least one minute.) Did the job execute? If so, then on which node? host srvctl start service -d RAC -s pxtest select job_name, schedule_type, job_class, enabled, auto_drop, state from user_scheduler_jobs; host ssh collabn2 ls -sh /u01/app/oracle/diag/rdbms/rac/RAC2/trace/*scheduler01.trc host ssh collabn1 ls -sh /u01/app/oracle/diag/rdbms/rac/RAC1/trace/*scheduler01.trc
- Modify the PXTEST service to run on both nodes and stop it. SQL> host srvctl modify service -d RAC -s pxtest -n -i RAC1,RAC2 SQL> host srvctl stop service -d RAC -s pxtest
- Submit 20 jobs to run the program and then enable the service. (This way all of the jobs should get scheduled nearly concurrently.) On which node(s) did they execute? begin FOR i IN 10..29 LOOP dbms_scheduler.create_job('TESTJOB'||i,'PLSQL_BLOCK', job_action=>'traceme(scheduler'||i||');', job_class=>'TESTOFF1',enabled=>true); END LOOP; end; / select job_name, schedule_type, job_class, enabled, auto_drop, state from user_scheduler_jobs; SQL> host srvctl start service -d RAC -s pxtest select job_name, schedule_type, job_class, enabled, auto_drop, state from user_scheduler_jobs; host ssh collabn2 ls -sh /u01/app/oracle/diag/rdbms/rac/RAC2/trace/*scheduler*.trc host ssh collabn1 ls -sh /u01/app/oracle/diag/rdbms/rac/RAC1/trace/*scheduler*.trc
File Test
editOur second PL/SQL test will look at the UTL_FILE package. With any PL/SQL operations on RAC you must be aware that the code could execute on any node where its service lives. This could also impact packages like DBMS_PIPE, UTL_MAIL, UTL_HTTP (proxy server source IP rules for example), or even DBMS_RLS (refreshing policies).
- Login to RAC1 as sh and create a file that we can try reading later. collabn1:/home/oracle[RAC1]$ sqlplus sh/sh@RAC1 create directory orahome as '/home/oracle'; declare fl utl_file.file_type; begin fl := utl_file.fopen('ORAHOME','data.txt','w'); utl_file.put_line(fl, 'Some sample data for an oracle test.', TRUE); utl_file.fclose(fl); end; /
- Exit SQLPLUS. At the prompt, copy this command to connect to the RAC service as sh again and attempt to read the file you just wrote. Run this command 10-20 times in a row. (Cut-and-paste is recommended.) What happens? Why? sqlplus -S sh/sh@RAC <<EOF declare fl utl_file.file_type; data varchar2(1024); begin fl := utl_file.fopen('ORAHOME','data.txt','r'); utl_file.get_line(fl, data); utl_file.fclose(fl); end; / exit; EOF
RAC Backups and Recovery
editSetup Backups
editDuring this lab we will intentionally misconfigure the cluster database backups and make some common mistakes with local, non-shared storage.
- Login to a terminal on collabn1 as the user oracle.
-
On collabn1 create a directory /u01/app/oradata and try to configure it as the Flash Recovery Area (FRA) through the init param db_recovery_file_dest. The operation will fail.
collabn1:/home/oracle[RAC1]$ mkdir /u01/app/oradata
collabn1:/home/oracle[RAC1]$ ss
SQL*Plus: Release 11.1.0.6.0 - Production on Mon May 4 07:39:57 2009
SQL> show parameter recovery_file
NAME TYPE VALUE
------------------------------- ----------- ------------------------------
db_recovery_file_dest string +FRA
db_recovery_file_dest_size big integer 4000M
SQL> alter system set db_recovery_file_dest='/u01/app/oradata';
alter system set db_recovery_file_dest='/u01/app/oradata'
*
ERROR at line 1:
ORA-32008: error while processing parameter update at instance RAC2
ORA-02097: parameter cannot be modified because specified value is invalid
ORA-01261: Parameter db_recovery_file_dest destination string cannot be
translated
ORA-01262: Stat failed on a file destination directory
Linux Error: 2: No such file or director
The error occurred on the remote node, but was reported here. It was also recorded on the remote node – do you know where it is recorded? What kind of monitoring would need to be in place to be proactively alerted by messages like this?
- Now create the directory on the remote node and re-run the operation. This should succeed but it is still a poor configuration; we will investigate the reasons later in this lab. SQL> host ssh collabn2 mkdir /u01/app/oradata SQL> alter system set db_recovery_file_dest='/u01/app/oradata'; System altered.
-
Shutdown the database across the cluster. Then mount it on collabn1 and put the database into archivelog mode. No archivelog destination is assigned – where will the archivelogs go and why?
You do not need to disable the cluster_database init param for this.
collabn1:/home/oracle[RAC1]$ srvctl stop database -d RAC
collabn1:/home/oracle[RAC1]$ srvctl status database -d RAC
Instance RAC1 is not running on node collabn1
Instance RAC2 is not running on node collabn2

collabn1:/home/oracle[RAC1]$ ss
SQL*Plus: Release 11.1.0.6.0 - Production on Mon May 4 09:08:01 2009

SQL> startup mount

SQL> alter database archivelog;
Database altered.

SQL> alter database open;

collabn1:/home/oracle[RAC1]$ srvctl start database -d RAC
Flashback Database
edit- Before opening the database, enable flashback database. SQL> alter database flashback on; Database altered. SQL> alter database open; Database altered. SQL> select flashback_on from v$database; FLASHBACK_ON ------------------ YES SQL> select oldest_flashback_scn,flashback_size from v$flashback_database_log; OLDEST_FLASHBACK_SCN FLASHBACK_SIZE -------------------- -------------- 610425 8192000
- Now, login to collabn2 and startup the database from sqlplus. You will get an error message. collabn2:/home/oracle[RAC2]$ ss SQL*Plus: Release 11.1.0.6.0 - Production on Mon May 4 09:21:25 2009 SQL> startup ORACLE instance started. Total System Global Area 318054400 bytes Fixed Size 1299624 bytes Variable Size 142609240 bytes Database Buffers 167772160 bytes Redo Buffers 6373376 bytes Database mounted. ORA-38760: This database instance failed to turn on flashback database SQL> select flashback_on from v$database; FLASHBACK_ON ------------------ YES SQL> select oldest_flashback_scn,flashback_size from v$flashback_database_log; OLDEST_FLASHBACK_SCN FLASHBACK_SIZE -------------------- -------------- 0 16384000
- Interestingly, the database seems to be running alright. Investigate the alert log for error messages. collabn2:/home/oracle[RAC2]$ cdd collabn2:/u01/app/oracle/diag[RAC2]$ cd rdbms/rac/RAC2/trace/ collabn2:/u01/app/oracle/diag/rdbms/rac/RAC2/trace[RAC2]$ less alert_RAC2.log Mon May 04 09:22:07 2009 Errors in file /u01/app/oracle/diag/rdbms/rac/RAC2/trace/RAC2_ora_22856.trc: ORA-38701: Flashback database log 1 seq 1 thread 1: "/u01/app/oradata/RAC/flashb ack/o1_mf_4zxxs99n_.flb" ORA-27037: unable to obtain file status Linux Error: 2: No such file or directory Additional information: 3
-
Investigate the alert log on collabn1 – do any error messages appear here? Do any other problems occur?
You might have to wait for a few minutes. Check the output of "srvctl status database -d RAC" too.
- Disable flashback database. You do not need to shutdown for the disable operation. SQL> alter database flashback off; Database altered.
Block Change Tracking
edit- Enable block change tracking on the database and explicitly choose the local FRA destination. (Typically the block change tracking file is created in the OMF DB destination rather than the FRA.) SQL> alter database enable block change tracking 2 using file '/u01/app/oradata/changetracking.ctf'; What happens? Make sure to check the alert logs. Try it with only one instance open, and then open the other instance to see what happens.
- Disable block change tracking. SQL> alter database disable block change tracking; SQL> col filename format a40 SQL> select * from v$block_change_tracking; STATUS FILENAME BYTES ---------- ---------------------------------------- ---------- DISABLED
Archived Logs
edit- Look at the sequence number of the two current logs. SQL> select thread#, sequence# from v$log where status='CURRENT'; THREAD# SEQUENCE# ---------- ---------- 1 6 2 3
- Execute “alter system switch logfile” and check the result. What happened? SQL> alter system switch logfile; System altered. SQL> select thread#, sequence# from v$log where status='CURRENT'; THREAD# SEQUENCE# ---------- ---------- 1 6 2 4
- Execute “alter system archive log current” and check the result. What happened now? SQL> alter system archive log current; System altered. SQL> select thread#, sequence# from v$log where status='CURRENT'; THREAD# SEQUENCE# ---------- ---------- 1 7 2 5
- Check where the archived logs are being stored by default. (Was this what you expected?) Explicitly assign them to the FRA and test to see if your changes took effect. SQL> col t format a5 SQL> col name format a70 SQL> select thread#||'.'||sequence# t, name from v$archived_log; T NAME ----- ---------------------------------------------------------------------- 1.6 /u01/app/oracle/product/11.1.0/db_1/dbs/arch1_6_685220246.dbf 1.6 /u01/app/oradata/RAC/archivelog/2009_05_04/o1_mf_1_6_4zy1wofw_.arc 2.4 /u01/app/oracle/product/11.1.0/db_1/dbs/arch2_4_685220246.dbf 2.4 /u01/app/oradata/RAC/archivelog/2009_05_04/o1_mf_2_4_4zy1wpn9_.arc SQL> alter system set log_archive_dest_1='LOCATION=USE_DB_RECOVERY_FILE_DEST'; System altered. SQL> alter system archive log current; System altered. SQL> select thread#||'.'||sequence# t, name from v$archived_log; T NAME ----- ---------------------------------------------------------------------- 2.5 /u01/app/oradata/RAC/archivelog/2009_05_04/o1_mf_2_5_4zy2xzv3_.arc 1.7 /u01/app/oradata/RAC/archivelog/2009_05_04/o1_mf_1_7_4zy2y1q6_.arc
- Take a backup of all the current archivelogs, using the default RMAN configuration. Why does it fail? collabn1:/home/oracle[RAC1]$ rman target / Recovery Manager: Release 11.1.0.6.0 - Production on Mon May 4 10:43:45 2009 connected to target database: RAC (DBID=2273202257) RMAN> backup archivelog all; Starting backup at 04-MAY-09 current log archived allocated channel: ORA_DISK_1 channel ORA_DISK_1: SID=113 instance=RAC1 device type=DISK archived log /u01/app/oradata/RAC/archivelog/2009_05_04/o1_mf_1_4_4zy03zdh_.arc not found or out of sync with catalog trying alternate file for archived log of thread 1 with sequence 4 RMAN-00571: =========================================================== RMAN-00569: =============== ERROR MESSAGE STACK FOLLOWS =============== RMAN-00571: =========================================================== RMAN-03002: failure of backup command at 05/04/2009 10:47:56 RMAN-06059: expected archived log not found, lost of archived log compromises recoverability ORA-19625: error identifying file /u01/app/oracle/product/11.1.0/db_1/dbs/arch1_4_685220246.dbf ORA-27037: unable to obtain file status Linux Error: 2: No such file or directory Additional information: 3
- Crosscheck the archived logs; most will fail. Then copy the files from the local FRA on collabn2 and crosscheck them again. RMAN> crosscheck archivelog all; RMAN> list archivelog all; List of Archived Log Copies for database with db_unique_name RAC ===================================================================== Key Thrd Seq S Low Time ------- ---- ------- - --------- 6 1 4 X 26-APR-09 Name: /u01/app/oradata/RAC/archivelog/2009_05_04/o1_mf_1_4_4zy03zdh_.arc RMAN> host 'scp -r collabn2:/u01/app/oradata/RAC/archivelog/* /u01/app/oradata/RAC/archivelog/'; o1_mf_1_5_4zy044nl_.arc 100% 1024 1.0KB/s 00:00 o1_mf_2_6_4zy3k2s0_.arc 100% 12KB 11.5KB/s 00:00 o1_mf_2_3_4zy1txkr_.arc 100% 13KB 12.5KB/s 00:01 o1_mf_1_4_4zy03zdh_.arc 100% 29MB 4.9MB/s 00:06 o1_mf_2_2_4zy1dksv_.arc 100% 1209KB 1.2MB/s 00:01 o1_mf_2_4_4zy1wpn9_.arc 100% 233KB 233.0KB/s 00:00 o1_mf_2_5_4zy2xzv3_.arc 100% 19KB 19.0KB/s 00:00 RMAN> crosscheck archivelog all; RMAN> list archivelog all; List of Archived Log Copies for database with db_unique_name RAC ===================================================================== Key Thrd Seq S Low Time ------- ---- ------- - --------- 6 1 4 A 26-APR-09 Name: /u01/app/oradata/RAC/archivelog/2009_05_04/o1_mf_1_4_4zy03zdh_.arc
Database Backups
editWe will configure backups to take full advantage of the cluster by running in parallel.
- Configure the RMAN default channels and parallelism. RMAN> configure device type disk parallelism 2 backup type to compressed backupset; RMAN> configure channel 1 device type disk connect 'sys/racattack@rac1'; RMAN> configure channel 2 device type disk connect 'sys/racattack@rac2'; RMAN> show all;
- Take a complete hot backup of the entire database. RMAN> backup database plus archivelog; Starting backup at 04-MAY-09 current log archived channel ORA_DISK_1: starting compressed archived log backup set channel ORA_DISK_2: starting compressed archived log backup set ... Finished backup at 04-MAY-09 Starting backup at 04-MAY-09 channel ORA_DISK_1: starting compressed full datafile backup set channel ORA_DISK_2: starting compressed full datafile backup set ... Finished backup at 04-MAY-09 Starting backup at 04-MAY-09 current log archived channel ORA_DISK_1: starting compressed archived log backup set channel ORA_DISK_2: starting compressed archived log backup set ... Finished backup at 04-MAY-09
-
Crosscheck the backup. What happens and why?
RMAN> list backupset summary;
Key TY LV S Device Type Completion Time #Pieces #Copies Compressed
------- -- -- - ----------- --------------- ------- ------- ----------
1 B A A DISK 04-MAY-09 1 1 YES
2 B A A DISK 04-MAY-09 1 1 YES
3 B A A DISK 04-MAY-09 1 1 YES
4 B A A DISK 04-MAY-09 1 1 YES
5 B F A DISK 04-MAY-09 1 1 YES
6 B F A DISK 04-MAY-09 1 1 YES
7 B F A DISK 04-MAY-09 1 1 YES
8 B F A DISK 04-MAY-09 1 1 YES
9 B A A DISK 04-MAY-09 1 1 YES
10 B A A DISK 04-MAY-09 1 1 YES
RMAN> allocate channel for maintenance device type disk;
released channel: ORA_DISK_1
released channel: ORA_DISK_2
allocated channel: ORA_MAINT_DISK_1
channel ORA_MAINT_DISK_1: SID=111 instance=RAC1 device type=DISK
RMAN> crosscheck backup;
RMAN> list backupset summary;
Try this again, without allocating the maintenance channel. What happens and why?
Database Recovery
editThis exercise depends on the completion of the previous exercises.
- Clear the RMAN channels and parallelism configuration. RMAN> configure channel 1 device type disk clear; RMAN> configure channel 2 device type disk clear; RMAN> configure device type disk parallelism 1; RMAN> show all;
- Preview a restore of the entire database. Why does it fail? How can you remediate this? RMAN> restore database preview; Starting restore at 04-MAY-09 allocated channel: ORA_DISK_1 channel ORA_DISK_1: SID=114 instance=RAC1 device type=DISK RMAN-00571: =========================================================== RMAN-00569: =============== ERROR MESSAGE STACK FOLLOWS =============== RMAN-00571: =========================================================== RMAN-03002: failure of restore command at 05/04/2009 11:44:53 RMAN-06026: some targets not found - aborting restore RMAN-06023: no backup or copy of datafile 5 found to restore RMAN-06023: no backup or copy of datafile 3 found to restore RMAN-06023: no backup or copy of datafile 2 found to restore
- Revert the FRA to the correct shared location, assigned during DB creation before lab 6. SQL> alter system set db_recovery_file_dest='+FRA'; System altered.
- Now, repeat the Database Backups exercise and this exercise with shared storage.
- ↑ "What is Antivirus?". antivirus.comodo.com. Retrieved 2016-04-29.