RAC Attack - Oracle Cluster Database at Home/Create Shared Disks
Prev: Linux Install
Create Cluster (e)
- Create Interconnect
- Create Shared Disks
- Copy VM
- Configure Disks
- Configure Node 1
- Configure Node 2
- SSH and CVU
Next: Grid Install (ASM or Shared Filesystem)
REPEAT STEPS 1-6 FOR BOTH OF THESE DEVICES:
| Virtual Device Node (Adapter/Device) | Size | Path (Datastore/Directory/Filename) |
|---|---|---|
| SCSI 1:0 | 3.25 GB | [RAC11g-shared] data.vmdk |
| SCSI 1:1 | 3.25 GB | [RAC11g-shared] backup.vmdk |
-
In the Inventory tab at the left, select collabn1 (the virtual machine we just created).

-
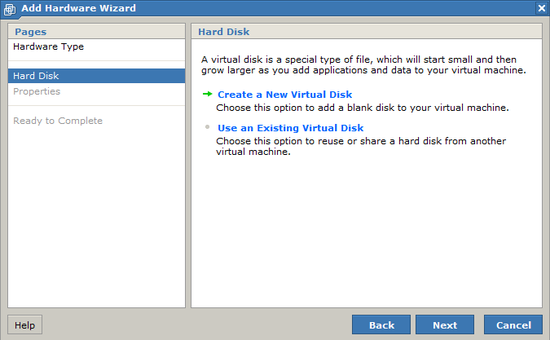
From the Commands box, click Add Hardware. In the window that appears, click Hard Disk.

-
Choose to Create a New Virtual Disk and click Next.

-
Enter a capacity of 3.25 GB and type the name “[RAC11g-shared] data.vmdk”.
- Choose File Options → Allocate all disk space now.
- Choose Disk Mode → Independent and Persistent.
- Choose Virtual Device Node → SCSI 1:0. Click Next to continue.

-
Click Finish to create the disk.

It may take a moment for the disk to appear to the VMware console. Wait until the new disk appears before you continue with the lab. Furthermore, the web browser may display an error which requires you to reload the page and login to VMware again. - Repeat steps 1-5 for the second disk (it is listed at the beginning of this lab).
-
CONFIRM that your list of hard disks and network devices matches this screenshot.

-
From the Commands box, click Configure VM.

-
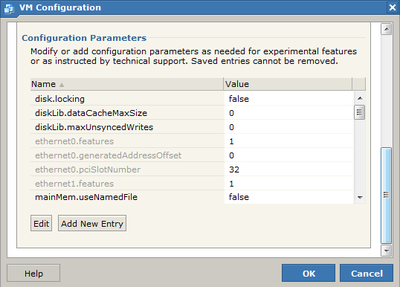
Click the Advanced tab and scroll down to the Configuration Parameters. Use the Add New Entry button to add the entries listed here. Click OK to save the configuration changes.
Name Value disk.locking false diskLib.dataCacheMaxSize 0 diskLib.maxUnsyncedWrites 0 mainMem.useNamedFile false 
I have found the following three websites among the most useful while creating custom VMware configurations. They show how powerful and versatile VMware is – even the free VMware Server product.http://sanbarrow.com/vmx/vmx-advanced.html
http://vmfaq.com/?View=entry&EntryID=25
http://sanbarrow.com/vmx/vmx-config-ini.html


