RAC Attack - Oracle Cluster Database at Home/Configure Node 2
Prev: Linux Install
Create Cluster (e)
- Create Interconnect
- Create Shared Disks
- Copy VM
- Configure Disks
- Configure Node 1
- Configure Node 2
- SSH and CVU
Next: Grid Install (ASM or Shared Filesystem)
-
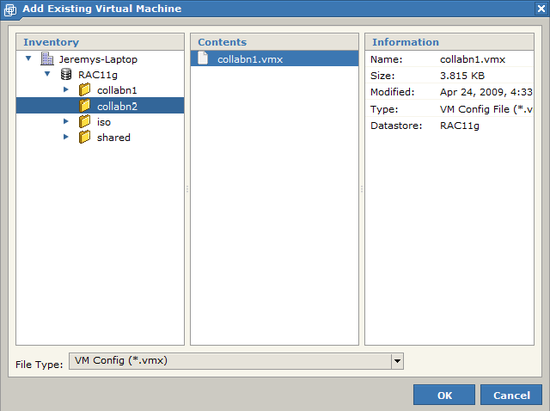
In the VMware console, go to the Virtual Machine menu and choose Add Virtual Machine to Inventory.

-
Browse to RAC11g/collabn2 and open collabn1.vmx. Make sure you browse to the right folder!
-
In the Inventory tab at the left, select the new VM – collabn2. Choose the Console tab and click the play button to start the VM.

-
The VMware console should ask you whether you copied or moved the VM. Answer that you copied the files and click OK.

-
When you see the square boxes, click anywhere to open a console window.

-
Login as the oracle user with the password racattack.

-
Open a terminal ( Applications >> Accessories >> Terminal ) and switch to the root user.
When you first open a console on collabn2, you will notice that the hostname still says collabn1. This is because we copied the machine; we will change the hostname shortly.

- CONFIRM that the IP address of eth1 starts with 172.16.100. [root@collabn1 ~]# ifconfig|grep net eth1 Link encap:Ethernet HWaddr 00:0C:29:C9:3E:C8 inet addr:172.16.100.129 Bcast:172.16.100.255 Mask:255.255.255.0 inet addr:127.0.0.1 Mask:255.0.0.0
- Update the IP addresses by directly editing the linux network configuration files. Update the BOOTPROTO line and add the remaining lines. COMMENT or DELETE the line which begins with HWADDR. [root@collabn1 ~]# cd /etc/sysconfig/network-scripts [root@collabn1 network-scripts]# gedit ifcfg-eth0 BOOTPROTO=none #HWADDR=... IPADDR=192.168.78.52 NETMASK=255.255.255.0 GATEWAY=192.168.78.2 [root@collabn1 network-scripts]# gedit ifcfg-eth1 BOOTPROTO=none #HWADDR=... IPADDR=172.16.100.52 NETMASK=255.255.255.0
- Update the DNS search domain [root@collabn1 network-scripts]# gedit /etc/resolv.conf search vm.ardentperf.com nameserver 192.168.78.2
- Update the HOSTNAME by editing the linux system configuration files. Set it to collabn2.vm.ardentperf.com. Then change the active system hostname with the hostname command. [root@collabn1 network-scripts]# gedit /etc/sysconfig/network HOSTNAME=collabn2.vm.ardentperf.com [root@collabn1 network-scripts]# hostname collabn2.vm.ardentperf.com
-
As root, restart the network services by typing service network restart. Then confirm the new ip addresses with ifconfig. Confirm that search domain by inspecting /etc/resolv.conf – if the file has reverted then edit it again. (The change stuck after the second time I edited the file while walking through this lab.) Also confirm the new hostname with hostname.
You must perform this step in VMware; do not use PuTTY.

- Exit your terminal session and start a new one so that you can see the updated hostname in the prompt.
- Edit /etc/hosts. EDIT the line with 127.0.0.1 and then ADD all of the other lines below: [root@collabn2 etc]# vi /etc/hosts 192.168.78.51 collabn1 collabn1.vm.ardentperf.com 192.168.78.61 collabn1-vip collabn1-vip.vm.ardentperf.com 172.16.100.51 collabn1-priv collabn1-priv.vm.ardentperf.com 192.168.78.52 collabn2 collabn2.vm.ardentperf.com 192.168.78.62 collabn2-vip collabn2-vip.vm.ardentperf.com 172.16.100.52 collabn2-priv collabn2-priv.vm.ardentperf.com 192.168.78.250 collab-scan collab-scan.vm.ardentperf.com 192.168.78.251 collab-gns collab-gns.vm.ardentperf.com 127.0.0.1 localhost.localdomain localhost ::1 localhost6.localdomain6 localhost6


