Visual Studio/Printable version
| This is the print version of Visual Studio You won't see this message or any elements not part of the book's content when you print or preview this page. |
The current, editable version of this book is available in Wikibooks, the open-content textbooks collection, at
https://en.wikibooks.org/wiki/Visual_Studio
Need and use
Integrated Development Environments (IDE) are often used for developing software applications. Their purpose is to provide a space where many of the different faculties a developer might need are available and work seamlessly together. Visual Studio is one of those IDEs.
Visual Studio is an IDE that runs on Windows. While there are many IDEs that function on Windows, Visual Studio has been popular over the years for a few different reasons:
- It's built for Windows and supports the latest tools.
- It has very powerful debugging tools to track down errors.
- It's free: the Community edition (available since 2015) has full feature-parity with the Professional edition; and it has 90% of the features of the Enterprise edition.
- It supports a wide variety of languages and suits for many use cases.
But it's not all glitter and gold:
- It consumes a lot of space. Depending on what you want, you may need anywhere from 5 GB to 80 GB!
- Being very powerful, its UI could be intimidating for new users. Such users may be better off downloading an older Express edition (more on that later)
- The Enterprise edition is very costly.
So assuming that you jump on the VS bandwagon, which edition do you get? It's actually easy; since the 2015 edition, VS has only three major editions:
- Community: The free version, this will likely meet the needs of the vast majority of today's developers. However, there is a catch; you cannot use this edition as part of a large company unless you are into open-source. Hobbyists and the wannabe developer shouldn't face any problems.
- Professional: It's just the Community version with the usage limitations removed.
- Enterprise: The most advanced version of VS, it includes virtually all features that a developer would ever need. Developers who buy this edition generally know what they are getting to.
Most of the Professional and Enterprise editions include MSDN. This's actually a big deal as it allows you to obtain many software licenses for free for development purposes. Check the Visual Studio website for more information.
For versions before 2013, the Community edition was precluded with the Express edition (from 2005). These editions are packaged per-language (before 2012) or per-usage (2012 and 2013; eg: Desktop, Store etc). However, unlike the Community edition, the Express editions are beset with significant feature limitations. However, they are also significantly easier to use, and you may prefer them when starting to the programming world.
The Premium version used to exist before the 2015 edition and was a cross-over between the Professional and Enterprise editions, but that is now discontinued.
So now that you want it, how do you get it? For the latest version, go to the Visual Studio website and download the installer you need. However, the 2017 installers onwards are highly customizable and hence deserving of its own section. We'll see this on the next section.
Installation
Installation of Visual Studio depend on the version you use. Previous versions of Visual Studio were typically easy to install, as they had few choices for the user to make. However, for Visual Studio versions from 2017 onwards, its component-based nature means that the user is suddenly faced with hundreds of options to choose what to install, as it isn't economical or even sensible to just install everything.
The wrapper
editWhen you download VS 2019 or VS 2017, you're greeted with a message which might make you think that it's already installing...

...while in reality it's just an installation wrapper which is now downloading the actual installer. Just wait.
While it might seem that the VS 2019 and VS 2017 installers are the same, they aren't. However, one can manage VS 2017 installations from the VS 2019 installer (but usually not the other way round).
The installer
editOnce the installer itself is installed, you'll be faced with this screen:
Basic workloads
edit
As you can see, Visual Studio has already selected a default list of options, which generally won't suffice for most. What workload you need depends on the type of development work you expect to do. For example, if you plan to make console C++ programs, you should select the Desktop development with C++ workload. The basic workload options are pretty self-explanatory.
But the default workload options may not be enough. For instance, you may want to develop programs for an old version of .NET Framework or want to include a specific debugging feature. That's where the Individual components options come into play:
Customizable options
edit
As you can see, there are a lot of options to choose from! While many of them would have already been selected, you may find that you need some more. Select all that you need. Remember to be judicious; selecting unnecessary options will waste space on your computer and potentially increase data charges.
You also have the option of changing the language in the next screen.
Installation
editVisual Studio will install the version you select on top of any existing versions and on top of the 2017/19 Preview (beta) version if you have already installed that. However, only the 2017 and 2019 versions supports co-existing install of a released and preview version; these are the only versions which also allow you to have multiple VS 2017/19 (i.e, similar) installations on the same OS. |
Once you are done with your options, just click Install. VS will download and install the components at the same time to save time, so you cannot simply disconnect the internet before the installation is complete (unlike VS 2010). If you want to download the required components before installing, you can either
- Select the option to download before installing (for VS 2017 onwards)
- Use the command line using the
/layoutswitch (see here on how to do this)
For VS 2017, the second option is very complicated and is not easy to configure. However, for VS 2015 and before, the second option is easy to use and you may wish to use this option if your internet connection is slow or unreliable.
During the very first installation of a Visual Studio product after VS 6, you are given the option to choose the location of the tools and the main IDE. While you shouldn't generally have to tinker with the default options (except when, for instance, you are installing VS into a secondary drive to save space), once you make your very first installation, you cannot change them later, even if you later uninstall the first Visual Studio product you installed.
For Visual Studio 2017/19, you can change the location where the installer downloads the files for installation, and you can also delete them after the installation is complete. However, this is not required; the installer uses these files if a reinstall is required.
Updates
editInstaller
edit
The VS 2017/19 installer will automatically check for updates on start-up, and will force you to update it if it detects that a newer version exists.
Program
editBefore Visual Studio 2017, updates need to be installed manually or through Windows Update.
From VS 2017 onwards, the installer will check for updates and will notify you if there is a newer version available. This is also the case in the program itself, and VS 2019 may download any updates in the background and then prompt you that it is ready for installation. However, (especially if the update is minor, and with a reasonably fast PC), updates finish quite quickly (in seconds) in most cases.
The IDE
The First Boot
editWhen you first launch Visual Studio, you are asked to choose a default environment that best corresponds to the language(s) you plan to develop. While the keyboard shortcuts and other settings will try to match the language used, you can always change this within Settings. Note that if you are upgrading from a previous version of Visual Studio (whether that version still resides on the hard drive or not), you may not see this screen. You will not see this screen if you are updating within the same version of Visual Studio (for 2017).
You will also be given an opportunity to enter a license key (for paid editions) or account details (Visual Studio 2013 onwards) if required.
The first startup will take more time than usual; this is Visual Studio setting up the default environment.
Welcome screen
edit
This section applies to VS 2019 only. Visual Studio 2017 and earlier versions will automatically go straight to the IDE.
When VS 2019 first launches, it goes to a welcome screen which shows the latest recent projects and some useful places (like creating a new project) to start. If you click the "Continue without code" option, it goes straight to the IDE, much like older versions of Visual Studio.
Selecting a new project
editOnce you are in the IDE, go to File>New>Project.

By default, it will point to the language you selected at startup. Choose a name and hit OK. In this case, we chose a C++ Windows Console Application.
Configuring .NET Feamework version
editFor some projects, you can choose the .NET Framework version you wish to target. In the screenshot above, the target is set to v2.0. Note that this is not applicable for every type of project, if it isn't applicable, then the version you select will have no effect.
This feature is most important on VB and VC# projects as the features available depend on the version you choose to target. This will, naturally, also impact the Windows versions the program can run.
Initial wizards
editWhen you select a project, you will (often) be faced with a set of wizards which configure the initial properties of your project. The options are mostly self-explainatory and differ with the project you chose.
Once you complete the wizard(s), you will directly face the code environment.
Intellisense and debugging
One of a programmer’s most arduous tasks is to debug a program – repeatedly testing it to make sure that it’s free from errors. Here, we’ll take a brief look at what Visual Studio can do to help the developer on that.
Intellisense
editIt is a fuzzy-logic system used to predict code as it is typed. For example, let’s say that your code looks like this:
#include "pch.h"
#include <iostream>
using namespace std;
int main()
{
	int a, b;
	cout << "Enter the two numbers\n";
	cin >> a >> b;
}
We’re now going to insert a cout line giving the sum of the two numbers. As cout is entered, Visual Studio immediately displays a box suggesting possible results for what you have just entered.

Tab to accept the given output.
This alone is very powerful, as it saves developers’ time. Instead of manually having to write every command manually, you can just type a part of it and Visual Studio will suggest what you’ve thought.
Before Visual Studio 2012, Intellisense for C++ had to be invoked manually by pressing CRTL+J:

Error detection
editAnother very useful feature of Intellisense is the ability to detect errors before runtime. Some of them would be very trivial:

In the above example, if is misspelled as iff
However, in some cases, IntelliSense reports cryptic errors. Consider the below line of code:
3 = a;
Obviously illogical. However, IntelliSense reports the error as “expression must be a modifiable lvalue”. While some of them would be very hard to diagnose, IntelliSense reports the line numbers wherever possible, and hence you can use that to pinpoint the problem.
But IntelliSense is not all rose and gold. For example, consider this line:
cout << 0/0;
This line is obviously not possible. But IntelliSense does not catch it! You’ll need to build it before the error comes out: “C2124: divide or mod by zero”
Breakpoints
editOne of the most fundamental components of debugging is setting breakpoints. Simply put, they allow you to view the value of the program’s variables at any point of the program’s execution and is very useful when a piece of code is having problems but you’re not sure where.
Setting breakpoints is easy: go to the line which you want to stop the program execution, and press F9. Alternatively, click on the left bar just inside the code window. A circle will appear, which means that a breakpoint has been set on that line.

Now debug the program. When the specified line is reached, the program stops. Here’s how Visual Studio looks during this step for an example program:

It is possible to view variables’ values by using the Locals and Autos windows, or by simply hovering on top of the said variable (both are demonstrated in this screenshot).
The Locals and Autos windows, through both displaying variable values, do not target the same areas and hence target different variables.
This is also the opportunity to view performance data, which we’ll be looking at a later stage.
It should be noted that if you pause the execution of the program by using the Pause option in the toolbar, you’ll also reach the break stage.
If some cases, the variables cannot be viewed, and Visual Studio will report that they are “optimised away and not available”. This can happen for a variety of reasons, including but not limited to heap corruption, garbage collection and so on.
Performance measurement
editNewer versions of Visual Studio include features to track and analyse the usage of various components like the CPU and memory by the program.

Now once a breakpoint is hit or the program execution is paused, the memory usage corresponding to the time the snapshot was taken can be viewed:

This requires that you take regular snapshots so that you can compare memory consumption and usage across two different times of the program.
It is also possible to view CPU process information up to that point:

Note that the relevant options must be enabled explicitly, as they create additional CPU overhead and may affect the program depending on its intended task.
C in Visual Studio
editDespite the fact that Visual Studio C++ is primarily meant to support C++, Visual Studio has fairly strong support for the C Programming language. The problem however is that there's no implicit option to do so.
To work around, create an empty project file. Then, in Solutions Explorer, add a new C++ file, but set the file extension as .c instead of .cpp.
IntelliSense support is available, and it's not C++. To prove it, cout will no longer work as it's not part of the C specification; you'll need to use printf.
Extensions
Like most other programs of its genre, Visual Studio supports the use of extensions to further the capabilities of the program.
Note that Extensions are supported in all editions of Visual Studio except the Express editions (the free Community edition can install extensions).
For all versions
editFor all versions of Visual Studio, extensions can be installed via the classic method: by downloading the extension's installer from the publisher's website and installing it, which will register the extension with Visual Studio.
Using Extensions Gallery
editFrom Visual Studio 2010 onwards, it is additionally possible to install extensions using the Extensions Manager. Note that a restart of Visual Studio is required before the installation starts for most extensions. [1]
Using this method allows VS to monitor updates to the extensions and inform users of any new updates, making it easier for users to update extensions. When an update to an extension is released, the user is given a notification and can update the extension from the Extension Manager.
List of (useful) extensions
editNote that not all extensions are free; some are paid. Not all extensions listed below install via Visual Studio's Extension Manager and must be installed manually. It goes without saying that this list is non-exhaustive; if you find one that isn't listed here, you can add it below.
- Roslynator
- SideWaffle Template Pack
- Power Commands for Visual Studio
- Resharper for Visual Studio
- SlowCheetah
- Web Essentials
- Devart
- CodeMaid
- OzCode
References
edit
Embedded development
Constraints
editVisual Studio
editNot all versions of Visual Studio can work for a particular Windows CE version. In particular, VS 2008 is the upper limit for Windows CE 6 and 7, and only Visual Studio 2012-2015 can be used for Windows Embedded Compact 2013.
Windows
editThe major difficulty that you're likely to face is the restriction of Windows versions that you can use to develop and virtually test it.
- For Windows CE 7 and below, Virtual PC 2007 is needed. That version works properly only up to Windows 7. Windows 8 and 10 (32-bit) can install Virtual PC 2007, but you will most likely face issues with booting up Windows CE. The 64-bit versions cannot run Virtual PC 2007, and you cannot substitute with VMWare or VirtualBox (described below). Your only option in this case is to use VirtualBox/VMWare inside your host using a Windows 7 license or earlier, and install Virtual PC 2007 inside the virtual machine.
- For the 2013 version, Hyper V is used, which is only available on Windows Server or Windows 8 + (64-bit). You'll also need a processor which support SLAT.
Procedure
editWe assume that you've resolved the issues mentioned above from now on, unless otherwise specified.
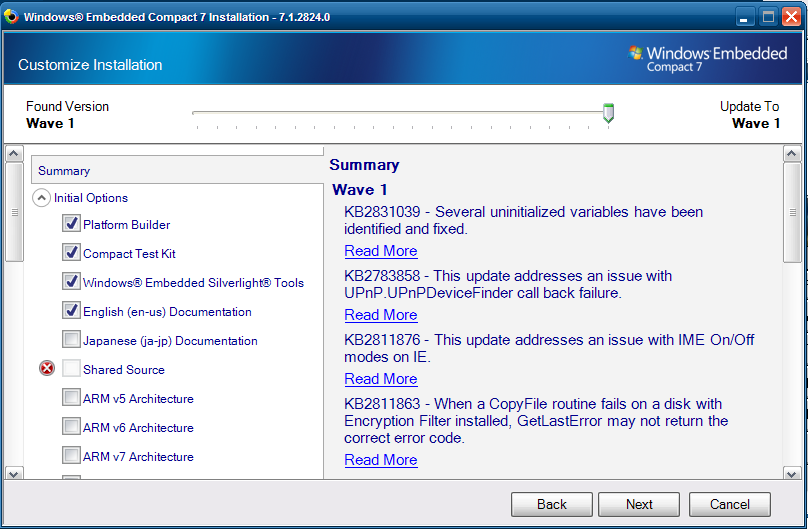
- Install the desired version of Visual Studio. Note that if you're only going to use Platform Builder, you can safely deselect the optional components. Install VS2005/VS2008 SP1 as needed.
- Install the Windows Embedded Compact 7 toolkit. While you should select the core components (Platform Builder, Compact Tool Kit and the Silverlight tools), you need not (and should not) download/install all the architecture packs unless you also plan to deploy onto a real device. For Virtual PC, the x86 pack is enough.
- Install Virtual PC 2007.
- Open Visual Studio and create a new Platform Builder project.
- In the next screen, select the Virtual PC BSP.
- Here, you are given the change to customise the OS design or go with one of the suggested templates. No matter which option you choose, you can change it later. For now, we'll select the Enterprise Device>Handheld option.

- You can now complete the wizard. Select the option to build the release config at the last wizard screen. If you have not done that, then go to Build>Advanced Build Commands>Sysgen.


In some cases, you will get a cryptic error which is traced to the lack of findstr.exe, and can happen if the host is on a non-standard Windows version (eg, Windows Embedded 2009 POSReady). In this case, grab a copy of findstr.exe from a Windows XP/Server 2003 CD (use EXTRACT in the same directory to expand FINDSTR.EX_) and copy it to system32. You may also have to add the System32 directory as a PATH variable if that does not work. |
Now would be a good time to check that you have what you need. Go to View>Other Tools> Catalog Items Window. Here you can add and remove components as necessary. Make sure that you have a shell (usually the Standard shell), otherwise you won't see anything! |
- Open Visual Studio, and select the option to import a vmc file. Locate the vmc default file (typically located at
C:\WINCE700\platform\VirtualPC\VMif you've used the default options). After importing, make sure that the network settings are set correctly, this is needed. - Start the virtual machine, which will soon start giving
BOOTMEmessages.

If you did this using VMWare or VirtualBox, the VM will halt instead saying that the network adaptor is not supported. You may also receive this error if the network adaptor is disabled.
You will have one minute to complete the next step before the VM will halt. |
- Go to Target>Attach Device. Platform Builder should soon recognise the VM and start uploading to it.
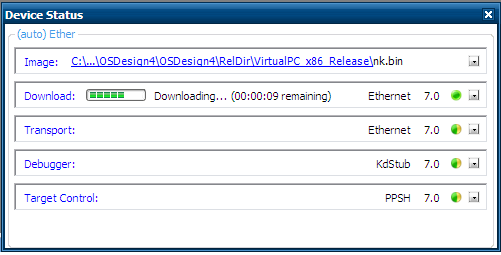
- You should now see CE7 on Virtual PC 2007.


Visual Studio Code
Visual Studio Code is a distant derivative of Visual Studio, but there are major differences which one should be aware of. Here we present a brief guide to the usage of this code editor.
Differences
edit- VS Code is a code editor. You'd most likely use it to maintain code rather than debug it. However, as you'll see below, it is often possible to enable debugging.
- It is modular. The core of VS Code is based on the Electron framework, and extensions are added it to add more features. This is the reason Java debugging is possible on VS Code; this is not possible in any version of Visual Studio.
- Most of VS Code is open-source and released under the MIT license. Visual Studio is fully proprietary.
- VS Code is cross-platform and available for Mac and Linux.
Both software follow different update schedules.
Installation
editVS Code can be installed from [https://code.visualstudio.com/].
Main page
editWhen VS Code is started, you'll be given an option to install additional support for popular languages. It is suggested that you do so for those which you mostly program in.

Extensions
edit
The bane of VS Code is extensions, more so than Visual Studio. One uses it to install practically any additional support on top of VS Code's barebones editor.
On the left bar, click Extensions. This gives you a bar with installed and recommended extensions (see right side).
To add a new extension, search for it. Then a list of possible extensions matching your search will come up. Click Install for the one(s) you need. VS Code will ask to restart itself when the installation is complete; this is necessary for the extension to be activated.
Linux development
Recent versions of Visual Studio have included cross-platform support, notably for Android, iOS and now Linux. As Linux applications cannot (obviously) run natively on Windows, one can either
- use another Linux machine
- use Windows Subsystem for Linux
In this guide, we'll use the latter method as it's more 'native', though those wishing to use the former method can also use this guide.
Visual Studio 2019 can natively detect the presence of WSL. This means that while you still have to install WSL, you may not have to follow all of the other steps. |
Pre-requisites
editYou'll need
- Windows 10 (64-bit only)
- Visual Studio 2017 or later
Procedure
edit- Install the Linux development workload from Visual Studio Installer if you already haven't.
- Install the Windows Subsystem from Linux tools and download a Linux flavour from the Windows Store of your choosing Here's an example guide. Set up the Linux configuration.
- Run the following commands on the Linux bash:
$ sudo apt update
$ sudo apt install -y build-essential
$ sudo apt install -y gdbserver
$ sudo apt install -y openssh-server
- Open
/etc/ssh/sshd_configusing a code editor; for example,sudo nano /etc/ssh/sshd_config. Look forPasswordAuthenticationand set it to yes. - Start the SSH service:
$ sudo ssh-keygen -A
$ sudo service ssh start
- Open Visual Studio and create/import a Linux project:

- Open Cross-Platform Manager, and click Add. Enter the host name as localhost, port number as 22 and enter your UNIX username (not Windows!) and password. If you are not using Windows Subsystem for Linux, enter the host name of the Linux machine that you'll use instead of localhost. If all goes well, you'll see a message telling that IntelliSense is configuring libraries.

You need to have the Linux compiler installed on WSFL! Use appropriate apt-get commands as necessary to install them (eg: sudo apt-get g++). Otherwise, you'll get an error when trying to run (or after clicking Add in the previous step)
- Make sure that the target is set correctly, and then debug as normal. You'll see the output in the Linux Console Window on the bottom of Visual Studio (not in the bash shell or Command Prompt).
If you can't see any output, make sure that your program has at least one waiting state. This is because the Linux Console Window disappears, and its contents erased, when the program stops debugging (it has the same effect as debugging a normal Windows program through VS if you haven't configured it not to close immediately).
If you are programming in C, make sure to set the file extension as .c for IntelliSense to work. Even then, you may get errors saying that common header files like stdio.h cannot be found; this is a bug and the program should still compile. |
Usage
editYou can use it much like you'll debug a normal Windows program. The main exception is that features like CPU tracking are restricted, which is because the app is technically run elsewhere - on the Linux subsystem. One can easily set breakpoints, watch, locals and autos as normal. When (if?) a segmentation fault occurs, Visual Studio will halt the program and show the nearest location where the fault could have occurred (like what you'd get if you used gdb and enabled debugging symbols).
It is often possible to customise debugging settings. To do so would be the same as it's done on Windows - by going to Project Settings.
References
edit
Python
Since Visual Studio 2010, VS has support for debugging and running Python applications.
Notes
editPython is an interpreter, not a compiler. This means that, barring syntax errors, the code is executed at runtime. Hence Visual Studio (and others) have weak IntelliSense support.
Installation
editFollow the instructions here. In particular, while you can use Visual Studio 2017's installer to install Python, this isn't needed and Python can be installed otherwise. The same applies if you want to use alternative Python distributions like Anaconda-Python.
Usage
editOnce you've installed it, a new project can be created by Python -> Python Application or from the option "From Existing Python Code". Running the Python code will open a command window where the code is run, and one can set breakpoints like any other program.
Hint: Visual Studio requires a project file to be created for Python. However, this does not mean that you cannot use other programs at the same time. For example, if you are using Spyder, then simply open the main .py file from there; VS does not add any extra information to it. |
Azure

Visual Studio can be used to integrate many services with Azure. Here we present a brief overview of the possibilities.
App publishing
editApps can be published into Azure. This brings several advantages - for example - web applications can easily be debugged. [4]. The Azure web page says that
App Service Web Apps is a platform that is optimized for hosting websites and web applications. This platform-as-a-service (PaaS) offering lets you focus on your business logic while Azure takes care of the infrastructure to run and scale your apps.
Azure functions
editAzure Functions lets you execute your code in a serverless environment without having to first create a VM or publish a web application.—[5]
Azure App Services
editThe Visual Studio website (https://docs.microsoft.com/en-us/visualstudio/azure/?view=vs-2019) contains multiple resources on integrating Azure with Visual Studio, including using Azure App Services amongst others.
Azure Databricks
edit| This page or section is an undeveloped draft or outline. You can help to develop the work, or you can ask for assistance in the project room. |
References
edit- ↑ https://blogs.msdn.microsoft.com/saraford/2010/03/11/how-to-install-visual-studio-extensions/
- ↑ https://medium.com/@thiagoloureiro/some-of-my-favorite-visual-studio-extensions-877f44097f0d
- ↑ https://blog.elmah.io/list-of-the-best-free-visual-studio-extensions/
- ↑ https://tutorials.visualstudio.com/aspnet-azure/intro
- ↑ https://tutorials.visualstudio.com/first-azure-function/intro