VirtualBox/Setting up a Virtual Machine/Windows
Remarks
edit- Please check the images. They are not perfectly aligned!
- As Windows is not open-source, no screenshots of Windows are present here to prevent any kind of copyright infringement.
Create Installation Media
editUsing Media Creation Tool (for Windows 10 VM)
edit- Download the Media Creation Tool from the Microsoft Official Website.
- Run the Media Creation Tool.
- Select the Installation Media Type. Choose "Create a bootable disk image".
- Choose file destination.
- Wait for a while. The download size is typically around 4.7 GB. When the creation of installation media completes, you will be redirected to the file destination. You should see a .iso file in that folder.
For other versions of Windows
edit- Download the Windows disk image from a trustworthy source. If you are not using a Windows host machine, the download link for the Media Creation Tool will be replaced by the direct download link of the official .iso file.
- Compare the checksum (if available) to verify the integrity of the disk image file.
Install in VirtualBox
edit- Open VirtualBox

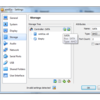
- Press "New" Button on the Left Upper Corner

- You will see the screen on the right. Enter a suitable name for the Virtual Machine. Also, Choose "Windows" for "Type" and your downloaded version for "Version".
- For Memory, choose a suitable value (around 256 to 8192 MB depending on OS).
- 256-512MB for Windows XP
- 1024-2048MB for Windows Vista or 7
- 2048-4096MB for Windows 8, 8.1 or 10
- 4096-8192MB for Windows 11
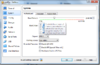
- As shown on the right, choose "create a virtual hard disk".

- Select "VDI"
- Select "Dynamically Allocated".
- Select the name and a suitable size (at most 100GB) for the virtual storage. Also, create a file location.
- After that, a virtual machine will be created. However, do not boot.

- Go to "Storage" Section.

- Add a SATA Controller.
- Choose Add Optical Hard Drive.
- Choose the .iso file created above.
- Go to "System" Section.
- Set the Boot Order to: Optical Hard Drive, Hard Disk
- Go to "Network" Section.
- Tick the "Enable Netork Adapter Checkbox" and the "Cable Connected" checkbox. (The latter checkbox is in the Advanced Section).
- Quit Settings and Boot by clicking "Start".
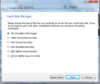
- You will see a installation screen. Click "Install Now".
- Then enter the product key in the spaces provided. Otherwise, click "I don't have a product key". This enables you to have limited functions.
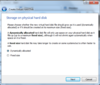
- Accept End User License agreement.
- Wait for Installation.
- After installation completes, shut down machine and go to Settings.
- Go to "Systems" Section and revert boot order.
- Click "Processor" tab and set the number of CPUs.
- Go to "Display" Section and set the video memory to maximum value.


Great! You have finished the setup. Explore as much as you want.
Resize
editHere is the DOS command for six gigs (the size must be in megabytes):
"C:\Program Files\Oracle\VirtualBox\VBoxManage" modifyhd "MyVMPath.vdi" --resize 6000
NB: you may need to resize the internal VM partition after, for example to enlarge "/" in Linux :
- boot with gparted
- move the other partitions at the disk end
- then resize /
FAQ
editThe Windows installation page doesn't allow me to skip product key entry. How to skip this?
editIf this is the case, it would be quite complicated.
- First, you will need to mount the iso file by your own means: Windows does not have built-in function to unpack iOS files. But there is a software called Virtual CD-ROM Control Panel. If you are using OS X, mount it by "Disk Utility".
- Open the .iso file and search for a file called "ei.cfg".
- If this file exists, open with Notepad/TextEdit. Otherwise, create a CFG file. (Save it as "All Files" and type "ei.cfg" for name.
- Type the following (type all content as is if bracketed in [], write by instructions if bracketed in {}):
   [Edition ID]
   {Edition you desire (e.g. Home/Professional)}
   [Channel]
   {OEM/Retail}
   [VL]
   {0/1}
- For any other problems, see this Microsoft page
- Save this file and you should see the "Skip for now" option.