Trainz/Tutorial for Modifying the reskin mesh in GMAX
The sound of the word GMAX often strikes terror into the hearts of those who have struggled through tutorials then given up. This tutorial takes you through the necessary steps and only the necessary steps to do modify the position of the numbers on the reskin of the basic plank wagon.
If you have any intention of doing serious work in GMAX please set up GMAX as per Paul Hobbs first GMAX tutorial.
To work in GMAX we need three files. These are the GMAX source file and two texture files, one for the wagon and one for the numbers. GMAX will want to know where they are so normally I keep all the files for a project together in one folder under the GMAX\mesh folder. This part will use a Highland Railway loco coal wagon to demonstrate how to move the numbers.
The first step is to create a folder with the correct name under the GMAX\mesh folder.

Now we need the GMAX source file so we need to extract it from cmp, note it is unusual to find the GMAX source files supplied in the model files on the DLS. First we edit in explorer.

This gives us access to the files.

The first file we want is the zip file containing the source. Note Auran does not permit files of type .zip to be stored so it has been renamed to .txt file extension. First we copy the file.

Then paste it into the new folder.

Repeat to get the texture.tga files form the body folder.

Note we can collect two files at once by highlighting them both.

Then paste them into the new folder.
At this point you may wish to copy in your new cs_skin.tga file.

To unzip the GMAX source first rename the file to a .zip extension.

Then unzip the file.

Now we open the GMAX source file in GMAX. GMAX has two ways to show an object, one is wire mode, the other is Smooth Plus Highlights. We need the Smooth Plus Highlights. To change from one to the other right click the word in the top left hand corner then select the appropriate one.

It is probable that the texture file has not been found.

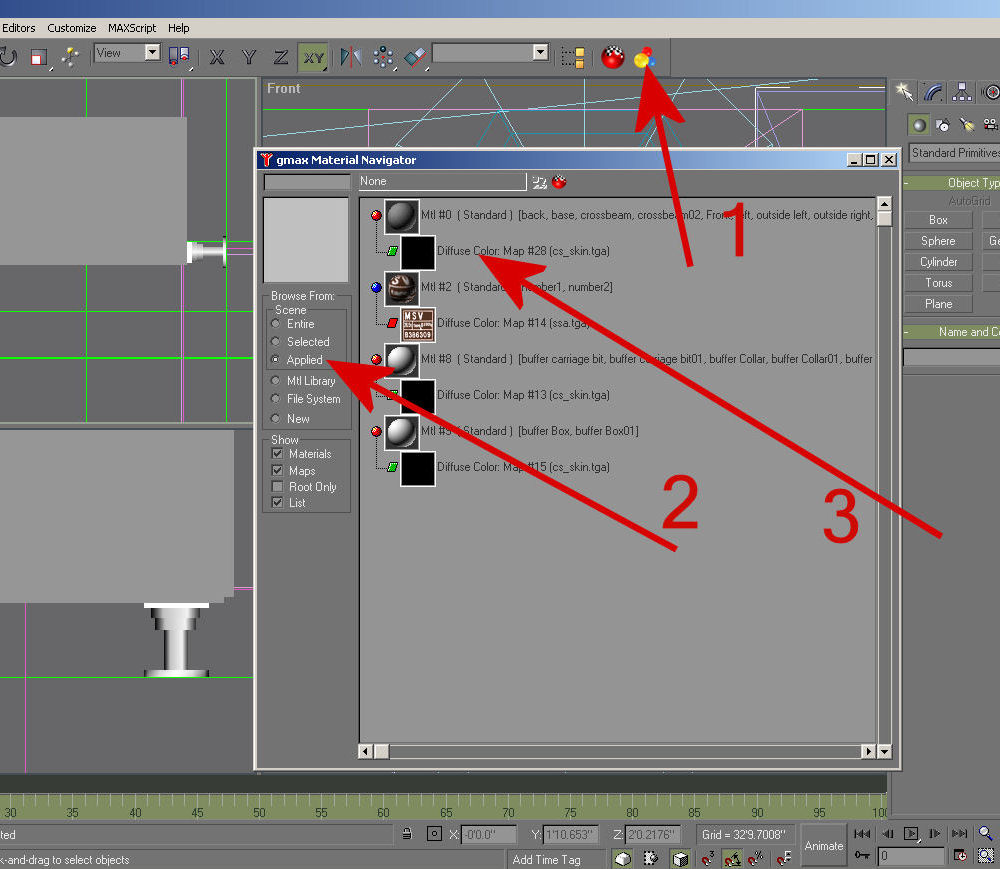
So we tell GMAX where the file is with the GMAX Material Navigator. 1 Click on the GMAX Material Navigator button, 2 then check the applied button, 3 finally click on the file we want to change.

Use the "select bitmap image file" window to select the image file we wish to use.

Repeat for the other instances of the file name.

Now we have our correctly textured wagon showing in GMAX.

To show more detail select the quadrant we are interested in then press the "W" key.

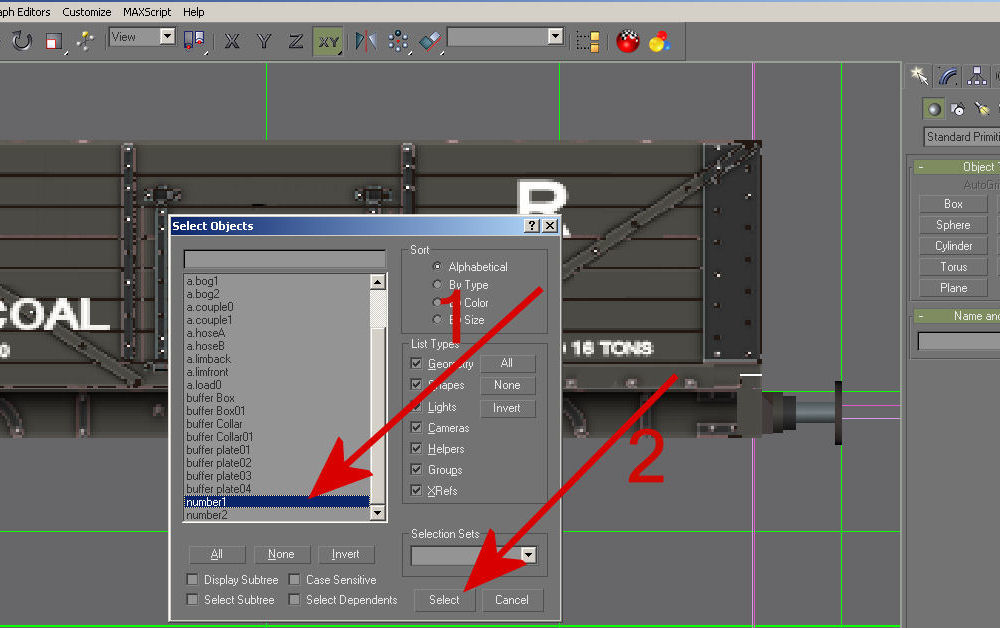
For clarity a brown ssa.tga has been used. We'll change it to the proper ssa.tga texture later on. Now we want to select the number panel before moving it. To do this press "H" then highlight the item (1) in this case number1 and press the select button (2). You can click on the item directly but GMAX can interpret a mouse click as a command to both select and to move the object with unwanted results so use the H selection method to avoid this.

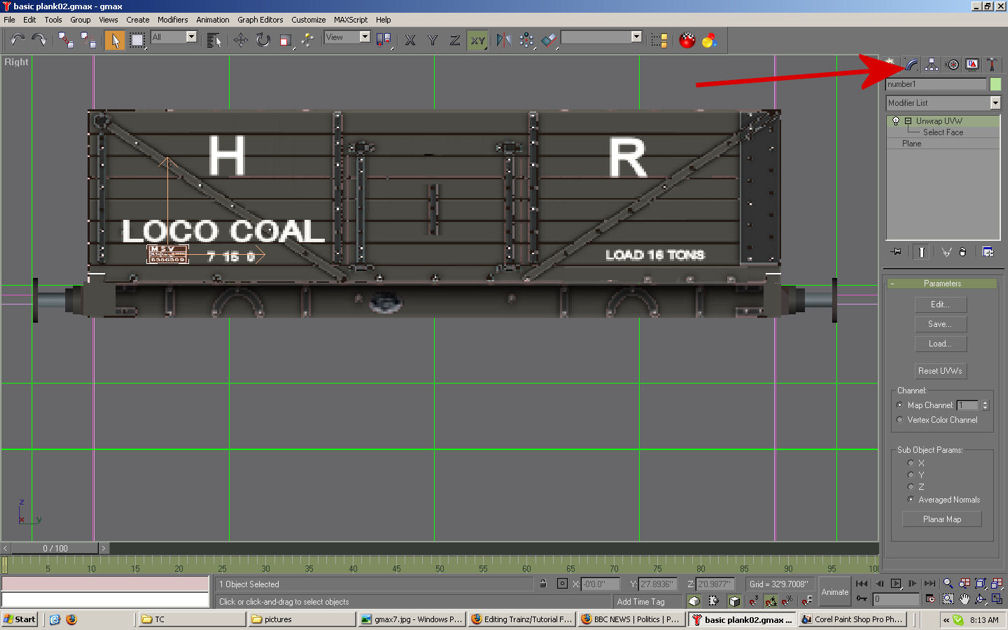
Click on the blue arc tab to show which item we have selected. This will also allow us to resize the panel with the wagon number on if required.

The next step after selecting the panel is to move it. We click on the move icon with four arrows on it. If you look carefully to the right of the icon you can see the letters X Y Z and xy these constrain movement in the those planes. Z is up and down, Y is side to side, X is in and out. With the xy constraint set as it is here we can move the panel about without fear that it will move further into or away from the wagon. The panel can be moved either with the mouse or by changing the values in the Y and Y boxes at the bottom of the screen. Do not touch the value in the X box, a value of 0 in the Y box means the number will be centered on the Y axis.

Here we can see the panel has been moved into position note the value of Y.

In this case the wagon number panel wants to be slightly longer so we click on Plane, then adjust the value in width to 18". This is often easier to see with the correct texture file.

The wagon with the correct texture file copied in place.

Repeat using the Left view to adjust number2.
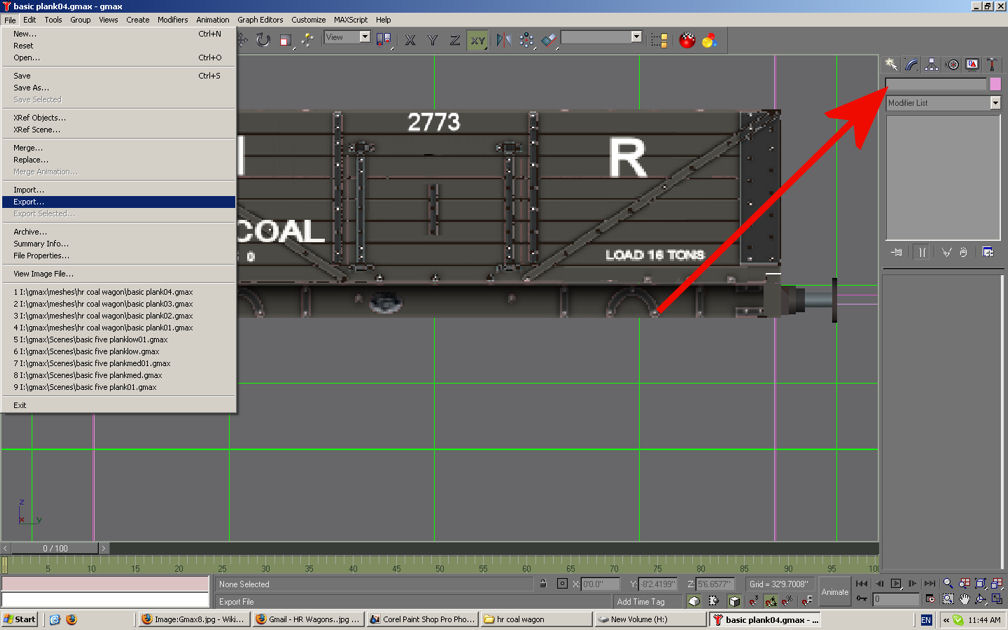
Finally we come to the export. Trainz has its own preferred file format so to get Trainz to recognise our wagon we need to export it. Make sure nothing is selected Then locate the export entry on the file menu.

We need to tell GMAX to create a file called body.im, one way is to simply type "body.im" in the save box. This file is the close up or high detailed one for the lod.

After that we copy the .im files and tetxure.txt files into the appropriate folder in CMP. Normally if you sort the folder by time you will want to copy the most recent files but not the .GMAX source.


We need to double check that the wagon points to our new texture group by editing the config.txt file if you haven't already done so.

Commit the changes and open up Trainz and we should find our new model. View it from close up to view the detailed mesh and texture file. Note the three different wagon numbers on display.

This model uses lod or level of detail to assist performance. Trainz selects the appropriate version depending how far away you are form the model. You can control this but for the moment we'll simply create the lower detailed meshes and point them at smaller versions of the texture files. So first double check we have the smaller versions of the texture file available.


And save as cs_skin_med.tga.

Level of Detail steps
editThen back into GMAX and open up our wagon. The first step is to save the source under a different name.

We add the letters "med" onto the end of the name.

We are going to both reduce the polys and point to a smaller texture file but the first step is to ungroup group B which contains one of the details that we are going to detail. So use H to bring up the Select Objects and highlight B.

Here we can see that there is buffer detail that can be seen close up but not from further away. Note the vertical and horizontal arrows that show the centre of the object and the white lines around the object.

After the ungrouping we can see the buffer collar and buffer collar01 in the Select Objects which we will delete for the medium level of detail. For the low level of detail we will also delete the carriage bit and carriage bit 01.

Select and press the delete key.

Here you can see a minor detail has been deleted which won't be noticeable in the med lod.

Now we need to point the mesh to the smaller texture file. Click on the three balls for the GMAX Material Navigator. reduce the selection by clicking Applied in browse form scene, (on the left), click on the first cs_skin to bring up the Material Editor and finally click on the bitmap to change the name of the file. The same steps as we used when opening up GMAX for the first time to get the texture.

Open the cs_skin_med.tga. Repeat this step for the other two references to the CS_Skin.tga file file in the GMAX material editor.

Finally we export the body_med.im file.

Repeat these steps for the low version of the lod.
Copy the body_med.im cs_skin_med.texture.txt body_low.im cs_skin_low.texture.txt ssa.texture.txt files from the mesh folder into the zrb_body folder as you did for the body.im file earlier.
Commit and your reskin is now complete.