Scribbling On Regardless/Printable version
| This is the print version of Scribbling On Regardless You won't see this message or any elements not part of the book's content when you print or preview this page. |
The current, editable version of this book is available in Wikibooks, the open-content textbooks collection, at
https://en.wikibooks.org/wiki/Scribbling_On_Regardless
Materials you will need
Boom! Community Arts are distributing simple art packs - you'll hear these referred to in our videos - in the North of Glasgow. But you don't need one of these art packs to take part in any of our activities - most of the materials are things you can find at home.
The sort of things we're using
edit- A4 paper
- A4 card
- Colouring pencils
- Felt tip pens
- Glue stick
- Old magazine pages
- Paperclips
- Wool
- Scissors
- HB pencils
- Pencil sharpener
Some other things
edit- Shrinkie paper (special plastic that can be shrunk in the oven)
- Sticker paper (printer labels work just as well)
Next project
edit
Making a sketchbook
The first project we're making is a sketchbook, for you to fill with drawings, paintings & sketches!
Materials you'll need for the sketchbook
edit- A4 paper (10 sheets)
- A4 card (1 sheet)
- Paperclip or thumbtack
- Scissors
Instructions
editWatch our video for a step-by-step guide
- Neatly assemble your 10 sheets of A4 paper on top of the sheet of cardboard, and then carefully fold in half to create an A5 size.
- Cut along the fold.
- Using a pen or pencil mark a dot roughly an inch in from the short edge, and roughly the same from the long edge, at both sides.
- Using a thumbtack (or something similar) carefully press through the dots marked to make a hole. NOTE: if you have two thumbtacks, leave them stuck through the paper until the next step - it makes things a bit easier!
- Straighten out the paper clips and feed them through the holes until they are half way through.
- Bend both ends out over the edge of the paper, and twist them together. Bend the excess back onto your card to keep it out of the way.
- Ta-da! You now have a simple sketchbook. Why not decorate the cover as your first project?
Next Project
edit
Making a BoomBuddy
In this tutorial we'll show you how to make and decorate your very own BOOM buddy. If you've got a printer, you can print out the template below. If you don't have a printer, then you can also trace the template by placing a piece of paper up against the screen - but be very careful not to damage the screen! (You might need an adult to help with that. If you are an adult, don't get pen on the screen...)
Materials you'll need for your BOOM buddy
edit- Boom buddy template (see below)
- Glue
- Scissors
- Coloured pens or pencils
Instructions
editWatch our video for a step-by-step guide
- Print out your BOOM buddy - we've got 2 sizes to choose from...
- Colour in your BOOM buddy - decorate them however you'd like! They could have rainbows & smiley faces, or maybe they're a robot or a friendly monster?
- Cut out along the solid lines. (Not the dotted ones!)
- Fold along the dotted lines.
- Glue the tabs to the inside of the BOOM buddy.
- Glue the arm pieces to the sides
- Decorate! Does your BOOM buddy need a hat? Are they carrying anything? What are they called?
BOOM buddy templates - click to expand
-
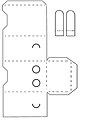 Big BOOM buddy
 -
 Regular BOOM buddy


Next Project
editPrevious Project
edit
Making ArtDice
This project is about making Art Dice - roll the dice and decide which arty activity you should do! A fun way to get ideas, or get you through any artistic block. Your art ideas can go in the sketchbook you made in the first activity.
Materials you'll need for the art dice
edit- Art Dice template (see below)
- Colouring pens or pencils
- Glue
- Scissors
Instructions
editWatch our video for a step-by-step guide
- Print out / trace your art dice template
- Give you art dice some background colour - the more vibrant and bright the better!
- You've got 2 dice for a reason - one is for activity, and one is for subject.
- Decide which activities you want on the first one - drawing, painting, collage, stickers... and write one on each side of the dice
- Decide which subjects you want for the second one - out your window, animals, food... and write one on each side of the other dice
- Carefully cut out your dice
- Fold over the dotted lines, and glue together
- Now get rolling!
Art Dice templates - click to expand
-
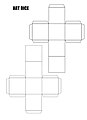 Large Art Dice template
 -
 Small Art Dice template


Next Project
editPrevious Project
edit
3 Colour Drawing
Fun & easy drawings using only three colours! See what ideas you can come up with when you're limited to just three colours... no more, no less...
Materials you'll need
edit- Paper (use your sketchbook)
- 3 colours of pen or pencil
Instructions
editWatch our video for a step-by-step guide
- Test out your colour combinations in your sketchbook or on a spare piece of paper
- How do they look together? What different styles and patterns can you make?
Cityscape
edit- Try doing a cityscape, like in the video. At its most basic, you draw a square, and then make it a cube with three diagonal lines, and then join and connect them.
- How do different cubes and boxes fit together?
- Add windows to your buildings - maybe a door, or a chimney? Is there a garden? What's in the garden?
Stack 'em up
edit- Start with a small idea - like a star - at the bottom of your page
- Draw different bubbles stacked on top of each other - each one must be connected to the bit below it
- Now turn each of these into a character - what faces are they pulling? Are they wearing a hat? Do they have different clothes?
Next Project
editPrevious Project
edit
Making Stickers
Fun & easy stickers using simple materials!
Materials you'll need
edit- Sticker paper
- Pens or pencils
- Scissors
Instructions
editWatch our video for a step-by-step guide
- Sketch out your sticker design – what do you want it to be? Maybe use your Art Dice to help you decide…
- Do you want to make one big sticker? Or lots of little ones?
- Draw your design onto the paper
- What shape do you want your stickers to be? Round? Square? Curvy?
- Now decide where it’s going to go… on your sketchbook maybe?
Next Project
editPrevious Project
edit
Making a Shrinkie
Make a shrinkie!
Materials you'll need
edit- Shrinkie sheet - can be bought from most art shops
- Pens or pencils
- Scissors
- Hole punch (optional)
- Oven
Instructions
editWatch our video for a step-by-step guide
- Decide what design you want to make. In our video, we're making a key, but you can make anything you like. A flower? A tree? A character?
- Using a dark pen, sketch out the design of shrinkie you want to make, and colour it in. The colour will intensify when you shrink it!
- If you're making a keyring, or would like to attach your shrinkie on to something, make sure to punch a hole.
- Now to the oven bit - make sure you have adult supervision for this bit!
- Preheat the oven to 160 Celsius, and bake your shrinkie on a tray for 1-3 minutes.
- At first the shrinkie will curl up, but then it will flatten out.
- Once it flattens back out, bake for 30 seconds more
- Remember it will be hot when it comes out of the oven - use an oven glove, and don't peel it off straight away, mind your fingers!
- Once it's cool, you can thread a string or keyring through your shrinkie :)
Previous Project
edit