Wikijunior:How Things Are Made/Electrical Appliances/Washing Machine
Products
edit-
 A front-load washing machine
 -
 A top-loading washing machine


The washing machine main functions is to automatically washing clothes by spinning the drum to mimic the actions of washing clothes.
What do we need to make this thing?
editMany parts of a washing machine are manufactured from sheet steel, usually coated with zinc to improve rust resistance.The spin tub is made of stainless steel.
Many other parts are plastic as well. Manufacturers receive raw plastic from which they fabricate parts in pieces about the size of a small ant, using them for machine components that do not bear weight and/or require extremely good rust resistance. Such parts include the pump, the tub guards (which prevent your clothes from being thrown out of the spin tub into the wash tub or the cabinet area), and the agitator.
The transmission is generally made from cast aluminum, which arrives from the manufacturer in ingots-20 pound slabs of aluminum. Scrap parts are usually remelted and reused. Hoses, controllers (timers, switches,etc...), and motors are purchased in prefabricated form from other manufacturers.
What is the step by step process?
editThe manufacturing process of washing machine is complicated due to various materials needed and thus it is split into fabrication (making parts), sub-assembly (putting parts together to make components), and final assembly (putting the components together to form the final product).
A. Fabrication
- Step 1: Most sheet metal parts are formed by a machine called a press. This name is quite descriptive, as the machine actually presses (or squeezes) a piece of sheet metal between two halves of a mold called a die. The metal will take the form of the space between the halves of the die. Because metal in parts shaped by only one die tends to wrinkle, crack, or tear, multiple dies are generally used to form each component. Where possible, the metal is fed directly from a coil into the press. When this is not possible, the metal is cut to length and manually (or, with larger parts like the cabinet, automatically) placed into the die.
- Step 2: Plastic parts are formed in an injection molding machine, a metal mold with one or more cavities in the shape of the desired part. After being heated to its melting point, the plastic is forced into the mold under high pressure. Next, water is passed through the mold to cool and solidify the part. The mold is then opened and the part pushed out by ejector pins. When you look at a plastic part, you often can see small circles created by these pins.
- Step 3: Aluminum transmission parts are formed into a rough shape in a die cast machine, which works much like an injection mold except that it does not use pressure. The molten metal is mechanically ladled into the mold and cooled. The ensuing rough casting is then given its final shape by various machines which drill holes, shave excess metal off critical surfaces, or cut metal away from the part.
B. Sub-assemblies
- Step 4: The transmission is assembled manually by workers who bolt, snap, or pressing several shafts and gears together. Workers then add a metered amount of oil and bolt the unit together.
- Step 5: The pump is assembled automatically. Robots place the impeller and seals in the cover and body, and seal the pump. Some manufacturers use heat and others vibration (which generates heat) as a sealant.
- Step 6: The tub parts are made in presses, and the sub-assembly is manufactured automatically. After being rolled into a drum shape, the side is welded. The weld is then smoothed out and the drum is placed on a unit called an expander, which stretches the tub into its final shape. A bottom is then welded onto the drum, and this weld is also smoothed. If the tub is stainless steel it is polished so it won't snag the clothes. Otherwise the tub is dipped in a solution called a ground coat and heated to about 1600 degrees until this coating hardens. If the tub will not be visible (the wash tub), the unit is done. If the tub will be visible (the spin tub), a finish coat is applied following the same procedure used with the ground coat.
- Step 7: The balance ring is a large weight that stabilizes the washer. Its outside structure is plastic, with a ring of metal melted into the plastic for strength. Cement is added and balanced precisely. This ring, which weighs more than 10 kilograms keeps the machine from moving about,when it is in use.
C. Final Assembly
- Step 8: This process begins with mounting the transmission on the balance ring. The transmission is set on a bearing that is bolted on the wash tub; the wash tub is sitting on a conveyor. Another bearing (the lower bearing), the brake assembly, and the drive pulley are put on the end of the transmission. Next, a pivoting mechanism called the pivot dome and legs are bolted on the assembly to hold all the pieces together.
- Step 9: Using a hydraulically operated mechanism, workers then lift this assembly, called the module, onto the washer base. Springs are added to hold module and base together. A seal is added, the spin tub is bolted to the transmission inside of the wash tub, and its plastic covers are snapped into place. A plastic hub, which attaches the agitator to the transmission, is bolted onto the output end of the transmission shaft. Then the agitator is snapped onto the hub.
- Step 10: The pump and a mounting bracket are now bolted onto the motor, which is then fitted with a shield to protect against potential leaks. This assembly is bolted to the base of the washing machine and connected to the transmission module with a belt and hoses.
- Step 11: Next, the lid hinges are attached to the lid and the top. The top of the washer is bolted to the cabinet with a hinge for easy maintenance. The graphics panel, which provides words and pictures to explain the controls, is mounted on the control panel; the controls themselves are attached from the back. The wiring, connected as one unit, is called a harness. The harness is clipped to the control connectors at one end, and the other end is passed through a hole in the top to be mounted to the motor. Because of its large size and weight, the cabinet assembly is then placed in the washer by a robot.
- Step 12: The cabinet is bolted to the base, and the controls are snapped together with the mating connectors on the module and motor. The drain hose is pulled through the cabinet and a part called the gooseneck is added. This part is what gives the hose its hook shape so that it will fasten into the drain. After being tested, the front panel is bolted on, and a packet of user manuals and accessories is added inside the drum.
- Step 13: The finished unit is crated automatically. A machine opens the cardboard box, which was flat for shipment, and drops it over the washer. The top and bottom flaps are simultaneously folded over and glued. Then the machine applies pressure on the top and bottom of the crate to make sure the glue sets properly. After the glue has set, the machine puts a banding strap around the top of the crate to add strength for lift truck transportation
-
 Step 1: Metal are being formed by presses
 -
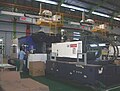 Step 2: Plastic parts are being molded from injection molding
 -
 Step 3: Aluminium are formed thru die casting


