Jeep Liberty/Electrical/Firewall Penetration
Opening the Factory Firewall Penetration
edit


First off, there is an unused rubber grommet that is already slit for a pair of medium sized wires on every automatic trans Liberty. It's for the clutch line (on the manual trans), and can be found directly left of the master cylinder. Use a medium length of tube, and shove it through the grommet, the wires will come out on the drivers side near the gas pedal assembly. This is higher up, and won't fit anything much larger than 2 8GA wires. I followed this procedure on my 2005 CRD, and it worked great. If you want something larger, follow the instructions below.
Ok, so you want to get some wires from the passenger compartment to the engine compartment. Maybe your running some wires for that new set of fog lights, a power wire for that bangin' sub in the back or power wires and coax for that big honkin' amateur radio that you want to use mobile. The installation instructions for the DC fog light kit show the wires being run through the seal around the main wiring harness. That is OK if you have some small 18-20ga wires to run, but if you have 10-12ga power wires and good RG-8 coax to get thru the firewall you might have some problems.
Luckily DC has placed an oval penetration in the firewall that will accommodate these larger wires. This page will demonstrate how I found this opening and utilized it for my own needs.
First off, you will need to remove the drivers side kick panel. Pull up on the lower door trim piece and pull out on the kick panel; these both use metal spring clips to fasten to the body (Fig 1).
Once you have the kick panel removed, grab the edge of the carpet and pull toward the brake pedal. This will allow you to see the sound insulation on the inside of the firewall. You can see where this insulation fits around the main wiring harness (Fig 2). Take note of the bolt coming thru the small plastic fitting. This bolt will help you locate the firewall plug later.
Once you have the insulation pulled back you will see the white plastic ring around the main wiring harness. Just below that over at the joint of the firewall and the left side of the passenger compartment you will see a black plastic plug. This is the plug for the penetration you will open up. Fig 3 shows this penetration with my wires going out.
Now for the fun part. Pull out your drill, cordless if ya got it, and grab a good-sized bit, around 3/8th or 1/2. Drill through the center of the plastic plug and you should be able to pull the plug right out (Note:I did not use this method, but others have mentioned it and it seems better than the contortionists trick I used to get to mine from the engine side). At this point you will have revealed an opening about 1/2" x 1". Go ahead and run your wires; a coat hanger or other thin, flexible rod will help here. Once done, put the insulation, carpet and cabin trim pieces back in place and you are done! Don't forget to purchase or find some RTV or silicone sealant to seal the opening once you have run everything through.
A step by step photo walkthrough can be found in the gallery below:
-
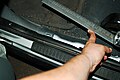
 Driver's Opening (Engine Side)
 -
 Passenger's Opening (Engine Side)
 -
 Removing Door Trim (1)
 -
 Removing Door Trim (2)
 -
 Removing Kick Panel
 -
 Moving Carpet
 -
 Moving Insulation
 -
 Plastic Cover and Firewall Opening (Cabin Side)


External Links
editLink no longer valid 09-10-14