Blender 3D: Noob to Pro/Mist - Make Objects Opaque
How Blender's Mist works
editIf you render Objects within Blender's Mist, they mix up with the Background-Color,
because Blender decreases their Alpha-Value by increasing Mist-Intensity and distance from the Camera.
The Problem
editThis does a well job if your scene has a constantly-colored Background, but
in case of a real Background or World-Texture it looks not convincing.
All objects are looking like ghosts.
The Solution explained briefly
editThis page will show you two ways to get rid of that Problem.
The major thought is to mix Objects with an opaque color, instead of making them transparent.
The more Transparency, the more of the opaque color will be added.
Because Blender delivers a (dynamic) Alpha-Value with Mist enabled,
we can use this value as a factor for increase or decrease of mixing the objects
with a certain color (or even to enhance or lower the contrast of materials, etc.)

The first solution goes with the help of an external compositing program
and won't be explained in depth as we want to focus on how to solve
this issue within blender since it is open source.
Solution 1: Make use of an external composite software.
editJust render your Background and your Objects separately with Alpha-Channels.
Then you import these files into a composite program on two layers.
(One for the Objects and one for the Background).
Between these layers you set a new "Color-Layer" with a solid greyish-blue color
(because this fits the color of the atmosphere) and create a clipping mask.
A "clipping mask" means that the "Color-Layer" is only visible where the objects of the top layer are.
And where there's no object you can see the Background.
As the object is partially transparent (because of Blender's Mist),
you will see the greyish-blue color shining through.
The more the object is away, the more transparent it is,
and the more the color-Layer will shine through the Objects.
Solution 2: Make use of Blender's Composite-Nodes.
editSince Solution 1 seems not to be a big deal as we cannot afford expensive packages, we are also able
to achieve this "Mix-Technique" by Blender's built-in Composite-Nodes.
To continue reading it would be good, if you know a little about Blender's Compositing-Nodes.
Now, here's the interesting part of the tutorial, the Graph of the Nodes in the Node-Editor:

Description:
Step 1 Render Layer1
editIn the Render Settings Tab you assign the Objects which you don't want to be transparent to Render Layer1.
See http://wiki.blender.org/index.php/Doc:Manual/Render/Layers for how to deal with RenderLayers.

It is important that you turn off "Sky" and that you turn on "IndexPass".
(The Option "Mist" delivers the same Value as the Alpha-Output in the Node RenderLayer1)
"IndexPass" will be explained in Step 5.
Step 2 Render Layer2
editThis Layer renders only the Background, the Sky.
In my case I had to enable other elements also, because otherwise the groundplane won't render.
I don' t know why, but this doesn't matter in our case.
Step 3 Separating RGB+Alpha
editThe "Image output" of the Node RenderLayer1 delivers RGB+A, that's a little distracting,
because you can see an Alpha-Output also. Select "Add" -> "Color" -> "Separate RGBA" in the Node-Editor Window.
Step 4 Combining RGBA
editNow the Separated RGB gets combined again to RGB, but this time with a new Alpha of Step 5.
Step 5 Making the transparent Objects opaque
editThe good thing is, that Blender's Object-ID Alpha Value does ignore mist.
So we can add an ID-Mask Node to get the Alpha of the Object into the new Image.
Here you must set the ID of the Object to the same number as in the ID-Mask Node.
Select the Object and set its ID Pass-Index!
Beside is a screenshot where you set the Object ID.

Step 6 Mixing the Object with a Color
editHere you add a Mix-Node to mix the Object with a "Horizon-Color".
The Color should be set to a bright greyish-blue as this is the color of the air inner the atmosphere.
Any color is possible, you may think of a dark red in a fire-hollow or of black if somewhere out in space.
Step 7 Setting the Factor of how much of the color should be added
editBlender delivers an Alpha-Value to the Objects due to the Mist.
If an object is far away or if the Mist-Intensity is very high,
the Alpha-Value of the Object decreases, which means the Alpha-Value becomes more black.
And if the Object is close, it has accordingly high Alpha, which means getting white.
Black means a Value of R-G-B 0-0-0 and White a Value of R-G-B 1-1-1.
Since we want to use these values as a factor of how much to blend the Object
with our "Horizon-Color", we need to invert this Value.
(Close Objects = High Alpha = Factor almost 1 - but we need Blend Factor close to 0, because we want low mist as the Object is close)
So let's add an "Invert-Color-Node".
Get the Settings of the Node-Graph for this Node.
This Node inverts Black to white, dark-grey to bright grey, etc.
We now use this inverted alpha-value (or Mist-value)
as a factor for mixing the Horizon-Color with the Object.
Step 8 Layering the colored Objects over the Sky-Background
editNow you add an Alpha-Over-Node which will layer our Objects over the Sky-Background.
Be aware to use the settings shown in the screenshot and that the order of the two Image-Inputs
of the Alpha-Over-Node is very important.
The second Input always gets over the first Input.
Step 9 Add an Output-Node
editFinally you need an Output-Node and to enable "Do Composite" in the RenderSettings.
Step 10 Example
editHere an Example, of how it worked out in my project:
-
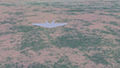
 Close Distance - Almost no Mist
 -
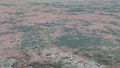
 Far Distance - Low Mist or atmospheric opacity
 -
 Further Distance - (!)The Object is even scaled
 -
 Farthermost Distance - In original size the Object would be so small that it isn't visible -only to make the Logic clear


Summary
editBe sure, you got every step right - then all will work out properly.
What is almost of more importance, that you understood the logic behind this,
so that you learn about Blender's Compositing-Nodes and the 01-Logic ;)
Since "Mist" means something like "Bullsh**" in German I did not believe that it really
is like that in Blender - and it isn't! Blender is a quite nice and powerful tool.
And I hope that it'll ever be Open-Source.