Trainz/Tutorial for Normal mapping (TRS2009)
|
|||
|

| Glossary |
| HKeys-CM |
| HKeys-DVR |
| HKeys-SUR |
| HKeys-WIN |
| Mouse use |
| Notations |
Introduction edit
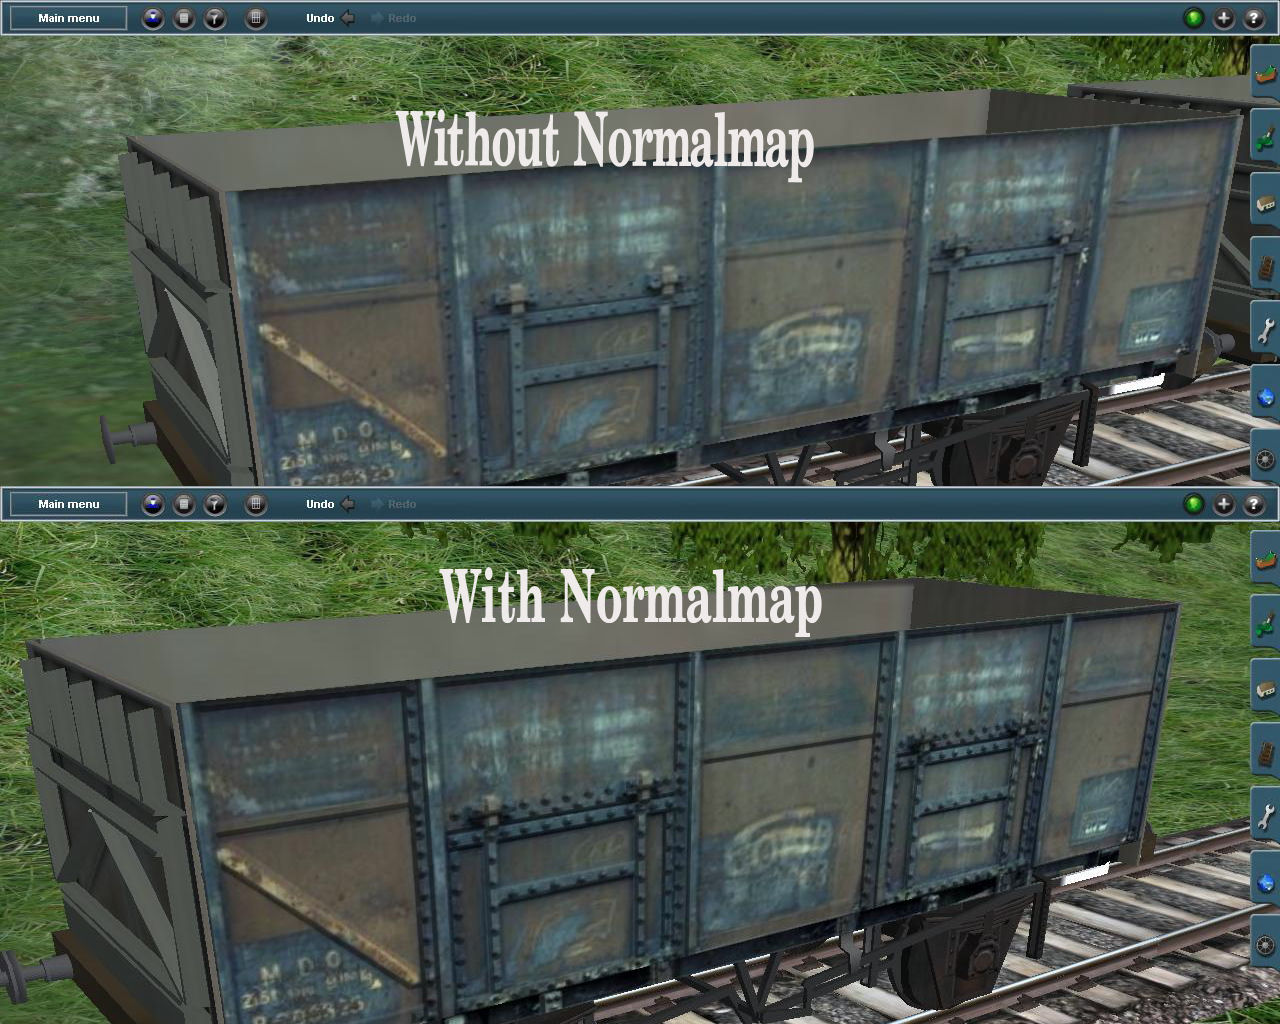
Normal mapping is a graphics processing technique...
Lorem ipsum dolor sit amet, consectetur adipisicing elit, sed do eiusmod tempor incididunt ut labore et dolore magna aliqua. Ut enim ad minim veniam, quis nostrud exercitation ullamco laboris nisi ut aliquip ex ea commodo consequat. Duis aute irure dolor in reprehenderit in voluptate velit esse cillum dolore eu fugiat nulla pariatur. Excepteur sint occaecat cupidatat non proident, sunt in culpa qui officia deserunt mollit anim id est laborum.
| This Trainz/Tutorial for Normal mapping (TRS2009) section is a stub placeholder, an outline or marker that this section of the book is otherwise incomplete. You can help the Wikibooks Trainz project by expanding it with fuller discussion of the topic. |
Using a high-res photo edit
- Contributing author: JohnWeylan
Making a normal map from a photograph picture or any image used for UV mapping. You will need the freeware graphics program Gimp2 to make the normalmap with. "Gimp 2.6.4" found at http://gimp.org/downloads/. Gimp 2.6.5 is at http://gimp-win.sourceforge.net/stable.html. Gimp 2.6 help files are located at http://docs.gimp.org/. I prefer version 2.6.4 because 2.6.5 tends to freeze the computer up. The normalmap generator for Gimp can be downloaded from http://nifelheim.dyndns.org/~cocidius/normalmap/ look for win32 binaries (.zip) and click on that. Open the zip file and read the readme.txt file for installation instructions.
The texture file was created from an original photograph by Paul Bartlett who retains copy write but is used with his permission.

Pre-production needs edit
In this tutorial you will take an image that you used to UV texture a mesh in your favorite 3D object maker program. (i.e. 3DSmax, Blender, Gmax, etc.) I like using Blender cause it's powerful like 3DSmax and the best part is.......it's free. In Gimp2, you will make a copy of the texture file, convert it to grayscale and work it for conversion to a normalmap using Gimp2's own normalmap generator plugin. In my next tutorial...You will learned how to implement the normalmap with a texture map for the 3d shadow affect you will see in trainz using the Blender 3D object program.
Steps edit
First you take the texture you used for UV mapping and load it into Gimp. After it is loaded, click on the word "Image"  and choose Duplicate. The shortcut is (ctrl-D). Close the original image to keeps it safe from changes.

Next delete any alpha masks from the copy by clicking Layer, Mask, and Delete Layer Mask.(Circled in image below). We won't need it for the normalmap since texture or opaque maps will handle that for us.

Change to greyscale by using Image, Mode, Grayscale.

Save the copy by clicking file, save-as. The save dialog below will pop up. Name the file "textureName_grayscale.tga" or any name that helps you remember what this image is for. Click save.

Uncheck RLE compression checkbox in the upper left corner of the popup box, and then click save to complete the process.

NOTE: For all textures used in Trainz always uncheck the RLE compression checkbox. Trainz will compress the image itself and doesn't liked pre-compressed textures.
After you saved the file we will start preparing it for normalmap conversion. Start by making all of the backgrounds (the parts that are not used in the UV mapping) and make it pure white. This is because white will be the deepest points in the picture and darker shades are higher points. White is further away from you, blacks closer to you. Any shades laid on the UV textures will have the edges rounded back like the edge of a box instead of beveled like the lip of a cup. Also the shades of greys are relative in references. This means if you use a medium grey color any lighter shades will be further back and any darker shades will be closer to you. (using the color picker a shade value "V" of 65 in the middle of a shade 60 and 70 is the same relevance as 90 between 85 and 95). I'll explain more as we get into details.

Next, we start finding all the flat parts of the picture and select those areas. The area marked in red can be selected just don't select the diagonal bar yet. You can also work these spots one at a time, til you get a better feel of using the selection tools. The selection tools are the first 4 brushes in the top row of toolbox pictured below.

After the selection use the paint sprayer tool and set it to the following specs.

Then click color picker
and choose a nice medium shade of gray. ie. 50 to 70.

Then spray paint the selected areas to that shade of gray. Note: the shade value can be anywhere from 1 to 99 but this gives you rooms to go up and down with.

Now for detailing.

In the above picture you see "1's" as the lowest areas and 7's as the highest area. By selecting each area and shading them to their relative shade you'll create the different heights you'll need for the 3D effect in Trainz. Before you start, you need to work out the shade values you'll need in the color picker. If we made "1" a value of 50 then to set a higher plane we need to pick a darker shade value. You can use 49 for "2's" area; and it will work; but it's hard for ours eyes to see the difference. So, I like using values of 3 to 5 points differences. It makes seeing the differences in the shades easier so you don't get lost. The actual height spread is controlled in the normalmap generator. So, lets set 2's at 47 , 3's at 44 and so forth. If it's a bigger jump in height like number 7, then use a difference of 7 to 10 or more. In this case a jump of 7 relative to 6's area will suffice.
Next, we start to select each of these parts and allow for rivets. At first glance that seems like a lot of work. But, it really isn't too bad and is a whole lot easier than making a Hi LOD mesh and a Low LOD mesh to bake a normalmap with. Plus, this way it is a lot easier to correct mistakes.

Now select one of the number 3's areas and de-select the approximate centers of where the rivets will go. Indicated by the red arrows. Do this by holding ctrl while left-click and dragging with the mouse. Pressing + plus sign and - minus sign on the 10 key pad will zoom in and out the image. Holding the middle mouse button and dragging will pan the image. Make the de-selection just large enough to see. 4 pixels is usually good. Be sure to get all the rivets along the area you selected. Now would be a good time to save. Remember to save often so you don't lose too much in case of power outs or a crash. So, far I have be quite please with the stability of Gimp.

Now, we will simulate the heights of the rivets. Pick the circle selector. Indicated by the red circle in the following picture.

And go back to the image and zoom in on one of the rivet spots. With the circle selector, outline a 2×2 circle around the spot like in the right-hand image just below. If you don't get it just right, you can mouse over and a move cross arrow will appear and you can drag into place. Also, on the sides you will see size changers; just grab one and adjust to your liking. Now without clicking again on the image go to the toolbox and pick the pencil image. Indicated with the blue circle in the above picture. Set the specs as indicated above and click the color picker. Rivets come out well if set 3 and 6 shade points higher than its surrounding shade. Since the shade value for our "3s" area was 44 on our list, we want to set the outer 8 pixels to value 41 and the center 4 pixels to 38. Remember darker is a lower shade value and it causes the plane to be higher in the "bump map". Thus the rivet will be higher than the plate it's fastened to. Select each value in turn and, with the pencil, color each pixel in the selected area.


Now with the area still selected right click and choose edit then choose copy. Shortcut key is ctrl-c. Pick the circle selector again and outline the next rivet spot. This time just right click choose edit and then choose paste. Shortcut is ctrl-v. If it is not in the right spot you can now use the cursor arrow keys to nudge it to the right spot. Always remember the rivets are relative to their own plane. So, if you're working on area 2 which we determined to be a value of 47 then the rivet will be set to 44 for the outer 8 pixels and 41 for the 4 center pixel (value 3 and 6 again). The values being the same as a plane in another area is irrelevant to the current rivet.
Now on to another detailing trick.

In the picture above we have a sloping plane. "A" is high value about 21 and B is low value about 38. We will use a blend brush to create the slope values needed. In the toolbox select the blend brush, Circled in red. Click on the gradient button mark with green. Select gradients editor marked with orange in the 2nd image. Select "New" marked with a blue circle in the 3rd image. In the last image rename the new gradient to a name like, "slope" in the name slot marked by pink. Click the arrow marked by yellow to bring up the editor dialog in the lower image.

Choose "left Endpoints Color" marked by red.

Set the "V" value to 21, our high point shade. Click OK.

Choose "Right Endpoints Color" marked with blue and set the "V" value to our low point of 38. Click OK. Save slope in the Gradient Editor (4th pic at the top) and close the editor and each popup back to the main toolbox. Make sure the gradient "slope" is picked and go back to our picture.

Click just inside the selected area at point A and drag the mouse to the bottom of the area next to point B. Release the mouse button and you have a smooth slope for the normalmap generator to use. Remember to save often. Continue working on the other parts until you're satisfied. Do not leave any untouched areas, it will stand out like a sore thumb. By the way, in the dark deep area across from "B", I used a near white value because it sets under the car quite a way's. So near white would create the deep area in the normalmap. Always remember darker is closer to you, lighter is further away.

Now the fun part........

Right click on the image and mouse over map then choose Normalmap; as in the image above.
In the generator popup window below, set the following specs.

Set filter to Sobel 3x3, set scale to 3, (negative numbers cause inversion of height), Check Invert X and check Invert Y. (leaving these unchecked cause the shadows to fall towards the sun instead of away from it). Set "Conversion:" to Colorspace.
Then click the 3D Preview button to see the result.

When you're done examining it, close the previewer and click OK in the generator window. You should have a normalmap instead of the grayscale map now. See image below. If it's not right or you hit OK when you meant to cancel, just hit ctrl-z to undo the normalmap and continue working; if need be; on the grayscale map. Notice that the image seems to be backwards. I do it this way because trainz uses it backwards (high and low inverted).

Now, you're ready to save it. Save it in the folder your original UV texture file is in and name it something like "Original_name_Normal.tga". Click save and remember to UNCHECK the RLE compression checkbox. Then click save to finish.
That's it!! You now have a normalmap in less time it would take to create 2 meshes, line them up, set the distances, bake it. Not to mention you don't have to create a high detailed LOD mesh and a low LOD mesh.
Now, you can use my next tutorial for incorporating normalmaps using Blender.