Simulation with AnyLogic/Discrete Event Simulation/Bank Model/Step 6. Adding tellers
Step 6. Adding Tellers
Now we will create another part of the system by adding tellers that are working at the bank. Now some clients will come to see tellers, some – to access the ATM. We can model tellers using delays in the same way as we modeled ATM. However, modeling tellers using resources is much more convenient. Resource is a special unit that can be possessed by entity. Only one entity can possess a resource at a time; therefore entities compete for resources.
![]() Modify the flowchart
Modify the flowchart
- Add Service object.

Service seizes resource units for the entity, delays the entity, and releases the seized units.
Modify the object properties:- There is one queue for all tellers. Set up Queue capacity to be of 20 places.
- We assume that service time is triangularly distributed with the min value of 2.5, average value of 6, and the max value of 11 minutes. Set Delay time: triangular( 2.5, 6, 11 )

- Add ResourcePool object. ResourcePool object is storage for resource units. It should be connected to resource seizing and releasing objects (Service in our case). So connect it to the lower port of the service object.

Name the object tellers. Specify that this resource object has only four resource units: define its Capacity: 4
- Place SelectOutput object. SelectOutput object is a decision making block. The entity arrived at the object is forwarded along one of two output ports depending on the user-defined condition.
Leave the default object properties. The entity routing condition randomTrue(0.5) defines that the number of customers competing for ATM and teller service will be approximately equal.
Connect selectOutput and service to other objects as shown in the figure:


Since the model changed, we need to alter the model animation as well.
![]() Modify the animation
Modify the animation
- Draw a polyline to animate the waiting customers queue. Draw it from left to right. Name the polyline queueBeforeTellers.

- Draw a polyline with four points to the right of queueBeforeTellers. This polyline will indicate where teller animations are placed. Name it tellerPlaces.


Now we will animate our tellers by defining two images representing tellers being idle and busy. AnyLogic will automatically switch between these images when the resource unit becomes seized and released.
![]() Animate tellers
Animate tellers
- Drag Image from the Presentation stencil to the place shown in the figure with a blue crossed rectangle.

- Go to the Properties of the image shape. Name the image busyTeller.
- Define the image that this shape will display. Use Add Image button to add Teller Busy.png. You can find this file in the folder where Billing Department sample model is located (somewhat like <AnyLogic folder>\plugins\com.xj.anylogic.examples.<build number>\models\Billing Department).
You will see the added image in the preview area.
- Select the Original Size check box. If Original Size option is not selected, the picture is shown to fit the rectangle of the image shape, and otherwise the picture is shown without any distortions.
- Create one more image to show relaxing teller. Name it idleTeller and choose Teller Idle.png as the image displayed by this shape.


Now we will animate the flowchart by setting up animation properties of the flowchart objects.
![]() Animate the model logic
Animate the model logic
- Now we need to animate customers queue. Therefore, modify the service properties:
- Set queueBeforeTellers as Animation guide shape (queue)

- Set queueBeforeTellers as Animation guide shape (queue)
- To animate tellers, modify the tellers properties:
- Specify tellerPlaces as Animation guide shape
- Choose Set as Animation type
- Set idleTeller as Idle unit animation shape
- Set busyTeller as Busy unit animation shape


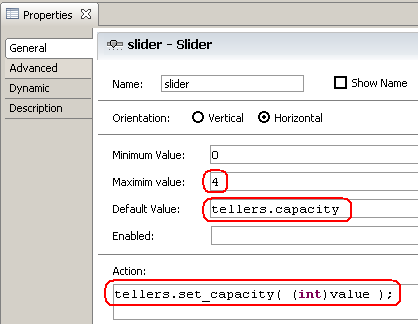
In the current model the number of tellers is fixed. However, we may need to vary it dynamically at the model run time. AnyLogic provides a set of controls enabling changing the model parameters. Now we will add a slider to vary the number of tellers at run time.
![]() Add a slider to vary the number of tellers
Add a slider to vary the number of tellers
- Add a slider. Open the Controls stencil of the Palette and drag the Slider element from there into the graphical editor. Place it below our ResourcePool object to let the user know that this slider will vary the capacity of this particular object.

- We want to vary the number of tellers in the system from 0 to 4. Therefore, set 4 as slider’s Maximum value.
- Type tellers.capacity as the slider's Default value.
- Specify tellers.set_capacity((int)value); as slider's Action.


Run the model. You can see tellers being animated with our images. Now you can change the number of tellers with the slider. Therefore, you can see how many tellers you need for the specific customer arrival rate.
